
User Guide

www.electrolux.com6
9
7
8
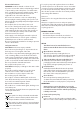
'BO speed control
Change the fan speed by gently touching fan icon
on the product. If the product is in AUTO mode, it
will switch to manual mode on touching the fan
icon. (ref. picture 7).
Auto mode and sleep mode
$IBOHFCFUXFFO"650BOE4MFFQNPEFCZ
HFOUMZUPVDIJOHJDPOMBCFMFE
In AUTO mode the unit will adjust operation
according to latest air quality (PM2.5 level). In
SLEEP mode unit will operate at the low noise
level and all indicators except for SLEEP icon will
go off.
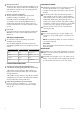
Power o
Power down the product by gently touching the
ON/OFF icon on the center of the product (ref.
picture 9)
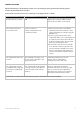
AIR QUALITY INDICATOR
The appliance has an air quality sensor that
analyzes the air quality.
The air quality light will show the real-time air
quality through different colors of light. As shown
below:
10
LIGHT'S COLOR
Blue
Green
Orange
Red
PM 2.5 (μg/m
3
) AIR QUALITY
0-15 Very Good
16-35 Good
36-75 Bad
>75 Very Bad
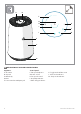
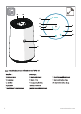
FILTER CHANGE INDICATOR
The filter change indicator will light up to
remind you to change the filter3FG&''$-/.
• When lter change indicator icker with red
light, please replace the lter and reset the lter
change indicator.
• When lter change indicator stop icker and the
red light x, please replace the lter immediately
and reset the lter change indicator.
11
12
Filter change indicator reset operation
Press the mode JDPOMBCFMFE for 3s and
filter change indicator will reset, then red light
will go off.
STORAGE
ERROR CODE
If you are not planning to use the appliance for
a long time, cover it with plastic or return it to its
carton.
Fan failure error code, when fan failure occurs, the
light of screen will all go o and the unit can’t be
operated then.
"JSRVBMJUZsensor failure error code, when sensor
failure occurs, the light of AJSRVBMJUZJOEJDBUPSwill
go off and the unit can’t be set on auto mode.
16
17
18
NOTE: The multi-layer lter can not be washed, it
can only be replaced.
CAUTION!
Do not touch the fan blade when removing the
multi-layer lter.
CARE AND CLEANING
Unplug the appliance before cleaning to prevent
shock or re hazards. Use a damp cloth or a
vacuum cleaner with soft brush to clean your air
purier.
The plastic part of the cabinet and top may be
cleaned with an oil-free cloth or washed with a
cloth dampened in a solution of warm water and
mild liquid dishwashing detergent. Be sure to
wring excess water from the cloth before wiping
around the controls. Excess water in or around the
controls may cause damage to the appliance.
Never use harsh cleaners, wax or polish when
cleaning the unit.
13
15
14