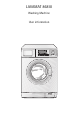
LAVAMAT 86810 Washing Machine User information
Dear Customer, Please read this user information carefully and keep it to refer to later. Please pass the user information on to any future owner of the appliance. 1 3 2 2 The following symbols are used in the text: Safety instructions Warning! Information that affects your personal safety. Important! Information that prevents damage to the appliance.
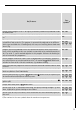
Contents Operating Instructions . . . . . . . . . . . . . . . . . . . . . . . . . . . . . . . . . . . . . 5 Safety . . . . . . . . . . . . . . . . . . . . . . . . . . . . . . . . . . . . . . . . . . . . . . . . . . . . . . . . . 5 Description of the appliance . . . . . . . . . . . . . . . . . . . . . . . . . . . . . . . . . . . . Control panel . . . . . . . . . . . . . . . . . . . . . . . . . . . . . . . . . . . . . . . . . . . . . . . . . . What is shown in the display . . . . . . . . . . . . . . . . .
What to do if... . . . . . . . . . . . . . . . . . . . . . . . . . . . . . . . . . . . . . . . . . . . . . . . . . Remedying small malfunctions . . . . . . . . . . . . . . . . . . . . . . . . . . . . . . . . . . . . If the wash result is not satisfactory . . . . . . . . . . . . . . . . . . . . . . . . . . . . . . . . Carrying out an emergency drain . . . . . . . . . . . . . . . . . . . . . . . . . . . . . . . . . . Drain pump. . . . . . . . . . . . . . . . . . . . . . . . . . . . . . . . . . . . . . . . . .
Operating Instructions 1 Safety Prior to using the appliance for the first time • Follow the “Installation and connection instructions”. • If the appliance is delivered in the winter months when there are minus temperatures: store the washing machine at room temperature for 24 hours before using for the first time. Correct use • The washing machine is only designed for the washing of normal domestic laundry at home. • Additions or modifications to the washing machine are not permitted.
General safety • Repairs to the washing machine may only be carried out by qualified/ authorised service engineers. • Never use the appliance when the electrical cable is damaged or the control panel, worktop or plinth area are damaged to such an extent that the inside of the appliance is openly accessible. • Switch off the washing machine prior to cleaning it and carrying out maintenance.
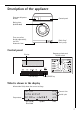
Description of the appliance Detergent dispenser drawer Control panel Rating plate (behind door) Three screw feet (height adjustable); rear left: Automatic foot Plinth flap/ Drain pump Control panel Programme knob and On/Off switch Display Function keys START/PAUSE key What is shown in the display Information field, shows the current settings COTTON Cycle end at Temperature 12.45 Current time 15.
Program overview 1600/1400 1200/1000/ 800/600/400 0 • • • • • • • • • COTTON 7kg • • • • •3) •3) • • • • • 7kg or 3,5kg • • •4) • •3) •3) • • • • • 7kg • • • • • • • 3,5kg • • • • • LINEN/EASY-CARES 60°, 50°, 40°, 30°, Cold cycle 40 - 60 MIX DELICATE 40°, 30°, Cold cycle • • •4) • • DELAY START NIGHT CYCLE 7kg VERY SHORT STAIN ENERGY SAVING 2) Program SHORT SENSITIVE RINSE HOLD Spin speed PREWASH Times max.
Care symbols1) Use/Features Energy-saving program at 60 °C for lightly to normally soiled whites/coloureds made of cotton/linen. MO Program at 95 °C for normally to heavily soiled whites/coloureds made of cotton/linen. O General program for whites/coloureds made of cotton/linen as well as for easy-care mixed fibres and synthetics. The program is automatically adjusted to the different fabric types and load sizes. If loading only with easy-care washing, do not load more than 3,5kg.
Prior to using for the first time Switching on the appliance for the first time - setting the language 3 The display is set to English as standard in the factory. Important: If the display does not show the menu for setting the language when the appliance is switched on, the appliance has been switched on before. If this happens, please see the section “Setup/Language”. To switch on the appliance, turn the program knob to any program, e. g. COTTON.
Setting the time So that the time and the end of the program are correctly displayed, please check the display and set the current time if necessary. To do this, please see the section “Setup/Clock”. Carrying out a wash programme prior to first use In order to remove any residues from the drum and water container which may have been left during manufacturing, perform the first wash cycle without any washing in the machine. Programme: LINEN/ EASY CARES 60 °C, option Time saving: VERY SHORT, use approx.
Running a wash cycle Adding detergent/conditioner Important: Only use detergents/conditioners that are suitable for use in household washing machines. Add detergent/conditioner in accordance with the detergent/conditioner manufacturer’s instructions. Observe instructions on the packaging. The amount of detergent used depends on: – the degree of soiling, – the load size – the hardness of the tap water.
Softener, wash-care products to preserve the shape of garments, starch Fill the compartment to no more than the MAX indicator. Add water to thick liquid concentrates in accordance with the manufacturer’s instructions before using them. Dissolve powder starch. If you are using liquid detergent: Add liquid detergent using measuring containers provided by the detergent manufacturer. Switching on the appliance/selecting a program 3 Select the program using the program knob, e.g., LINEN/ EASY-CARES.
Changing the temperature Press the TEMP. key repeatedly until the desired temperature is displayed. 12.45 LINEN/EASY CARE Cycle end at 14.37 50C1600 aýýýýýaýaýaýaýaýaýaýaýa TEMP. RPM OPTIONS OK TIME Changing spin speed/selecting rinse hold 3 14 Press the RPM key repeatedly, until the desired spin speed or RINSE HOLD is displayed. LINEN/EASY CARE Cycle end at 12.45 14.37 50C 800 aýýýýýaýaýaýaýaýaýaýaýa • With spin speed “0” the TEMP.
Opening the door/Loading the washing 1. To open the door: pull the handle on the door. 2. Unfold washing and load it loosely into the machine. Mix large and small items. Attention! Do not get any washing caught between the door and the rubber seal. 3. Push the door firmly shut. Door catch must audibly click shut. Current load display 3 3 If settings are not undertak- Max. load: kg 7.00 en for several seconds during ¢¢££££££££ kg 1.
Setting options Options can be added to a wash cycle that has already been selected. Press the OPTIONS key. The display shows the symbols for the options. PREWASH Pre-washes at about 30 °C before the main wash cycle, which follows automatically. SENSITIVE Enhanced rinse action through an additional rinse cycle together with decreased drum movement (improved fabric care). This is ideal when frequent washes are necessary, for example, in cases of highly sensitive skin.
Prewash, Sensitive, Stain, Night Cycle 1. Press the OPTIONS key repeatedly until the desired symbol flashes, e. g., PREWASH (With each press of the key, the next symbol flashes, from left to right.) 3 12.45 LINEN/EASY CARE Prewashing 14.37 aýýýýýVýSýFýLýBýaýaýaýa TEMP. RPM OPTIONS OK TIME 2. Press the OK key. The symbol 12.45 LINEN/EASY CARE stops flashing. A black bar 14.56 Sensitive appears under the symbol. aýýýýýV_ýSýFýLýBýaýaýaýa The option is set. The display changes to the next option.
Setting times Shortened cycles and the delay of the start time can be set for a wash cycle that has already been selected. Press the TIME key. The display shows the symbols for Time Saving and Delay Start. Time Saving: SHORT or VERY SHORT Shortened wash cycle for lightly soiled washing. – SHORT: only possible with the programmes COTTONS, LINEN/ EASY CARES and EASY IRON – VERY SHORT: only possible with the programmes COTTONS, LINEN/EASY CARES, EASY IRON and DELICATES.
Delay Start 3 1. Press the TIME key repeatedly, until the DELAY START symbol flashes. 2. Press the OK key. “Start in 0 min” is shown in the display. 3. Press the TIME key repeated12.45 Delay Start ly, until the display shows 18.37 Start in 4h the desired period by which you want to delay the start, aýýýýýaýaýaýaýaýaýaýKýT_ e. g. “Start in 4 h” (=4 TEMP. RPM OPTIONS OK TIME hours). A black bar appears under the symbol. If 20 h is displayed and you press the key again, the delayed start is cancelled. 4.
Programme progress 3 The display indicates the stage of the programme that is currently being performed as well as the time to the end of the programme. 12.45 LINEN/EASY CARE Washing 14.37 50C 800 aýýýýýaýaýaýaýaýaýaýaýa TEMP. RPM OPTIONS OK TIME During the wash cycle the time to the end of the programme may change as the programme adjusts itself to different conditions (e. g., type and quantity of laundry, out of balance spin detection, special rinses, etc.).
Washing cycle complete/Removing the washing At the end of the cycle a long acoustic signal sounds 3 times (when the SOUND setting is NORMAL or LOW) and the messages “Cycle ended” and “Door openable” appear alternately in the display. 1. Open the door and remove the washing. 2. Turn the programme knob to OFF. 3. Turn off the tap. 4. After the wash, pull out the detergent dispenser drawer slightly to allow it to dry. Leave the door slightly open to air the inside of the washing machine.
Setting the Memory Example: Programme posi12.45 LINEN/EASY CARE tion MEMORY 1 is to be giv14.37 en the following programme Cycle end at 40C 800 aýýýýýVýaýaýaýaýaýaýaýa combination: LINEN/EASY CARES 40 °C, 800 rpm, with TEMP. OPTIONS OK TIME RPM PREWASH. 1. Turn the programme knob to LINEN/EASY CARES. 2. Press the TEMP. key repeatedly, until 40 °C appears in the display. 3. Press the RPM key repeatedly, until 800 appears in the display. 4. Using the OPTIONS key set PREWASH and press the OK key.
Volume The volume of the acoustic signal can be selected. 1. Turn the program knob to any program and press the OPTIONS key repeatedly until the SETUP symbol flashes. 2. Press the OK key. 3. Press the OPTIONS key repeatedly, until VOLUME is shown in the display. 4. Press the OK key. 5. Press the OPTIONS key reSound peatedly until the desired NORMAL volume (NORMAL, LOW, NO aýýýýýaýaýaýaýBýaýaýaýa SOUND) is shown in the display. TEMP. RPM OPTIONS OK TIME 6. Press the OK key to confirm the setting.
Language 1. Turn the program knob to any program and press the OPTIONS key repeatedly until the SETUP symbol flashes. 2. Press the OK key. 3. Press the OPTIONS key repeatedly, until the display shows LANGUAGE. 4. Press the OK key. 5. Press the OPTIONS key reSprache peatedly, until the desired language appears in the dis- DEUTSCH aýýýýýaýaýaýaýBýaýaýaýa play, e. g. DEUTSCH. 6. Press the OK key. The display TEMP. OPTIONS OK TIME RPM changes to the next special function. 7.
Contrast and brightness 1. Turn the program knob to any program and press the OPTIONS key repeatedly until the SETUP symbol flashes. 2. Press the OK key. 3. Press the OPTIONS key repeatedly, until the display shows CONTRAST or or BRIGHTNESS. 4. Press the OK key. Contrast 5. Using the OPTIONS key set ƒ………………™………………‡ the desired setting. With aýýýýýaýaýaýaýBýaýaýaýa each press of the key or if the key is kept pressed down, TEMP.
Child safety device If the child safety device has been activated, the door can no longer be shut. Activating the child safety device: Use a coin to turn the knob (on the inside of the door) in a clockwise direction as far as it will go. 1 Warning! The knob must not be depressed after being set, otherwise the child safety device is not activated. The knob must stand out as shown in the illustration. Deactivating the child safety device: Turn the knob in an anti-clockwise direction as far as it will go.
Cleaning and maintenance Important! Do not use furniture care products or aggressive cleaners to clean the appliance. Wipe control panel and body with a damp cloth. Cleaning procedure If you plan to wash mainly at low temperature, you should run a hot programme from time to time. This will reduce any deposits and clean the appliance from the inside. Detergent dispenser drawer The detergent dispenser drawer should be cleaned regularly. 1. Remove the detergent dispenser drawer by pulling it firmly. 2.
Door and rubber collar Regularly check whether deposits or foreign bodies are present in the folds of the rubber collar or on the inside of the glass door. Clean the glass in the door and the rubber collar regularly. What to do if...
Problem Possible cause Tap turned off. Display shows: “No incoming water/Check tap & Hose” Turn the tap on. The filter in the threaded Turn off the tap. Unscrew the inlet hose fitting is hose, take out the filter and blocked. clean it. Water tap is blocked with limescale or faulty. Check the water tap and have it repaired if necessary. Transit packaging has not been removed. Remove transit packaging. Washing machine vibrates when operating or is noisy. Screw feet not correctly adjusted.
Problem Possible cause Door locked. The door cannot be opened There has been a power when the appliance is cut. (All displays are off.) switched on. For safety reasons, the door will remain locked for between 4 and 10 minutes. Washing is heavily creased. Possibly too much washing was loaded. Remedy Wait until the display alternately shows “Door openable” and “Cycle ended”. The programme will continue when the power cut is over.
Carrying out an emergency drain 1 Warning! Prior to carrying out an emergency drain, switch off the washing machine and remove the power plug from the power point. Warning! The water that comes out of the emergency drain hose may be hot. There is a risk of scalding. Let the water cool before performing an emergency drain! 1. Open the plinth flap and remove it. 2. Remove the emergency drain hose. 3. Place a shallow container underneath it.
Drain pump 1 The drain pump is maintenance-free. It is only necessary to open the pump cover if there is a malfunction and water is no longer being pumped out, e.g. if the pump wheel is blocked. Before loading the machine, please always ensure that there are no foreign bodies present in the pockets or in between the items to be washed. Paper clips, nails, etc.
Disposal 2 2 Packaging material The packaging materials are environmentally friendly and can be recycled. The plastic components are identified by markings, e.g. >PE<, >PS<, etc. Please dispose of the packaging materials in the appropriate container at your local waste disposal facilities. Old appliance W 1 The symbol on the product or on its packaging indicates that this product may not be treated as household waste.
Technical data 5 This appliance conforms with the following EU Directives: – 73/23/EEC dated 19.02.1973 Low Voltage Directive – 89/336/EEC dated 03.05.1989 EMC Directive inclusive of Amending Directive 92/31/EEC – 93/68/EEC dated 22.07.1993 CE Marking Directive Height x Width x Depth 850 x 598 x 640 mm Depth when door is open 1017 mm Height adjustment approx. +10/-5mm Load (depending on programme) Max.
Installation and connection instructions 1 Safety information concerning installation • This washing machine cannot be built-in. • Before using for the first time, check the appliance for damage sustained while it was being transported. Do not under any circumstances connect an appliance that is damaged to the mains. In the event of damage to the appliance contact your supplier. • Be sure to remove all the components of the transport lock before using the appliance for the first time.
Installing the appliance Transporting the appliance 1 Warning: The washing machine is very heavy. There is a risk of injury. Exercise care when lifting the appliance. • Do not lay the washing machine on its front nor on its right side (as seen from the front). Electrical components may get wet. • Never transport the appliance without using the transport lock. Only remove the transport lock when the appliance is in its place of installation.
3. Remove both plastic caps sideways. 3 Special spanner A and sealing caps B (2 units) and C (1 unit) come with the appliance. 4. Use special spanner A to remove screw D and the compression spring. 5. Turn sealing cap C upside down as shown in the illustration. 6. Use sealing cap C to cap the hole. 7. Use special spanner A to remove the two screws E. 8. Use special spanner A to remove the four screws F. 9. Remove transit bar G. 10. Screw in the four screws F again. 11.
• If the location in which the appliance is to be installed is fitted with small-format tiles, put a rubber mat (available in the shops) under the appliance. If the appliance is to stand on a base: In order for the appliance to be secure on the base, fixing plates*) must be mounted, into which the appliance is inserted. If the appliance is to stand on a floor which moves, e.g. a suspended wooden floor: Place the appliance in an area as close as possible to a corner of the room.
Electrical Connection 1 1 Any electrical work required to install this appliance should be carried out by a qualified electrician or competent person. WARNING – THIS APPLIANCE MUST BE EARTHED. The manufacturer declines any liability should these safety measures not be observed. Before switching on, make sure the electricity supply voltage is the same as that indicated on the appliance rating plate. The appliance is supplied with a 13 amp plug fitted.
1 The switch must not break the yellow and green earth cable at any point. This appliance complies with the requirements laid out in the EEC Directive 76/899. Voltage 240 V AC: Fuse rating 13amps See rating plate for further information. This appliance meets VDE requirements. Particular regulations of local electricity authorities must be observed. This appliance conforms to EEC Directive No. 82/499/EWG on radio interference.
Water inlet 3 A 1.35m long pressure hose is supplied with the appliance. If a longer inlet hose is required, only hoses from the manufacturer are to be used. Your local Service Force stocks hose kits of different lengths. Sealing rings are either inserted in the plastic nuts of the threaded hose fitting or are included as spare parts. Do not use any other sealing rings. Important! All threaded hose fittings must only be tightened by hand. 1. Connect the hose with the right-angle connector to the machine.
Water Drainage The appliance drain hose should hook into a standpipe, the hook in the drain hose is formed using the plastic “U-Piece“ supplied. The standpipe should have an internal diameter of approximately 38 mm (see diagram) thus ensuring there is an air break between the drain hose and standpipe. Important! It is essential to lay the drainage hose without kinks. When discharging into a standpipe ensure that the top of the curve in the hose end is no more than 90 cm (35.4’’) and no less than 60 cm (23.
Pumping heights of over 1 metre The washing machine’s drain pump is able to pump water to a height of 1metre, calculated from the surface on which the appliance is installed. Important! If pumping height is over 1 metre malfunctions and damage to the appliance may arise. For pumping heights over 1metre a conversion kit can be obtained. Please contact Service Force Centre.
Guarantee/Customer Service Great Britain Standard guarantee conditions We, AEG, undertake that if within 12 months of the date of the purchase this AEG appliance or any part thereof is proved to be defective by reason only of faulty workmanship or materials, we will, at our discretion repair or replace the same FREE OF CHARGE for labour, materials or carriage on condition that: • The appliance has been correctly installed and used only on the electricity or gas supply stated on the rating plate.
European Guarantee This appliance is guaranteed by Electrolux in each of the countries listed at the back of this user manual, for the period specified in the appliance guarantee or otherwise by law.
p t b Magyarország +36 1 252 1773 H-1142 Budapest XIV, Erzsébet királyné útja 87 Nederland +31 17 24 68 300 Vennootsweg 1, 2404 CG Alphen aan den Rijn Norge +47 81 5 30 222 Risløkkvn. 2 , 0508 Oslo Österreich +43 18 66 400 Herziggasse 9, 1230 Wien Polska +48 22 43 47 300 ul. Kolejowa 5/7, Warsaw Portugal +35 12 14 40 39 39 Quinta da Fonte - Edificio Gonçalves Zarco - Q 35 2774 - 518 Paço de Arcos Romania +40 21 451 20 30 Str.
Service and Spare Parts If the event of your appliance requiring service, or if you wish to purchase spare parts, please contact Service Force by telephoning: 0870 5 929 929 Your telephone call will be automatically routed to the Service Force Centre covering your post code area. For the address of your local Service Force Centre and further information about Service Force, please visit the website at www. serviceforce.co.
www.electrolux.com www.aeg-electrolux.co.