LAVAMAT L 56840 User manual Washing machine
Contents Thank you for choosing one of our high-quality products. To ensure optimal and regular performance of your appliance please read this instruction manual carefully. It will enable you to navigate all processes perfectly and most efficiently. To refer to this manual any time you need to, we recommend you to keep it in a safe place. And please pass it to any future owner of the appliance. We wish you much joy with your new appliance.
Safety information 3 Operating instructions Safety information Read carefully & keep for future reference. • The safety of Your appliance complies with the industry standards and with legal requirements on the safety of appliances. However, as manufacturers, we feel it is our duty to provide the following safety notes. • It is most important that this instruction book should be retained with the appliance for future reference.
Safety information • All packing and transit bolts must be removed before use. Serious damage can occur to the product and to property if this is not adhered to. See relevant section in the user manual. • After having installed the appliance, check that it is not standing on the inlet and drain hose and the worktop is not pressing the electrical supply cable against the wall.
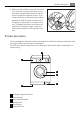
Product description 5 • Make sure that children or pets do not climb into the drum. To prevent children or pets becoming trapped inside the drum the machine incorporates a special feature. To activate this device, rotate the button (without pressing it) inside the door clockwise until the groove is horizontal. If necessary use a coin. To disable this device and restore the possibility of closing the door, rotate the button anticlockwise until the groove is vertical.
Control panel Detergent dispenser drawer Compartment for prewash phase or stain remover. The prewash detergent is added at the beginning of the wash programme. The stain remover is added during the STAIN-Action phase in the main wash. Compartment for powder or liquid detergent used for main wash . Compartment for liquid additives (fabric softener, starch). Follow the product manufacturer’s recommendations on quantities to use and do not exceed the «MAX» mark in the detergent dispenser drawer.
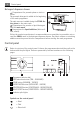
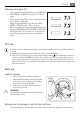
First use 7 Indicator pilot lights (7) After having pressed the button 5 , the WASHING (HOOFDWAS - LAVAGE) pilot light ( 7.1 ) illuminates. When the pilot light 7.1 comes on this means that the machine is operating. When the programme has finished, the END (EINDE - FIN) pilot light ( 7.2 ) comes on. When the appliance is performing additional rinses the EXTRA RINSE (EXTRA SPOELEN - RINÇAGE PLUS) pilot light ( 7.3 ) comes on. To add an additional rinse, please see «Select an additional rinse».
Daily use 1. Pull out the dispenser drawer until it stops. Measure out the amount of detergent required, pour it into the main wash compartment and, if you wish to carry out the prewash phase or to perform the stain function, pour the detergent or the stain remover into the compartment . marked 2. If required, pour fabric softener into the compartment marked (the amount used must not exceed the MAX mark in the drawer). Close the drawer gently.
Daily use 9 Press the button 2 repeatedly to change the spin speed, if you want your laundry to be spun at a speed different from the one proposed by the washing machine. The relevant light will light up. RINSE HOLD : by selecting this option the water of the last rinse is not emptied out to prevent the fabrics from creasing. When the programme has finished the pilot light 7.2 goes on, the pilot light of button 5 and the pilot light (7.
Daily use You must select this option after you have set the programme and before you press the button 5 . You can cancel the delay time at any moment, before you press the button 5 . If the button 5 has already been pressed: • set the washing machine to PAUSE by pressing the button 5 ; • press the button 6 once, the light relevant to the selected delay goes off; • press the button 5 again to start the programme.
After closing the door, it is necessary to select the programme and options again and to press button 5 . At the end of the programme The machine stops automatically. The pilot light of button 5 and pilot light 7.1 go off. The phase light 7.2 goes on. If a programme or an option that ends with water still in the tub has been selected, the relative pilot light remains lit, the phase light 7.2 goes on, the door remains locked to indicate that the water must be emptied out before opening the door.
Washing programmes Programme Maximum and Minimum Temperature Cycle Description Maximum Spin Speed Maximum Fabrics Load Type of Laundry Options COTTONS WITH PREWASH + VOORWAS / + PRELAVAGE 95° - 40° Prewash - Main wash - Rinses - Long spin Maximum spin speed 1600 rpm Max. load 6 kg - Red. load 3 kg White or coloured cottons with prewash phase (heavily soiled items).
Washing programmes Programme Maximum and Minimum Temperature Cycle Description Maximum Spin Speed Maximum Fabrics Load Type of Laundry Options WOOL (HANDWASH) WOL PLUS - LAINE PLUS 30° - Cold Main wash - Rinses - Short spin Maximum spin speed at 1200 rpm Max. load 2 kg Washing programme for machine washable wool as well as for hand washable woollens and delicate fabrics. Note : A single or bulky item may cause imbalance.
Helpful hints and tips Programme Maximum and Minimum Temperature Cycle Description Maximum Spin Speed Maximum Fabrics Load Type of Laundry Options REFRESH OPFRISSEN - RAFRAÎCHIR 30° Main wash - Drain - Short spin Maximum spin speed at 1200 rpm Max. load 3 kg This programme may be used for quick wash for sport items, or cotton and synthetic items lightly soiled or worn once. SPIN REDUCTION COTTON ECONOMY ECO - ECONOMIQUE 60° Main wash - Rinses - Long spin Maximum spin speed at 1600 rpm Max.
Helpful hints and tips 15 Temperatures 95° or 90° for normally soiled white cottons and linen (e.g. tea cloths, towels, tablecloths, sheets...) 60°/50° for normally soiled, colour fast garments (e.g. shirts, night dresses, pyjamas....) in linen, cotton or synthetic fibres and for lightly soiled white cotton (e.g. underwear) 40°-30°- Cold for delicate items (e.g.
Helpful hints and tips Blood: treat fresh stains with cold water. For dried stains, soak overnight in water with a special detergent then rub in the soap and water. Oil based paint: moisten with benzine stain remover, lay the garment on a soft cloth and dab the stain; treat several times. Dried grease stains: moisten with turpentine, lay the garment on a soft surface and dab the stain with the fingertips and a cotton cloth. Rust: oxalic acid dissolved in hot water or a rust removing product used cold.
Care and cleaning 17 A water softener must be added when water has a medium-high degree of hardness (from degree of hardness II). Follow the manufacturer’s instructions. The quantity of detergent can then always be adjusted to degree of hardness I (= soft). Degrees of water hardness Level Characteristic German °dH French °T.H.
Care and cleaning 2. Remove the conditioner insert from the middle compartment. 3. Clean all parts with water. 4. Put the conditioner insert in as far as it will go, so that it is firmly in place. 5. Clean all parts of the washing machine, especially the nozzles in the top of the washing-in chamber, with a brush. 6. Insert the detergent dispenser drawer in the guide rails and push it in.
Care and cleaning 19 • the machine makes an unusual noise during draining due to objects such as safety pins, coins etc. blocking the pump. Proceed as follows: 1. Disconnect the appliance. 2. If necessary wait until the water has cooled down. 3. Open the pump door. 4. 5. Place a container close to the pump to collect any spillage. Release the emergency emptying hose, place it in the container and remove its cap cover. 6. When no more water comes out, unscrew the pump and remove it.
Care and cleaning 8. Put the cap back on the emergency emptying hose and place the latter back in its seat. 9. Screw the pump fully in. 10. Close the pump door. WARNING! When the appliance is in use and depending on the programme selected there can be hot water in the pump. Never remove the pump cover during a wash cycle, always wait until the appliance has finished the cycle, and is empty.
Care and cleaning 21 5. Unscrew the hose from the machine. Keep a rug nearby because some water may flow. 6. Clean the filter in the valve with a stiff brush or with the piece of cloth. 7. Screw the hose back to the machine and make sure the connection is tight. 8. Turn on the water tap. Emergency emptying out If the water is not discharged, proceed as follows to empty out the machine: 1. pull out the plug from the power socket; 2. close the water tap; 3.
What to do if… 3. screw the water inlet hose back on and reposition the emergency emptying hose after having put the cap on again. By doing this, any water remaining in the machine is removed, avoiding ice forming and consequently damage to the appliance. When you use the machine again, make sure that the ambient temperature is above 0°C.
What to do if… Problem The machine does not fill: 23 Possible cause/Solution The water tap is closed. (Yellow pilot light of button 5 blinks) • Open the water tap. The inlet hose is squashed or kinked. (Yellow pilot light of button 5 blinks) • Check the inlet hose connection. The filter in the inlet hose or the inlet valve filter are blocked. (Yellow pilot light of button 5 blinks) • Clean the water inlet filters (see "Cleaning the water inlet filters" for more details) The door is not properly closed.
What to do if… Problem Possible cause/Solution Unsatisfactory washing results: Too little detergent or unsuitable detergent has been used. • Increase the detergent quantity or use another one. Stubborn stains have not been treated prior to washing. • Use commercial products to treat the stubborn stains. The correct temperature was not selected. • Check if you have selected the correct temperature. Excessive laundry load. • Introduce into the drum less laundry.
Technical data 25 If you are unable to identify or solve the problem, contact our service centre. Before telephoning, make a note of the model, serial number and purchase date of your machine: the Service Centre will require this information. Technical data Dimensions Width Height Depth 60 cm 85 cm 63 cm Electrical connection Voltage - Overall power - Fuse Information on the electrical connection is given on the rating plate, on the inner edge of the appliance door.
Installation Installation instructions Installation Unpacking All transit bolts and packing must be removed before using the appliance. You are advised to keep all transit devices so that they can be refitted if the machine ever has to be transported again. 1. After removing all the packaging, carefully lay machine on it’s back to remove the polystyrene base from the bottom. 2. Remove the power supply cable and the draining hose from the hose holders on the rear of the appliance.
Installation 3. Unscrew the three bolts with the key supplied with the machine. 4. Slide out the relevant plastic spacers. 5. Open the porthole, take out the inlet hose from the drum and remove the polystyrene block fitted on the door seal.
Installation 6. Fill the smaller upper hole and the two large ones with the corresponding plastic plug caps supplied in the bag containing the instruction booklet. 7. Connect the water inlet hose as described under the paragraph «Water inlet». Positioning and levelling Install the machine on a flat hard floor. Make sure that air circulation around the machine is not impeded by carpets, rugs etc. Before placing it on small tiles, apply a rubber coating.
Installation 1. Open the porthole and extract the inlet hose. 2. Connect the hose with the angled connection to the machine. Do not place the inlet hose downwards. Angle the hose to the left or right depending on the position of your water tap. 3. Set the hose correctly by loosening the ring nut. After positioning the inlet hose, be sure to tighten the ring nut again to prevent leaks. 4. Connect the hose to a tap with a 3/4” thread. Always use the hose supplied with the appliance.
Installation Water-stop device The inlet hose is provided with a water stop device, which protects against damage caused by water leaks in the hose which could develop due to natural ageing of the hose. This fault is shown by a red sector in the window «A» . Should this occur, turn the water tap off and refer to your Service Centre to replace the hose. Water drainage The end of the drain hose can be positioned in three ways: 1.
Electrical connection 31 The drain hose may be extended to a maximum of 4 metres. An additional drain hose and joining piece is available from your local Service Centre. Electrical connection Information on the electrical connection is given on the rating plate on the inner edge of the appliance door. Check that your domestic electrical installation can take the maximum load required, also taking into account any other appliances in use. WARNING! Connect the machine to an earthed socket.
Packaging materials The materials marked with the symbol are recyclable. >PE<=polyethylene >PS<=polystyrene >PP<=polypropylene This means that they can be recycled by disposing of them properly in appropriate collection containers. Ecological hints To save water, energy and to help protect the environment, we recommend that you follow these tips: • Normally soiled laundry may be washed without prewashing in order to save detergent, water and time (the environment is protected too!).
132948440 - 00 - 452009 www.electrolux.