ENGLISH Instruction Manual Manual de Instrucciones Manuel d’Instructions SB2000M LE ESPAÑOL IMPORTANT MANUAL -- Do not throw away MANUAL IMPORTANTE -- No lo descarte MANUEL IMPORTANT -- À Conserver WARNING: Read and follow all Safety Rules and Operating Instructions before using this product. Failure to do so can result in serious injury. ADVERTENCIA: Lea el manual de instrucciones y siga todas las advertencias e instrucciones de seguridad. El no hacerlo puede resultar en lesiones graves.
SAFETY RULES D WARNING: Failure to follow all Safety Rules and Precautions can result in serious injury. D KNOW YOUR UNIT S Read your instruction manual carefully until you completely understand and can follow all warnings and safety rules before operating the unit. D Restrict unit to users who understand and will follow all warnings and safety rules in this manual. WARNING: Inspect area before starting unit. Remove all debris and hard objects such as rocks, glass, wire, etc.
D D D D plug disconnected. Keep vents and discharge tubes free of debris which can accumulate and restrict proper air flow. Never place any object in the air intake opening as this could restrict proper air flow and cause damage to the unit. Never use for spreading chemicals, fertilizers, or other substances which may contain toxic materials. To avoid spreading fire, do not use near leaf or brush fires, fireplaces, barbecue pits, ashtrays, etc. Use only for jobs explained in this manual.
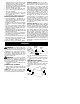
NOTE: Make sure edge of the small opening is flush against the flared area of the elbow tube, and the rib on the elbow tube is on the bottom. 3. Close the zipper on the bag. Make sure the zipper is closed completely. 4. Remove blower tube from engine. Vacuum Inlet Retaining Post Vacuum Inlet Cover 5. Place the hooks on the vacuum tube on the retaining posts; pivot tube into position. Secure vacuum tube by turning the knob clockwise until tight. Rib Groove Knob PIVOT 5.
OPERATION KNOW YOUR BLOWER READ THIS INSTRUCTION MANUAL AND SAFETY RULES BEFORE OPERATING YOUR UNIT. Compare the illustrations with your unit to familiarize yourself with the location of the various controls and adjustments. Save this manual for future reference.
S Watch out for children, pets, open windows, or freshly washed cars. Blow debris away safely. S Use the full blower nozzle extension so the air stream can work close to the ground. S After using blowers and other equipment, CLEAN UP! Dispose of debris in trash receptacles. STARTING POSITION BEFORE STARTING ENGINE Blower WARNING: Be sure to read the fuel information in the safety rules before you begin. If you do not understand the safety rules, do not attempt to fuel your unit. Call 1-800-554-6723.
STARTING A WARM ENGINE STARTING A FLOODED ENGINE 1. Move throttle lever to the position. 2. Pull starter rope sharply until engine runs, but no more than 5 pulls. NOTE: If engine has not started, pull starter rope 5 more pulls. If engine still does not run, it is probably flooded. 3. To stop the engine, move the throttle lever to the STOP position. Flooded engines can be started by placing the choke lever in the RUN position. Move throttle lever to the fast position ; then, pull rope until engine starts.
REPLACE FUEL FILTER To replace fuel filter, drain unit by running it dry of fuel, then remove fuel cap/retainer assembly from tank. Pull filter from tank and remove it from the fuel line. Install new fuel filter on fuel line; reinstall parts. INSPECT MUFFLER AND SPARK ARRESTING SCREEN WARNING: The muffler on this product contains chemicals known to the State of California to cause cancer.
Fuel stabilizer is an acceptable alternative in minimizing the formation of fuel gum deposits during storage. Add stabilizer to gasoline in fuel tank or fuel storage container. Follow the mix instructions found on stabilizer container. Run engine at least 5 minutes after adding stabilizer. ENGINE S Remove spark plug and pour 1 teaspoon of 40:1, 2-cycle engine oil (air cooled) through the spark plug opening. Slowly pull the starter rope 8 to 10 times to distribute oil.
LIMITED WARRANTY ELECTROLUX HOME PRODUCTS, INC., warrants to the original purchaser that each new Snapper t brand gasoline tool or attachment is free from defects in material and workmanship and agrees to repair or replace under this warranty any defective gasoline product or attachment as follows from the original date of purchase 2 YEARS-- Parts and Labor, when used for household purposes. 90 DAYS -- Parts and Labor, when used for commercial, professional, or income producing purposes.
quired maintenance, or which is scheduled only for regular inspection to the effect of “repair or replace as necessary” shall be warranted for 2 years. Any warranted part which is scheduled for replacement as required maintenance shall be warranted for the period of time up to the first scheduled replacement point for that part.