
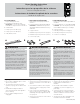
Installation Instructions
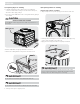
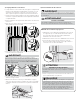

1. When washer is within 4 feet of its fi nal installation site, electrical and
water connections have been completed, and washer is level, have
two or more people lift the dryer onto the washer.
2. Center dryer left-to-right and align the seam between the dryer front panel
and side panel to the seam of the washer front panel and side panel.
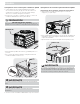
3. Insert tab of rear bracket into slot toward base of dryer.
4. Pivot rear bracket downward to align with holes in washer top panel.
4. Have two or more people lift the dryer off the washer and
gently place it on the fl oor.
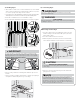
5. Attach each rear bracket to washer top panel with 2 #10 screws
supplied with stacking kit.
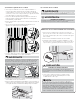
6. Lift front of dryer and remove backing from adhesive strip on front
bracket.
7. Gently lower dryer to adhere front bracket to washer top. Align dryer
side panel to washer side panel as you lower dryer.
C) Stacking dryer D) Connecting dryer
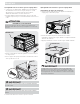
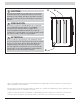
Removing stacked dryer
IMPORTANT
Refer now to dryer INSTALLATION INSTRUCTIONS including
connections and venting.
NOTE
If laundry appliances must be moved, front mounting bracket
may remain attached to the washer top until the dryer is
restacked. To permanently unstack the units and remove the
front bracket, use a 24” piece of monofi lament (fi shing) line to
carefully saw back and forth under the adhesive strip. Remove
residue with a general adhesive remover.
1. Disconnect dryer from electrical and gas connections and
exhaust venting. On models with Steam Option, disconnect
water supply to dryer.
2. Disconnect washer from electrical source.
3. With #2 square bit screw driver, remove the 2 front bracket
screws and 4 rear bracket screws and save for reinstallation.
2
3
4
WARNING
FIRE HAZARD
Improper installation of dryer venting could result in personal injury
or damage to property.
CAUTION
EXCESSIVE WEIGHT HAZARD
To avoid back or other injury, have more than one person move
or lift the dryer.
IMPORTANT
To ensure the dryer is centered on the washer, both bracket tabs
should be fl ush to dyer back panel and inner edge of the slot after
tightening all bracket screws. Adjust dryer position if necessary. Do
this before affi xing front bracket adhesive.
fl ush