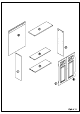
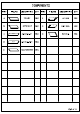
COMPONENTS PART FIGURE | DESCRIPTION | QTY | PART FIGURE DESCRIPTION | QTY A SN TOP SHELF 1PC F LEFT DOOR 1PC B SN BOTTOM SHELF | 1PC G RIGHT DOOR 1PC c SIDE PANEL LEFT | {PC H REAR PANEL 1PC sprightliness | 1PC E | \ | abwsmasieselr| 1PC
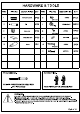
HARDWARE & TOOLS PART FIGURE DESCRIPTION| QTY |PART FIGURE DESCRIPTION | QTY 1 WOODEN DOWEL | PCS | 6 fru SCREW | PCS #3412 PIN PCS KNOCKABOUT TSETSE ] 3 GY cockamamie | BPS | 8 “o screw |14PCS #312 mm 4 EN hammerlock | 8PCS| 9 SF SHELF PIN PCS 5 5 GLUE 1PC 10 AG SCREW PCS $438 mm 1 == ANCHOR PCS TOOL NEEDED: SUGGESTION: PHILIPS SCREWDRIVER REQUIRED NOT INCLUDED TWO PEOPLE FOR ASSEMBLING WARNINGS: ASSEMBLED AND SET UP. 1. DO NOT LET ANY SHARP OBJECTS TOUCH OR RUB THE SURFACE OF THE PRODUCT. 2.
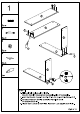
1 = PCs 2 em PCs 3 q YP PCs 4 RS PCs 5 1pc STEP 1: 1. Fill dowel hole half way with Glue #5. Wooden Dowel #1 may push out excess glue-wipe off excess glue. 2. Insert the Wooden Dowel #1 and Pin #2 into the hole on Side Panel-Left C. 3. Connect the Bottom Shelf B to the Side Panel-Left C with the Wooden Dowel #1. 4. Tighten Cam Lock #3 to the Pin #2, insert Cam Lock Cap #4 when finish.
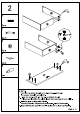
1 = PCs 2 =m PCs 3 q YP PCs 4 RS PCs 5 1pc STEP 2: 1. Connect the Bottom Shelf B to the Side Panel-Right D with the wooden dowel #1 and pin #2. 2. Insert the cam lock #3 into the hole on Bottom Shelf B, Tighten cam lock #3 to the pin #2, insert Cam Lock Cap #4 when finish. 3. Fill dowel hole half way with Glue #5. Wooden Dowel #1 may push out excess glue-wipe off excess glue. 4.
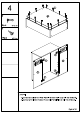
3 &P PCs 4 > PCs 9 1pc STEP 3: 1. Connect the Top shelf A to the main body. 2. Insert the cam lock #3 into the hole on Side Panel-Left C & Side Panel-Right D. 3. Tighten the cam lock #3 to the pin #2, insert Cam Lock Cap #4 when finish.
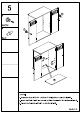
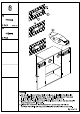
PCs $3*12 mm STEP 4: 1. Connect and tighten the Rear Panel H and the main body with the Screw #8. 2.
STEP &: 1. Attach the Knob #7 to the Left Door F & Right Door G with the Bolt #7. 2. Insert the Shelf Pin #9 into the hole on Side Panel-Left C & Side Panel-Right D. 3.
6 AO 2 PCS #4*38 mm 11 Ly PCS STEP 6: 1. We provide Alignment Paper Strip to help you to install the Wall Cabinet on the wall. Place Alignment Paper on the desire location and make sure it is horizontal. Pr-drill anchor holes,and install anchor #11. 2. Relayed the wall cabinet on the wall,and aimed the hole on the Rear Panel H and the anchor #11 in the wall. 3. Tighten the screw #10 into the anchor #11,and through the hole on the Rear Panel H.In this way, the wall cabinet shall be fixed on the wall.