
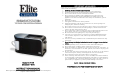
Use and Care Manual


2
CAUTION: For continuous use beyond 2 consecutive toastings, please
let the toaster cool for 5-10 minutes before resuming. Please repeat
this for ever
y
2 toastin
g
s.
SHORT CORD PURPOSE
NOTE: A short power cord is provided to reduce the risk of personal injury
resulting from becoming entangled in or tripping over a longer cord.
Longer power-supply cords or extension cords are available and may be used if
care is exercised in their use.
If an extension cord is used: (1) the marked electrical rating of the extension cord
should be at least as great as the electrical rating of the product; (2) the
extension cord should be arranged so that it will not drape over the countertop or
tabletop where it can unintentionally be pulled on or tripped over by
children or
pets.
POLARIZED PLUG
If this appliance is equipped with a
polarized plug
(one blade is wider than the
other), please follow the below instructions:
To reduce the risk of electrical shock, this plug is intended to fit into a polarized
outlet only one way. If you are unable to fit the plug into the electrical outlet, try
reversing the plug. If the plug still does not fit, contact a qualified
electrician. Never use the plug with an extension cord unless the plug can be fully
inserted into the extension cord. Do not alter the plug of the product or any
extension cord being used with this product. Do not attempt to defeat the safety
purpose of the polarized plug.
BEFORE FIRST USE
IMPORTANT: During the first few minutes of initial use you may notice smoke
and/or a slight odor. This is normal and should quickly disappear. It will not recur
after the appliance has been used a few more times. Clean all removable parts
before the first use. DO NOT USE ABRASIVE DETERGENTS OR MATERIALS. NEVER
IMMERSE THE APPLIANCE, OR PLUG IN WATER OR ANY OTHER LIQUID. (See
“CLEANING AND MAINTENANCE” section for instructions)
3
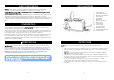
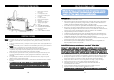
PARTS & FEATURES
T
INSTRUCTIONS
NOTE: Toaster and coffee maker may be used separately or simultaneously.
1. Place your toaster with coffee maker on a flat, dry, stable, heat-resistant surface.
2. Plug the toaster in, and adjust the Light/Dark selector to your desired toasting
darkness.
¾ NOTE: The toaster provides 7 toast shades to choose from: 1 being the lightest
toast shade and 7 being the darkest.
3. Place bread or other food suitable for this toaster (i.e. Waffles, bagels) into the
Bread Slot, then press down the Push Knob until it locks the bread in place. It will
remain down until the bread is toasted.
4. If you wish to stop the toasting process, press the Cancel Button. This will
automatically eject the toast, and shut off the heating elements.
5. If the bread sticks in the toaster, unplug it, wait for it to cool, and then remove
the bread.
1. Cancel Button
2. Light/Dark Selector
3. Moveable Crumb Tray
4. Power Cord
5. Push Knob
6. Bread Slot
7. Water Tank Cover
8. Water Tank
9. Coffee Filter
10. Coffee Mug
(Not included)
11. Skid proof Tray
12. Coffee Maker Switch
13. Coffee Maker