
Operation Manual
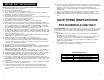


BEFORE FIRST USE .
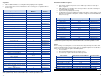
Working
Pressure
PSI Maximum
Pressure
Keep Warm
Temperature
Preset Timer
0~70kPa 12 PSI 90kPa
140ºF ~ 175 ºF
1~9 Hours
1. Remove packaging materials such as cardboard, plastics or Styrofoam and discard
properly.
2. Clean all the parts by wiping with a soft damp cloth or sponge and dry thoroughly.
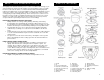
LID ASSEMBLY
:
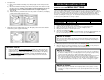
1. How to open the lid: When the lid (2) of the cooker is at the Closed position (Figure 1),
hold the Handle (1) and turn it counter-clockwise until you reach the Opened-Lid position
(Figure 2). Lift up and the lid will swing open vertically.
Note: For new units, the seal of the lid may be slightly stronger than normal and may be
slightly difficult to unlock. Once the lid has been opened and closed several times, it will
loosen up.
2. How to close the lid: When the Lid (2) of the cooker is in vertical position (Figure 4),
hold the Handle (1) and close it downwards at the Opened Lid position (Figure 5). Turn
clockwise until you reach the Closed Lid position. (Figure 6).
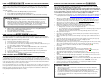
3. How to dismantle the lid: When the lid (2) of the cooker is in the upright vertical position
(Figure 7), hold the lid with both hands, and adjust the height between the Lid and the
upper edge of the cooker to approximately 10cm (Figure 8). Then turn it clockwise until
you reach the Closed Lid position (Figure 9). In order to remove the lid, you will need to
move in an upward direction (Figure 10).
5
4. How to install the lid: Hold the Lid (2) with both hands at the Closed Lid position and
pull it upwards in a slanted position which leads to a height of 10cm between the Lid and
the upper edge of the cooker (Figure 11). Align the Lid’s Sliding Valve (7) to the pressure
cooker’s Lock-Slider (6) and turn it in a counter-clockwise direction until you reach the
Opened Lid position (Figure 12). The lid will be installed when the lid is seated and in the
horizontal position (Figure 13).
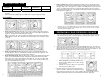
PREPARING YOUR PRESSURE COOKER .
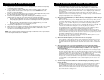
1. To open the lid, hold the Handle (1) and turn it in a counter-clockwise direction until you
reach the Opened Lid position. Then pull upwards to vertical position (Figure 14 & 15).
2. Remove the inner pot (8) and place desired food and liquids into the pot. The amount of
water and food should not exceed 4/5 of the height of the inner Pot (Figure 16.) For food
that will expand in water, the level should not exceed 3/5 of the Inner Pot (Figure 17). The
minimum level for cooking would be 1/5 of the Inner Pot (Figure 18).
• When cooking rice, the maximum amount of rice
allowed for this 6 quart pressure cooker is 12 cups
of uncooked rice.
• Normally one cup of rice requires one cup of water.
This may vary according to taste.
3. Be certain the inner receptacle, where the Electronic
Heater is located, is clean before inserting the inner pot.
Place the inner pot into the pressure cooker and adjust the pot left and right to ensure
optimal contact between the Inner Pot and the Electronic Heater. (Figure 19)
6
•
During the process of installing the lid, please ensure that the height between the Lid and
the upper edge of the cooker is approximately 10cm. This is to ensure smooth movement
when turning and installing the lid.