
Operation Manual


CLEANING & MAINTENANCE .
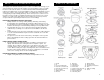
1. Always make sure the Pressure Cooker is unplugged, depressurized and completely
cooled down before dismantling.
2. Use a non-abrasive sponge or damp wash cloth to clean the exterior of the outer
body (9) and the exterior surface of the pressure cooker. NEVER immerse the
pressure cooker in any liquids.
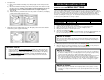
3. Remove the Steam Condensation Cup (13) and rinse it thoroughly and let dry. Clean
the Upper Body (10) with a damp sponge or wash cloth.
4. Clean the Lid (2) with warm soapy water, including the Seal Belt (21), Pressure
Limiting Valve (3), Filter (20), Vent, Float Valve (5) and let dry thoroughly.
• The Pressure Limiting Valve (3) pops off easily by gently reaching underneath it
and gently prying upwards. Be careful not to damage the thin wire spring under
it.
• On the underside of the lid below the Pressure Limiting Valve (3), is a small
metal filter cap which can be removed easily to clean.
5. Let parts dry completely before reassembling.
6. Wash the Inner Pot (8) with a non-abrasive sponge and allow to air dry or use a towel.
7. Clean the Pressure Limiting Valve (3) and the holes with a small brush to ensure
smooth flow of steam during the release cycle.
NOTE: Any servicing required shall be performed by an authorized service representative
or from the original manufacturer or distributer
13
FAQ (FREQUENTLY ASKED QUESTIONS) .
1) Is the Airtight/Exhaust Valve Knob on the top of the lid supposed to be loose?
- If you are not cooking or using the unit, the Valve Knob will be loose. It will turn 360
degrees and may even come off if you pull on it. Once you start using the pressure cooker
and the pressure has built up, and the Valve Knob is set to “Airtight” properly, it will not be
loose anymore.
- Sometimes during cooking and pressurizing, steam may escape from the Valve. It
indicates the Valve is not seated properly/securely. Simply use tongs or similar utensil and
gently/carefully adjust it so it is seated properly.
2) When I choose a Menu Button (ex: Meat & Chicken), nothing happens? What’s wrong?
- Nothing is wrong.
- Make sure the Valve on top is set to Airtight and the lid is locked securely. Once you have
selected the Menu Button, simply leave the unit alone and it will start to heat up and build
up pressure. This sometimes may take up to 5-10 minutes depending on what you’re
cooking.
- Once the unit has built up enough pressure, the red display will change to a letter (P). This
is the time the unit will start cooking the food. This may take up to 5 minutes.
- The unit will then start to cool down and de-pressurize on its own. It will beep 3 times.
The (P) will turn back to a (0) and the Keep Warm light will begin to blink.
- During this time, the food inside is still cooking. Depending if you want your food to be
cooked longer, you can allow the unit to naturally release the pressure by letting the unit sit.
(Some meats will keep cooking once the pressure is released, so if you prefer your meat to
be Medium or Medium-Rare, we suggest the quick release.)
- Once the pressure has completely released, the floating valve will drop down. You can
unlock the lid and open to check on your food.
3) What is the little black plastic piece that came in the accessory bag?
- This is part #15 on the instruction manual. Some may think it is part #7, but it is not. It is
the spatula/spoon holder that latches onto the side of the pressure cooker. Refer to the
instruction manual for the parts indicator to determine the location of where to attach #15
part.
4) When I set the pressure cooker using the Manual Pressure Cooking time OR the
Preset Menu Buttons, it will begin to build pressure heat up, but in about 5-minute the
unit beeps 3 times and goes to Keep Warm and my food did not cook completely.
What is happening?
- The unit is sensing that there is a leak in the pressure and that it is not sealed up properly.
Check the unit thoroughly. Make sure the rubber gasket ring is in place, the lid is securely
locked, and that the Valve on top of the lid is set to the “Airtight” position. Reset the unit by
unplugging it. Wait 10-seconds and plug it back in. Program the unit again.
- Another reason this may happen is that not enough liquid has been added to your recipe.
The pressure cooker has an automatic over-heat prevention sensor that will automatically
set itself to OFF or to Keep Warm when it senses that no liquid is present so it does not
over-heat.
5) Steam is being released around the rim of the lid during the pressurizing sequence.
How do I fix this?
- The Rubber Sealing Ring did not make a proper seal. Cancel all the functions. Exhaust
any remaining pressure and steam. Open the lid and remove it entirely. Check the
Rubber Sealing Ring to make sure it is positioned properly. Rub a wet cloth along it to
make sure it is clean of debris and it is smooth. Re-assemble the lid, lock it securely in
place and restart the cooking process.
14