
Use and Care Manual

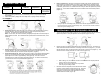
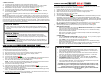


4. Closing the lid.
a) Make sure the Rubber Seal Ring (21) is fitted properly onto the inner part of the
lid (2).
b) Observe the Rubber Seal Ring (21) inside the Lid (2) and ensure that it is evenly
fitted onto the track. (Caution: If the rubber seal ring is damaged, do not
use the pressure cooker. Contact Customer Service to repair or replace.)
c) Close the lid.
d) Hold the Handle (1) and turn it to the “Closed” position or Counter -clockwise. (A
clamping sound can be heard) (Figure 20 & 21).
5. Adjust the Pressure Limiting Valve (3) to the “Airtight” position, and ensure that the
Float Valve (5) sinks. (Figure 22a & 22b)
OPERATING INSTRUCTIONS .
HOW TO USE THE
M
M
E
E
N
N
U
U
S
S
E
E
L
L
E
E
C
C
T
T
B
B
U
U
T
T
T
T
O
O
N
N
S
S
:
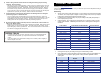
There are Thirteen Menu Buttons programmed for your pressure cooker. These are preset for quick
and easy cooking for small portions of food in addition to manual programming. (When cooking food
that is more than 3lbs. or more than 6-cups, please use the Timed Cooking function.) Each of these
choices is programmed to detect the weight of food being cooked and how much liquid is inside the
pot during the cooking cycle. The unit will automatically build up the pressure, cook the food and go
to Keep Warm when cooking is complete.
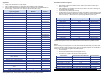
MENU BUTTON SELECTIONS & APPROXIMATE COOK TIMES:
REHEAT**
20-minutes
PORK/RIBS
30-minutes
BEANS
14-minutes
SOUPS
16-mintues
BROWN RICE
23-minutes
BEEF
26-minutes
WHITE RICE
10-minutes
POTATOES
12-minutes
WILD RICE/GRAINS
25-minutes
DESSERTS
20-minutes
STEW
18-minutes
V
EGETABLES
/
FISH
5-minutes
POULTRY
20-minutes
1) Prepare desired food and place into cooking pot.
2) Secure the lid onto the unit, turn it Counter-clockwise to lock it properly in place.
3) Make sure the Pressure Limiting Valve (3) is set to the “Airtight” position. (Except when using
the Reheat function. See Page 9 **Reheat Function).
4) Plug the power cord into a 120V power outlet.
5) The LED screen will display
00 00.
6) Press the Menu Select Button to scroll through the Menu Selections. The Cook-Time will
display for each selection. Press START once you have selected the desired Menu Function.
7) Once you press START, the LED screen will display
Г Г P
8) When proper pressure is achieved, the LED screen will display
P0 14 for cooking Beans as an
example and the cook-time will begin to count down.
9) When the unit has pressurized, it will begin to pressure-cook the food. You may hear quiet
hissing or sizzling sounds coming from inside of the unit during this time.
10) When cooking has completed, the pressure cooker will beep 6-times and automatically go to
Keep Warm. The LED Screen will display END.
11) The Keep Warm indicator light will begin to flash/flicker. This means the Pressure Cooker is
naturally releasing the pressure. This will take approximately 10-15 minutes.
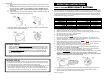
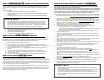
12) If you wish to Quick Release
the pressure, move the Pressure Limiting Valve (3) to “Exhaust”
position to release the pressure until the Float Valve (5) sinks. (Figure 23a & 23b).
CAUTION: Keep hands and face away from Pressure Limiting Valve while in the Exhaust
position. Failure to comply may cause serious injury.
13) Always be certain the pressure is released completely before unlocking the lid and opening it.
14) Remove food to serve immediately or press the Keep Warm button to keep food warm.
(It is not recommended to keep food warm for over 4-hours).
Continue on page 9…
NOTES & TIPS #1:
• Please note that the Pressure Limiting Valve (3) will be loose when you are not
using the unit for cooking. It will rock slightly and will turn 360° manually. Once
the pressure cooker is in operation and the pressure has built up to its capacity,
the Pressure Limiting Valve (3)
will tighten securely, only allowing itself to be
turned to the Left or Right to “Exhaust”. Once all the pressure has released, it
will become loose again.
NOTES & TIPS #2:
• During the Pressure Building process, you may notice steam or pressure escaping from
the Pressure Limiting Valve (3). Carefully adjust the valve by moving it gently or turning
it side to side gently using tongs or similar utensil until it seals properly.
• If any steam is escaping around the lid, it means that the Rubber Seal Ring (21) may not
have completed a tight seal when the lid was locked. Cancel the cooking process,
release pressure manually or naturally, remove the lid and check the Rubber Seal Ring
(21). Reposition the lid and ensure that it is secure. Start the cooking process again.
CAUTION: Always
use protective gloves
when releasing the
pressure to reduce
risk of injury.