
Use and Care Manual


**REHEAT FUNCTION
1) The Reheat function operates at a lower temperature setting of 220°F.
2) Food should be placed inside the pressure cooker in the main cooking pot. Heat resistant
containers or a trivet can be used. (Liquid is optional depending on the food type.)
3) Select REHEAT and press START. The LED screen will display
Г Г P
4) The pressure cooker will begin to warm, beep once and display
P0 20
5) Food will be heated for 20-minutes, and then automatically cycle to Keep Warm. The LED
Screen will display END.
6) It is important to continuously observe food during the reheat cycle to prevent overcooking or
burning.
NOTE: The Reheat function is only used for reheating foods. In order to prevent over-cooking, set
the Pressure Release Valve to EXHAUST. This will prevent the lid from locking and pressure build
up. Smaller quantities of food may overheat if left unattended. When using the reheat function, it is
recommended to monitor the progress depending on the amount of food. Larger portions will require
the maximum reheat time of 20-minutes. Whereas a smaller portion will require a shorter reheat time,
and can be cancelled prior to the 20-minute maximum.
HOW TO USE THE “
P
P
R
R
E
E
S
S
S
S
U
U
R
R
E
E
C
C
O
O
O
O
K
K
I
I
N
N
G
G
T
T
I
I
M
M
E
E”:
Setting your own cook time is ideal for cooking meat or poultry that weighs more than 3-pounds. It is
also suggested for slow-cooking certain recipes that require cooking for more than 30-minutes. The
programmed cook time can be set up to 99-minutes.
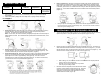
1) Prepare desired food and place into cooking pot.
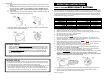
2) Secure the lid onto the unit, turn it Counter-clockwise to lock it in place properly.
3) Make sure the Pressure Limiting Valve (3) is set to the “Airtight” position.
4) Plug the power cord into a 120V power outlet.
5) The LED screen will display
00 00.
6) Press “Pressure Cooking Time” one time, then press the MIN button to the desired time frame.
(EX: If you set the cook time to 30-minutes, the LED screen will display
00 30).
7) Once the time has been selected, press the START button.
NOTE: The LED screen will not immediately display a “P” until the proper pressure has been
achieved. This may sometimes take up to approximately 5-10 minutes.
8) The pressure cooker will begin to operate.
9) When optimum pressure is achieved, the LED screen will display
P0 30
10) When the unit has pressurized, it will begin to pressure-cook the food. The programmed time
will begin to count down until it reaches zero.
11) When cooking is complete, the pressure cooker will beep 3-times and automatically go to Keep
Warm. The LED Screen will display END.
12) The Keep Warm indicator light will begin to flash/flicker. This indicates the Pressure Cooker is
Naturally Releasing the pressure
. (See Notes & Tips #4)
HOW TO USE THE
P
P
R
R
E
E
-
-
S
S
E
E
T
T
D
D
E
E
L
L
A
A
Y
Y
T
T
I
I
M
M
E
E
R
R
:
If you wish to program your pressure cooker to automatically cook prepared food, you can Pre-Set
the pressure cooker for up to 24-hours. (*See Tip #5 *Caution)
1) Prepare desired food and place into cooking pot.
2) Secure the lid onto the unit, turn it Counter-clockwise to lock it in place properly.
3) Make sure the Pressure Limiting Valve (3) is set to the “Airtight” position.
4) Plug the power cord into a 120V power outlet.
5) The LED screen will display
00 00.
6)
Press the DELAY TIMER button, then the HOUR button to increase the timer by 0.5-hour
increments up to 10-hours, thereafter 1-hour increments (indicated on the LED screen).
The maximum Preset period is 24-hours in half-hour increments. After 24-hours, the timer
will start a new cycle. (The time that displays on the LED screen shows how long the user
wants the unit to wait before the cooking process begins.
EX: If you wish to program the pressure cooker to automatically turn on in 3-hours, press the
DELAY TIMER button, then the HOUR button until the LED screen displays
3.000).
7) After choosing the desired pre-set time, choose your pre-set function or cooking time.
MENU SELECT BUTTONS:
o Select one of the thirteen pre-programmed MENU SELECT BUTTONS and press START.
Your pre-set timer has been programmed.
o After the pressure cooker counts down to automatically turn on, it will follow the cooking
sequence for Menu Button Operation.
o When cooking is complete, the pressure cooker will beep 6-times and automatically go to
Keep Warm. (See Notes & Tips #5)
COOKING TIME:
o Press the PRESSURE COOKING TIME to desired cook time. EX: If you wish to program
to cook for 60-minutes. The LED screen will display
3.060.
o Press START. Your pre-set delay timer has been programmed.
o After the pressure cooker counts down to automatically turn on, it will follow the cooking
sequence for desired cook time.
o When cooking is complete, the pressure cooker will beep 6-times and automatically go to
Keep Warm. The LED Screen will display END. (See Notes & Tips #5)
NOTES & TIPS #4:
• NATURAL RELEASE is recommended when cooking foods that will not have the
tendency to overcook such as Potatoes, Beans, Soups & Stews. During the Natural
Release time period (may take 10-15 minutes), the pressure cooker may still be heated
and cooking the food slightly.
• QUICK RELEASE
is recommended when cooking foods that you wish to be Medium or
Medium-Rare such as Beef Roasts or Lamb. This will release the pressure quickly and
prevent the food from over-cooking.
NOTES & TIPS #5:
• It is recommended to release the pressurized steam when the “Keep Warm” LED
stops flickering as the pressure cooker will have lower pressure. This will require a
little more time. (Approximately 5-10 minutes).
• During the cooking process, when the pressure cooker enters into the Pressurized
Sequence, the first digit on the LED screen will display the letter “P”. At the same
time, the power supply to the Heater (18) will shut off.
• For foods with a high volume of liquid (Stews, soups, porridges, etc.) IT IS NOT
RECOMMEND TO USE QUICK RELEASE. This is to avoid liquid splatter from the
ventilation in the Pressure Limiting Valve (3).
• Use the NATURAL RELEASE: User should wait for the temperature to drop and the
Float Valve to sink on its own prior to opening the lid.
*CAUTION: It is not recommended to use the Pre-Set Timer function to cook
foods that may spoil. Leaving raw foods inside the pressure cooker for long
periods of time prior to cooking may result in the food spoiling.
Cook food that can be left out such as rice, beans, grains or other foods that
will not spoil.
NOTES & TIPS #3:
• When cooking soups or stews with other hearty ingredients such as potatoes or meat,
as much as 5 or 6 cups of liquid must be used to prevent ingredients from over-cooking
or burning.