
Owner`s manual


The "Competitor" is your own best time on a given course, and therefore is not an
available option the first time you ride a given course. Beginning with your second
ride on a given course you can choose to ride against the Competitor (your previous
best time on that course) and can adjust the Competitor’s speed.
1. In the Choose Course screen, if you select a course you have ridden to com-
pletion at least once before, you can choose to ride against the Competitor
by clicking the ENABLE COMPETITOR button.
2. You can then adjust the Competitor’s pace by increasing or decreasing
his/her average speed or course time. Click the SPEED or TIME button and
adjust the desired value in the appropriate field.
3. Make all adjustments to the Competitor before you begin the course. The
adjustment screen is not accessible once the ride is started.
4. After selecting a course and adjusting the Competitor, click the NEXT button
at the bottom of the screen to proceed to the course screen, where you will
start the ride.
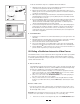
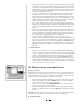
C. Starting the Course
1. Having selected a course, adjusted the Competitor, and clicked NEXT, you
should be looking at the course screen, with the course profile displayed at
the bottom of your screen. See Figure 19.
2. You can warm up for as long as you like before starting the course while
viewing current Speed, Heart Rate, Cadence and Power data.
3. When you’re ready to begin the course, click the Start (4) button at the bot-
tom of the screen. Use the handlebar console Tab key (→|) to select the but-
ton and the Return key (←
) to click it.
D. During the Ride
1. Data on Time, Distance, Slope, Cadence, Power, Heart Rate and Speed will
be displayed at the top of the screen. Data collection for your ride begins as
soon as you start the ride. Average and maximum data values are calculated
from the moment you click "start" until the course is completed (unless you
pause during the ride). Remember, you must complete the course in order
for any ride data to be saved.
2. As you ride, a red bar (representing the Rider) and a gray bar (representing
the Competitor, if activated) will appear on the course profile display to indi-
cate your position relative to the Competitor. Also displayed is the difference
in speed and distance between you and the competitor.
3. Current Heart Rate and Power are displayed in the graph above the course
profile. The two solid yellow bars in the graph indicate the heart rate target
zone upper and lower limits.
4. If your heart rate rises above or falls below the programmed target zone lim-
its, a pop-up window will appear to indicate heart rate is too high or too low.
If your heart rate exceeds the programmed max heart rate, resistance will be
reduced to zero. You can bypass this precaution by programming your max
heart rate slightly higher than your actual max.
5. To pause at any point during the ride, use the console Tab (→|) and
Return (←
) keys to highlight and click the Pause (;) button at the bottom of
the screen. To resume the ride click the Start (<) button. To terminate a ride
without completing the course, click the Stop (<) button. Remember: Ride
data will not be saved if the ride is not completed. When you click the Stop
( < ) button a dialog box will appear to confirm your decision to terminate
the ride.
E. Finish the Course
1. When you reach the end of the course data collection will cease. You can
continue pedaling as you cool down; current Speed, Cadence, Heart Rate
and Power data will continue to be displayed, but will not be recorded as
part of the ride data.
2. To save your ride data at the end of a course, click the SAVE button at the
bottom of the screen.
3. To view data from the ride just completed, click the NEXT button at the bot-
11
Axiom Course Screen
19