
Owner`s manual


12
tom of the screen. This summary of course data will be saved in the Course
History files for later comparison with other rides on the same course or for
a review of all rides within a specified date range. For more information on
viewing the course history files, see section IX.
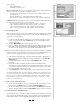
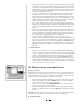
IX. Viewing History Screens
The History screen (Figure 20) allows you to view key data for all saved rides on all
courses or on a particular course and enables you to sort the data by date.
1. From the Home screen (Figure 13) select the rider whose history you wish to
view. Then click the HISTORY button.
2. Each line in the history screen represents a single ride, and lists the date,
ride time, distance, average power, average speed, average heart rate, and
elevation gain for that ride.
3. The field at the bottom of the screen lists the sum totals and averages for all
rides displayed.
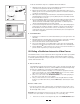
4. To view more detailed information for a particular ride (Figure 21), highlight
the ride and click the STATS button at the bottom of the screen.
5. To view all the rides on one particular course, select the course name from
the pull down list at the top of the screen.
6. To view rides within a specific date range (on all courses or on a particular
course) use the date fields at the top of the screen to specify the date range.
7. To return to the HOME screen, click the BACK button at the bottom of the
screen.
X. Customizing Your Workout
A. Heart Rate Target Zone Settings
When you create your Rider Profile, the software calculates a suggested maximum
heart rate value and upper and lower heart rate target zone limits as follows:
1. Maximum Heart Rate calculation: 220bpm–age = MHR
2. Target zone lower limit calculation: 70% of MHR
3. Target zone upper limit calculation: 80% of MHR
You can adjust the maximum heart rate value or target zone limits at any time
prior to starting a course. Many helpful books are available which provide guid-
ance on training by heart rate. The Travel Trac
™
RealAxiom allows you to cus-
tomize each workout by adjusting the target zone limits according to your goals
for that particular ride.
1. From the Home screen (Figure 13) click the NEW button to access the Rider
Profile screen (Figure 14).
2. Select the rider name in the RIDER field, make the desired changes to the target
zone settings and then click the SAVE RIDER button to save the changes.
B. Adjusting Competitor
Before beginning a ride on a given course, you can adjust the performance of
the Competitor, provided that you have ridden the course previously and saved
your ride data. Adjusting the Competitor’s pace can help you achieve your
goals—pushing you to improve on your previous best, or allowing you to take it
more slowly on a recovery day.
1. In the Choose Course screen click the ENABLE COMPETITOR button.
2. You can then adjust the Competitor’s pace by increasing or decreasing
his/her average speed or course time. Click the SPEED or TIME button and
adjust the desired value in the appropriate field.
3. Make all adjustments to the Competitor before you begin the course. The
adjustment screen is not accessible once the ride is started.
C. Creating Your Own Course
Course History Screen
20
Ride Stats Screen
21