
Owner`s manual


Creating a custom course allows you to specify the precise length and elevation
gain of the course. You can tailor a course to meet your specific training goals,
or replicate your favorite real world rides.
1. To create a custom course, click the AXIOM button on the Home screen to
access the Choose Course screen. Then click the NEW COURSE button at the
bottom of the screen.
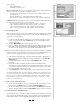
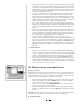
2. Enter a name for the course in the NAME field (Figure 22). Each course will
be divided into a series of sections, with a distance and slope specified for
each section.
3. Enter a distance for the first section of the course in the Length field and
press Return. The minimum distance for any section is 0.01 Mi. or Km.
4. Then enter either the slope or the ending elevation of the first section in the
appropriate field and press Return.
Note: Slope is the ratio of elevation gain (or loss) to distance traveled. For
example, a 6% slope indicates 6 feet of elevation gain for every 100 feet of
forward distance traveled.
Note: The maximum slope simulated by the RealAxiom resistance unit is 12%.
Slope values in excess of 12% will not produce any greater resistance from
the resistance unit. The maximum slope that can be entered is +/-20%. If you
enter an elevation value that produces a slope in excess of +/-20%, an error
message will appear requesting that you modify the value.
5. Continue entering distance and slope data for each section of the course
until the course is complete. Click the SAVE button at the bottom of the
screen to save your new course.
6. Click the BACK button at the bottom of the screen to return to the Choose
Course screen. Your new course will appear in the list of course names in
the CHOOSE COURSE box.
XI. Troubleshooting
1. When I open the program a "No Device Found" error message appears.
• Make sure the USB cable between the handlebar console and PC is secure at
both ends.
• Make sure the resistance unit power cord is connected to an electrical outlet.
• Make sure the cable from the handlebar console to the resistance unit is secure
at both ends.
• If the USB port is not recognized, or the Windows® Hardware Installation
Wizard tries to install a driver, see “Hardware Installation,” Section IV, p.5.
2. No data is displayed during a ride.
Make sure the following connections are secure:
• USB cable between the handlebar console and PC.
• Resistance unit power cord to an electrical outlet.
• Cable between handlebar console to the resistance unit.
• Make sure cadence sensor and magnet are aligned, and that the cadence cable
is securely connected to the resistance unit.
3. The program displays cycling data such as speed and distance, but no heart
rate data (or erratic heart rate data)
If heart rate data is absent or erratic, the signal from your transmitter chest strap
is probably to blame. Ensure that the strap is positioned correctly (see section
VI, D, p.7) and sufficiently snug, and that the back side of the strap (against the
skin) is sufficiently moist.
To avoid electromagnetic interference which may cause abnormally high or erratic
heart rate readings, maintain a distance of about four feet between the handlebar
console and common sources of interference, such as the computer monitor, TV’s,
other wireless transmitters, fluorescent lights and motor driven equipment.
13
Custom Course Screen
22