
Owner`s manual


5
11
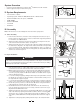
2. Loosely attach the magnet (L) to the inside of the left crank arm using one
zip-tie (Q). See Figure 9 and 10.
3. Position the sensor and magnet so that the space between them is no more
than 2-3mm. Proper spacing is often achieved by sliding the magnet and
sensor toward the rear of the bike. See Figure 11.
4. Once the magnet and sensor are positioned properly, tighten the zip-ties
securely. Secure the sensor cable to the chain stay using additional zip-ties
as necessary, and trim the loose ends from all zip-ties to prevent contact
with the spokes or drivetrain components.
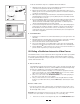
F. Cable Connections
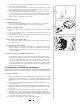
Handlebar Console to PC
Connect one end of the USB cable (N) to the handlebar console and the
other end to an available USB port on your PC. See Figure12a.
Console to Resistance Unit
1. The console to resistance unit cable (O) has a phone jack type plug at both
ends.
2. Plug one end of the cable into the appropriate outlet at the back of the con-
sole. See Figure 12a.
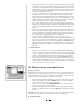
3. Plug the other end of the cable into the appropriate outlet at the back of the
resistance unit (B). See Figure 12b.
Cadence Sensor to Resistance Unit
Plug the cadence sensor cable (K) into the appropriate outlet at the back of
the resistance unit.
Resistance Unit to Power Supply
Only after all other connections are complete, connect the resistance unit
power cord (P) to the resistance unit and then to a standard electrical wall
outlet (120V AC). If all cables are connected correctly, the green LED on the
console should be lit.
G. Using the Travel Trac
™
RealAxiom without a PC
The RealAxiom can be used as a stand-alone trainer, independent of the
PC. When the handlebar console is not connected to the PC, the green LED
on the console will flash green. Use the "+" and "-" buttons on the console
to increase or decrease the resistance level. There are 8 levels to choose
from. The red LED on the console will flash each time the resistance level is
adjusted. After 20 seconds of inactivity, the resistance level will automati-
cally return to the lowest level.
IV. Hardware and Software Installation
Your Travel Trac
™
RealAxiom includes software compatible with Windows
®
2000, NT
and XP. The software also includes the USB driver required for the handlebar console.
A. Software Installation
1. Insert the RealAxiom CD in the CD-ROM drive. The installation should begin
automatically. If the installation does not start automatically, click on the CD-
ROM drive to explore the contents, and double click the "RealAxiomInstall"
icon.
2. Follow the on-screen installation instructions. When the installation is com-
plete, remove the CD.
3. During the software installation the USB driver for the handlebar console
will also be installed automatically, and a RealAxiom desktop shortcut will
be created.
4. Insert the Verona Championship Course DVD or Limoges Course DVD.
5. The DVD course installation should begin automatically. During installa-
tion, be sure to select the desired units of measure (Metric or English). If the
installation does not start automatically, click on the DVD drive to explore
the contents and double click the Setup icon.
6. The DVD course installation may require several minutes.
O
I
N
12a
12b
P
K
O