
Owner`s manual


These include:
• Entering rider data
• Creating a custom course
Mouse or Keyboard: The mouse or keyboard can be used to navigate between
screens, or to move from field to field within a screen.
• Use the mouse or the Tab key to move the cursor between fields or to
select buttons.
• Use the Return key to confirm data entered in data fields
• Use the mouse or the arrow keys to move the cursor within a data field.
Handlebar Console: The buttons on the console perform the same functions as
the Tab, Return and arrow keys on the keyboard.
• The "+" button performs the same function as the → arrow key
• The "-" button performs the same function as the ← arrow key
• The "→|" button performs the same function as the Ta b key
• The "←
" button performs the same function as the Return key
B. Create Rider Profile
Before your first ride, you must create a Rider Profile which includes age, weight
and other pertinent data for each rider. Each rider using the RealAxiom should
create his or her own profile.
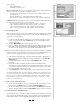
1. Double click the RealAxiom desktop icon to launch the program. From the
Home screen (Figure 13) click the NEW button to access the Rider Profile
screen (Figure 14).
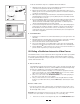
2. Click the NEW RIDER button at the top of the screen.
3. Enter your Name, Birth Date (mm/dd/yyyy), Weight, Max Heart Rate, Target
Zone Upper Limit and Target Zone Lower Limit in the appropriate fields. Use
the mouse or the Tab key to move from field to field within the box.
Note: The program will automatically calculate your maximum heart rate and upper
and lower target zone limits based on your age*. To enter a different value, sim-
ply type over the system-generated values in the appropriate field.
4. Select Metric or English units of measure (Kilometer, Meters, Kilograms or
Miles, Feet, Pounds) by clicking on the appropriate button in the UNIT OF
MEASURE box.
5. Once all data has been entered, click the SAVE RIDER button to save
the profile.
6. Each rider using the program should create their own Rider Profile.
Thereafter, select the appropriate rider using the arrow buttons on the Home
screen (Figure 13). The currently selected rider’s name appears in the name
field at the bottom of the Home screen.
7. Click the BACK button at the bottom of the screen to return to the Home screen.
*A standard maximum heart rate formula of 220-age = MHR is used, and target zone val-
ues of 80% of max heart rate for the upper limit and 70% of max heart rate for the lower
limit are used for the system-calculated values. A target zone range of 70-80% of maxi-
mum heart rate is appropriate for trained athletes. If you have been inactive, you may
want to use a lower target zone.
C. Edit or Delete an Existing Profile
1. To edit an existing rider Profile, go to the Rider Profile screen and select the
rider name in the RIDER field. Then click the DELETE RIDER button.
2. To edit an existing profile, select the rider name in the RIDER field, make the
desired changes and then click the SAVE RIDER button to save the changes.
D. Using a Heart Rate Transmitter Strap
The RealAxiom can be used with or without a heart rate transmitter strap. To get
the most from the RealAxiom features, we recommend using a transmitter strap.
A transmitter strap is not included with the RealAxiom trainer, but virtually all
7
Home Screen
13
Rider Profile Screen
14