
Owner`s manual


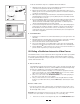


and select “Create Sub-Course.”
2. A screen will appear that shows the entire course length. Click on
the desired start and end points within the course, or use the up
and down arrows at the right of the screen to specifiy the course length.
3. Name the sub-course by clicking the Description tab and entering a
name.
4. Click SAVE to save the new sub-course, which will then appear in the list
of available courses.
C. Select and Adjust Competitor
Two competitor options are available, Personal Best and the Champion.
Personal Best is a virtual competitor that allows you to race against your own
best time on a given course. Since you have to complete a given course at least
once to establish your best time, the Personal Best competition is not
available the first time you ride a course.
1. In the Choose Course screen (Figure 16), if you select a course you have pre-
viously ridden and saved, you can choose to ride against your personal best
time by clicking the ENABLE COMPETITOR button and selecting “My best
course.”
2. You can then adjust the Competitor’s pace by increasing or decreasing his/
her average speed or course time. Click the SPEED or TIME button and
adjust the desired value in the appropriate field.
3. The adjustment screen is not accessible once the ride is started, so make
any desired adjustments before you begin the course.
4. After selecting a course and adjusting the Competitor, click the NEXT button
at the bottom of the screen to proceed to the course screen, where you will
start the ride.
The Champion (available on the Larciano video course) pits you against a pro
rider on the same course to let you see how well you stack up against seri-
ous competition.
1. In the Choose Course screen (Figure 16), click the ENABLE COMPETITOR
button to see whether the Champion option is available for the selected
video course. If "Course With a Champion" appears in the pop-up window,
the option is available.
2. Click on "Course With a Champion" to select this competitor option, and
then click the NEXT button at the bottom of the screen to proceed to the
course screen, where you will start the ride.
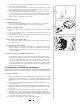
3. During the ride, an inset screen of the champion will appear in the main
screen. The champion’s speed and the distance gap will also appear in the
inset screen. In addition, the size of the screen itself will vary in proportion
to the distance gap—the closer you get to the champion, the larger the inset
screen. If you overtake the champion, the inset screen will disappear to the
right of the course.
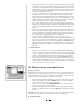
D. Starting the Course
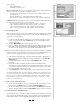
1. Having selected a course, adjusted the Competitor, and clicked NEXT, you
should be looking at the course screen, with an image of the course dis-
played on your monitor. See Figure 17.
2. You can warm up for as long as you like before starting the course while
viewing current Speed, Heart Rate, Cadence and Power data.
3. When you’re ready to begin the course, click the start (4) button at the bot-
tom of the screen. Use the handlebar console Tab key (→|) to highlight the
button and the Return key (←
) to select it.
E. During the Ride
9
RealAxiom Course Screen
17