
Installation Instructions
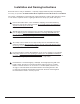
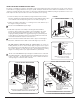
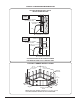
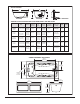
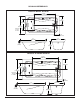

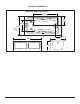

Table Of Contents

754764-100 Rev 7 3/21
3
Each bath arrives ready for installation, completely equipped with the pump and plumbing
necessary for operation. A drain/overflow kit is required for each bath and it is not included.
The variety of installations for this bath may require framing procedures other than those shown.
Locate studs as required. Ensure roughing-in dimensions are proper, plumb and square.
Installation and Framing Instructions
Remove the bath from the carton. Retain the shipping carton until satisfactory
inspection of the product has been made. Do not lift the bath by the plumbing at
any time; handle by the shell only.
All bath units are factory tested for proper operation and watertight connections
prior to shipping. Prior to installation and before enclosing with wallboard, tile,
etc., the bath must be filled with water and operated to check for leaks that may
have resulted from shipping damage or mishandling.
The sumps of these baths are not supported by the feet and additional sump
support is required. Once the bath is in place, the rim of the bath should contact
the stringer or pier but supports no weight.
Provisions must be made in all installations for an access opening for servicing the
bath pump. Unless an access opening of at least 12" x 24" (305mm x 610mm) is
provided, warranty service will not be performed. It is strongly recommended that an
additional opening be provided for access to drain components.
Each bath has a nominal length (L), width (W), and Height (H) along with a rim
height. Unless otherwise noted in the following rough-in references, assume
that the nominal tolerances are as much as +/-1/4 inch (6mm). Therefore, it is
strongly recommended that the installer build the surrounding structure after
receiving the actual bath. Structural measurements should be verified against
the actual bath received to ensure proper fit.
!
!
!
!
!