NAVIGATOR ELK PRODUCTS M1 USER GUIDE Elk-M1KPNAV Touchscreen Keypad L635 Rev.
M1KPNAV Navigator Touchscreen Keypad - User Guide Introduction Congratulations on purchasing a Navigator Keypad as part of your featured packed M1 Security and Automation controller. Navigator is a stylish Touch Screen Keypad interface for use with the M1 series Cross Platform Controllers. It features a large touch sensitive 3.5" color LCD with bright, easy to use graphic icons and softkeys. Navigator makes the M1 Security and Automation system extremely easy to operate.
M1KPNAV Navigator Touchscreen Keypad - User Guide TABLE OF CONTENTS Main Screen .................................................................................................... 4 Status Window ...................................................................................................... 4 View Violated Zones ........................................................................................... 5 EXIT - Arming in the “Away” Mode ..............................................................
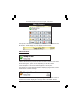
M1KPNAV Navigator Touchscreen Keypad - User Guide Main Screen The top line of the Main screen displays the current time and date from the M1 Control. Actual display may vary slightly from that shown. Status Window A Status Window directly beneath the time and date includes an Icon which will be either green, yellow, or red, depending on the M1’s status. A text description of the current status appears on the top line.
M1KPNAV Navigator Touchscreen Keypad - User Guide View Violated Zones To view zones that are violated (not ready) press the button labeled “Violated Zones” on the top right corner of the button arrangement. The display will begin with the first violated zone. The Up and Down buttons that appear in the Status Window can be used to move between zones. The Main Screen contains a numeric entry keypad along with several feature buttons, some of which are not found on other Elk M1 Keypads.
M1KPNAV Navigator Touchscreen Keypad - User Guide STAY - Arming in the “Stay” Mode Stay mode arming is used when the premises is occupied. All perimeter doors and windows are armed, and all interior zones are excluded. 1. 2. 3. Enter a User code or press the STAY key (Quickarm). ** Display will change to Armed Stay. Exit tone is silent during Stay arming. All interior zones will be excluded in the Stay mode. Exit and Entry zones will still have their respective delay times.
M1KPNAV Navigator Touchscreen Keypad - User Guide Display “Show” F Keys Pressing this button will swap the display to the extended Main screen. All 6 of the “F” keys are available on this screen. BYPASS - Excluding Zone(s) Bypass permits zones to be excluded (ignored) by the control during the current armed period. Bypassed zones cannot trip an alarm. Bypasses on zones are automatically canceled when the control is disarmed. 1. Press the Bypass key PLUS the number of the zone to be bypassed. 2.
M1KPNAV Navigator Touchscreen Keypad - User Guide What to do if the Alarm is Sounding 1. 2. 3. 4. Proceed directly to the Keypad and enter your user code. The alarm and/or keypad tone should silence. The System Armed display should disappear. If the alarm was accidental, contact the Central Monitoring Center to avoid a false dispatch of the authorities. Note: False alarms often occur when someone enters the building and doesn’t enter their User Code prior to the entry delay time expiring.
M1KPNAV Navigator Touchscreen Keypad - User Guide Main Menu Screen The Main Menu screen will be displayed when the Menu button is pressed on the Main screen. Various system User and Installer options are available. The Main Menu is split across 2 pages. To move between the pages press “Next Page” or “Previous Page”. An Information button at the bottom of both menu pages provides contact informaton for your Installation Company. This page must be filled in by the Installer.
M1KPNAV Navigator Touchscreen Keypad - User Guide Automation The M1 system has six (6) categories of Automation options which may be controlled via the Automation button. Your system may or may not be configured with these options. When the “Automation button” is pressed the screen will display the following options: · Tasks · Lighting · Outputs · Temperature Sensor · Keypad Temperature · Thermostat Temperature · Automation Custom Settings To return to the Main Menu press the Menu button.
M1KPNAV Navigator Touchscreen Keypad - User Guide Automation - Task Activation A Task is an M1 feature that is similar in operation to a “macro” found in a word processor or spreadsheet program. It allows a series of automation steps or processes to be activated by a single button press. Each task may have a name such as: Water the Lawn (to turn on electric water valves), Welcome Home (to turn on a series of Lights or adjust the temperature).
M1KPNAV Navigator Touchscreen Keypad - User Guide Automation - Task Activation - Single View At the bottom of the Task Activation screen is a “Single View” button. This provides a means to locate and activate a single Task, including a Task which has been greyed out or “hidden” on the regular screen. This button is mainly intended for use by advanced users that understand the reason a Task may be hidden, and understand the consequences that may be involved when activating a hidden task.
M1KPNAV Navigator Touchscreen Keypad - User Guide Automation - Lighting Control This menu option allows access to view and control any intelligent lighting devices which may be integrated with your M1 system. The Lighting Control screen can display up to 4 lights at one time. A scroll bar along the right side will scroll to 4 more lights, as can the Previous and Next buttons. Each Light has a number, a name, and a Icon showing the current state.
M1KPNAV Navigator Touchscreen Keypad - User Guide NOTE: Direct number entry is the only way to gain access to to a hidden Light. The Next and Previous buttons skip over hidden Lights. In Single View the lighting state can be toggled using the “Change State” button. ie Turn lighting ON or OFF. If the Light is dimmable then a Dim button will be displayed. Press the Dim button will display the Lighting Control Dim screen. To return to the regular Light screen press “Multi View”.
M1KPNAV Navigator Touchscreen Keypad - User Guide Automation - Output Control This option allows access to control any outputs that may be configured with your system. Outputs are relays or voltage trips used for controlling other types of equipment. Up to 8 outputs may be displayed on the screen at one time with the Output number and name. A scroll bar on the right side will scroll to other pages of outputs, as can the Previous and Next buttons.
M1KPNAV Navigator Touchscreen Keypad - User Guide NOTE: Direct number entry is the only way to gain access to a hidden Output. The Next and Prevous buttons skip over hiddent Outputs. In Single View the Output state my be toggled using the “Change State” button. i.e. Turn the Output ON or OFF. To return to the regular Output screen press “Multi View”. To return to the Main Menu press the Menu button. To return completely back to the Main screen press the red close button on the top right of the screen.
M1KPNAV Navigator Touchscreen Keypad - User Guide Automation - Keypad Temperature If your M1 system was installed with any M1KP Keypads you can use this option to view the temperature of their internal temperature sensor. Consult your Installer to see if your system includes any M1KP Keypads. This screen displays all active Keypads using a darker highlight on those buttons. Just be aware that only M1KP model Keypads contain a viewable temperature sensor.
M1KPNAV Navigator Touchscreen Keypad - User Guide Reset Smoke Detectors If your M1 system includes Smoke Detectors (optional) wired to the control, these generally have a visual LED light that will illuminate whenever the detector has activated. This is useful for troubleshooting and locating the source of an alarm after a false or accidental trip. The Reset Smoke Detectors button provides the means to reset (clear) the visual indicators by removing power from the detectors for 5 seconds.
M1KPNAV Navigator Touchscreen Keypad - User Guide History Log Your M1 System stores the last 512 events of activity history. This menu option permits you to view those events, starting with the most recent. The Next button will scroll backwards to the next most recent event. Previous will scroll forwards to the newer events. Scrolling in either direction will eventually lead to the “End of Log”. The viewed results include the logged event, the day, the month, the time of the event ,and the event type.
M1KPNAV Navigator Touchscreen Keypad - User Guide Change User Codes (This requires a Master Level User Code) Your system supports up to 199 Users as enabled by the Installer. A User with a Master Level Code may change, edit, or delete other Users. Press “Change User Codes” and then enter your Master Level code. Use the “Next User” or “Previous User” to find the User to be changed. Press “Change Code” to modify the code of this User. Enter the new unique 4 digit code you wish to allocate to this User.
M1KPNAV Navigator Touchscreen Keypad - User Guide System Settings (A Master or Installer Code is required for these options) This manual does not go into detail on the Systems Settings options. Many are self-explanatory, while others are intended for use ONLY by the Installer. Consult the installer if you have any questions or need more information. Set System Clock - Time is entered in 24hr format. Use the numeric keys for data entry and the “Set ..” keys for choosing the entry position.
Select Area (This Option requires entry of a valid User Code) Your system may be configured to allow control of multiple areas (e.g. Office, House, Garage etc). This allows a part of the system to be Armed, while others are disarmed. The “Select Area” and “Change Keypad Area” screen works as follows with two types of multiple area control. 1. Temporary Map another Area Press the desired Area from the list and then press “Change Area”.
Synchronise This is primarily for use by the Installer. After any programming changes are made to the M1 Control it may be necessary to activate this option so that Navigator can update and synchronise itself with the control. Clean Screen This option will disable the screen for 10 seconds to allow cleaning of the screen surface. Use Only a Soft Dry Cloth! DO NOT USE GLASS CLEANER! Authorise This screen will display whenever a particular option or feature requires the entry of a User Code.
Fire Safety & Maintenance If the fire alarm activates, the siren or bell will pulse ON and OFF and the display will show “Fire Alarm”. Always follow your evacuation plan and leave the building immediately, even if the a fire condition is not apparent. If your system is connected to a central monitoring station, an emergency report could be sent to that center. If you discover the fire alarm was in error, notify the central monitoring station to avoid an unnecessary response.
Emergency Evacuation Plans Preparation of an evacuation plan is of prime importance in fire prevention. Establish a household emergency evacuation plan in the event of fire. Refer to the Smoke Detector instructions concerning their mounting, layout and spacing. 1 Evaluate possible escape routes from your home. 2 Select 2 escape routes from each room. 3 Rooms on the second floor should have a rope ladder Be sure it will reach the ground. 4 Draw a sketch of your escape plan so everyone is familiar with it.
System Testing To assure the proper working order the system should be tested once a week using the following procedure. If the system Is monitored always contact the Central Monitoring Station prior to performing any test. Secure all protected doors and windows. 1. 2. 3. 4. 5. Press Away or enter a valid User code to arm the system. System Armed will display and the exit tone will start. At the end of the exit delay the alarm system will be armed Away.
Navigator Protective Screen Film Navigator is supplied with two pieces of self-adhesive Protective Film. We highly recommend this film be applied to the touchscreen front to help protect the sensitive touch surface against marks and scratches that may appear under normal use. The protective film should keep the screen looking brand new for years to come. Apply one protector and keep the other as a future replacement/spare. STEP 1.
www.elkproducts.