
Installation manual


Page 10 M1XRFTW Installation Manual
Wireless Submenu Description
This submenu is for Receiver (Transceiver) options. To select this menu press the RIGHT
arrow key, or press the Up or Down arrow keys to scroll the submenus.
Sets the expiration timeout value for supervision of zones assigned as
Supervisory Type 1
(
Non-Fire Zones). The range is 001 to 255 hours and the default is 024 hours. If a Type 1
sensor fails to check-in prior to this timeout it will be declared missing. The Type is assigned
to each transmitter (sensor) under Transmitter Opt 02 (see below).
Sets the expiration timeout value for supervision of zones assigned as Supervisory Type 2
(Fire Zones). The range is 001 to 255 and the default is 004 hours. Should a Type 2 sensor
fail to check-in prior to this timeout it will be declared missing.
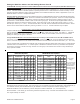
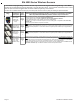
1:Rec Selb Prgr
Receiver Options
There are four (4) wireless setup submenus: 1-Receiver (Transceiver) Options, 2-Xmitter
Options, 3-Xmitter Enroll, and 4-Keyfob Event Definitions. Use the UP or DOWN arrow keys to
locate the desired submenu, then press the right arrow key to select.
14-Wireless
Setup r
† Not evaluated by UL
2:Xmit Sel b Prgr
Transmitter Opt r
WZn017 04: = No r
Enable Option 2
WZn017 01: = No r
Enable Transmitr
WZn017 02: = 0 r
Supervision Type
WZn017 03: = No r
Enable Option 1
RO3:=024 Hours r
Reg. Supervision
WZn017:Sel b Prgr
Wireless Zone
WZn017 05: = 001 r
Keyfob User ID
WZn017 06: = No r
PIR Auto Restore
RO4:=004 Hours r
Fire Supervision
From the keypad enter the Installer Level Programming mode. Press ELK, 9 > (enter installer code).
Navigate to the Wireless Setup - Menu 14 and press the RIGHT arrow key to select.
M1 Keypad Programming for the M1XRFTW
WZn017 shown as an example only!
This submenu is for specific transmitter (sensor) options. To select this menu press the
RIGHT arrow key, or press the Up or Down arrow keys to scroll to another submenu.
Use the UP and DOWN arrow keys to locate a particular wireless transmitter. Press the
RIGHT arrow key to select and program the displayed transmitter.
Displays if a transmitter is enabled or disabled. This option CANNOT be used to add a new
device, but it can be used to temporarily suspend or remove an already enrolled device. When
a new sensor is added via the enroll process this location will be set to Yes.
This sets the expected check-in (supervision) interval of a sensor. Burglar (non-fire) sensors
should be set as "1"=Normal Supervision. Fire Sensors should be set as "3" = Fire
Supervision. CAUTION! Keychain Remotes (Fobs) or sensors that leave the building MUST
be set to "0" = non supervised. See receiver selections R02 and R03 for supervision time
values. Valid values are: 0, 1, or 3 Factory default setting is 1 (Normal Supervision).
This is relevant to a few select sensors. Factory default is No.
See the List of Elk 6000
Series Wireless Sensors to determine which transmitters use this option.
This is relevant to a few select sensors. Factory default is No. See the List of Elk 6000
Series Wireless Sensors to determine which transmitters use this option.
This location allows a number to be assigned as the User ID that will appear in the M1 event
log whenever a Keychain Remote is used to arm/disarm. Valid range is 001 to 255. NOTE:
Standard M1 User codes are 001 to 199.
This option (PIR Auto Restore) is not currently used by the M1XRFTW.