
Installation manual


Page 8 M1XRFTW Installation Manual
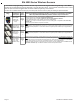
ELK6050 Smoke Detector
Two-Way with Internal Sounder
Elk6021 Mini
Window Sensor,
No Tamper
Loop # = 2 Since this is a single zone sensor the M1 default Loop # 0 will recognize the built-in reed switch immediately. It
is not mandatory to change (program) the Loop from 0 to 2. However, if this sensor is replacing a previous sensor that was
programmed with Loop # equal to 1 or 3, this sensor will not be recognized by the M1 until the Loop is reprogrammed to a
value of 2.
Heat 'Rate Of Rise' Xmtr
Ademco Part # 5809
Glassbreak Xmtr
Ademco Part # 5853
Shock Sensor
Ademco Part # 5800SSI
Elk6010 Keychain
Remote (FOB),
4 buttons with
System Status
Inquiry
Elk6022 Universal
3-Zone Dr/Wnd
Sensor,1 Reed +
2 Aux. Inputs,
Front/Back Tamper
ELK6030 Two-Way PIR
Motion Detector
Elk6020 Slim Door
& Window Sensor,
Front/Back Tamper
Shock Processor Xmtr,
3 Channels, 2 Ext. & 1 Reed
Sw.
Ademco Part # 5819
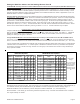
From Keypad Installer Programming use Menu 14, sub-menu 3:Lrn Sel Wireless Transmitter.
Follow the published Enroll Method procedure and other steps as listed below.
Part Number(s)
& Description
Image
This Sensor MUST be enrolled as a separate wireless zone for each input being used. The TXID will be the same for each.
Loop # = >>> Since this is a multi-zone sensor the Loop # directs which input on the sensor is assigned to the wireless
zone. Set the Loop # to 2 to use the built-in reed switch as the input. Set the Loop # to 1 to use the Aux. LP1 terminals as
the input. Set the Loop # to 3 to use the Aux. LP3 terminals as the input. This is very IMPORTANT!
Normally Open (N/O) contacts may be connected to the Aux. Inputs LP1 & LP3 by enabling Option 2 under Menu 14, sub-
menu 2:Xmit Transmitter Opt. For additional information see instructions packed with sensor.
Loop # = 2 Since this is a single zone sensor the M1 default Loop # 0 will recognize the built-in reed switch immediately. It
is not mandatory to change (program) the Loop from 0 to 2. However, if this sensor is replacing a previous sensor that was
programmed with Loop # equal to 1 or 3, this sensor will not be recognized by the M1 until the Loop is reprogrammed to a
value of 2.
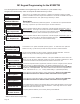
Set the Supervision Type as “0”. This is mandatory! Use Menu 14, sub-menu 2:Xmit Transmitter Opt.
Program the Zone Def. as 15-KEYFOB using Menu 5:Zone Definitions.
Key (button) functions may be modified using Menu 14, sub-menu 4:KeyfobSel Event Definition.
By factory default key (button) 1=Arm, 2=Disarm, and 3=Inquiry (System Status).
Keys (buttons) 1,2,3,4 may be converted to respond as 5,6,7,8 by enabling Option 1 using Menu 14, sub-menu 2:Xmit
Transmitter Opt.
Loop # = {For keychain remotes the Loop # does not matter}
Use Enroll Method 2
Use Enroll Method 2
Use Enroll Method 2
Use Enroll Method 4
Use Enroll Method 4
Enrollment and programming of wireless devices may be done from Keypad Installer Programming or from ElkRP
Enrollment from Keypad Installer Programming utilizes Menu 14 and the LRN (Learn) method. The enroll method varies between sensors. Please
follow the specific enroll method suggested below and read the additional programming recommendations.
Enrollment from the ElkRP software involves typing in the TXID (serial number of the sensor) along with selecting the particular attributes.
Single Button Panic Xmtr
Ademco Part # 5802, 5802MN
Holdup Switch Xmtr
Ademco Part # 5869
Use Enroll Method 3 NOTE: Program Zone Def. as KEYFOB. The single button responds as KEY 4 and MUST be assigned a
functionality as Key # 4 under SubMenu 4. Consider setting the zone as non-supervised if customer is likely to carry sensor away from
the premises. This helps prevent nuisance missing transmitter troubles. Refer to WZnxxx 02 (Supervision Type).
Enroll Manually by typing in the Xmtr ID NOTE: Select Zone and press the left arrow "HW". Type in the Xmtr Decimal ID
shown on the unit. Set Loop to "1". Since this type of holdup sensor is generally fix mounted, the zone can and should be programmed
as supervised. Refer to WZnxxx 02 (Supervision Type).
Wireless Outdoor Motion Sensor
Xmtr
Ademco Part # 5800PIR-OD
Use Enroll Method 2
Panic Xmtr w/Dbl Key Press
Ademco Part # 5802MN2
Enroll Manually by typing in the Xmtr ID NOTE: Select Zone and press the left arrow "HW". Type in Xmtr Decimal ID
shown on the unit. Set Loop to "1". Program Zone Def. as desired. Consider setting the zone as non-supervised if customer is likely to
carry sensor away from the premises. This prevents nuisance missing transmitter troubles. Refer to WZnxxx 02 (Supervision Type).
Flood / Temperature Xmtr,
3 Channels
Ademco Part # 5821
Use Enroll Method 2B NOTE: This Xmtr has 3 inputs and can be enrolled into 3 zones. The inputs have Loop # assignements
which must be set for each zone. The 1st zone could be Loop 1, the 2nd Loop 2, and the 3rd Loop 3. See sensor instructions. Repeat
the enroll process each of the other zones prior to setting their Loop #. Ext. inputs are N/C by default, but can be changed to N/O by
setting zone option WZnxxx 04 (Enable Option 2) to YES.
Use Enroll Method 2B NOTE: This Xmtr can be configured as a stand-alone temperature sensor and/or as either a Remote
Temperature Sensor OR Flood Detector. Each channel must have its own zone and Loop # assignment of 1, 2, or 3. Refer to sensor
instructions. Repeat the enroll process for each of the other zones prior to setting their Loop #.
Enroll
Method
1
Enroll
Method
3
Enroll
Method
2
Enroll
Method
1
Keypad
Enroll
Method
Elk 6000 Series Wireless Sensors