
Installation manual


M1XRFTW Installation Manual Page 9
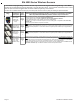
Enrolling Sensors from the M1 Keypad Installer Programming (additional details on following pages)
NOTE: The M1XRFTW must be enrolled on the data bus at address 2.
1. From M1 Keypad Installer Programming scroll or navigate to Menu: 14-Wireless Setup
2. Press right arrow and scroll up to Sub-Menu: 3:Learn Sel
bb
bb
bPrg
rr
rr
r WirelessTransmtr
3. Press right arrow WZone and search of scroll to the first available (unused) location displaying TransmitrToLrn. An existing
or already enrolled location will display Enrolled followed by a 6 digit TXID number of the enrolled sensor.
4. After finding an available wireless zone location press the right arrow to Lrn (Enroll) a sensor into this location.
5. The keypad will display Push Transmitter Button and the M1G will announce: "Press transmitter button for zone __". On
successful enrollment the keypad will chime and the TXID will briefly display. The M1G will announce: "Zone __ Enrollment".
The Rapid-Enroll feature will advance to the next available wireless zone in sequence and wait for another sensor to be enrolled.
The M1G will announce: "Press transmitter button for zone __". The Rapid-Enroll may be exited by pressing the ELK key.
ENROLL METHOD 1 -
A. Insert Battery in the Sensor while M1 is displaying "Push Transmitter Button". If battery is already installed then remove
it and wait 5 seconds before re-inserting.
B. Upon successful enrollment the Keypad will chime and briefly display the 6 digit TXID code of the Sensor.
- If enrollment FAILS the TXID will not display. If that happens then remove the battery, wait 5 seconds, then re-insert.
ENROLL METHOD 2 - For Sensors with Multiple Zone Inputs. The enrollment must be repeated for each additional Zone Input.
The TXID will be the same for each. We strongly recommend enrolling the additional zone(s) in sequence with the 1st.
A. For the internal reed switch Zone (LP2) insert the Battery into the Sensor while M1 is displaying Push Transmitter Button.
B. Upon successful enrollment the Keypad will chime and briefly display the 6 digit TXID code of the Sensor.
- If enrollment FAILS the TXID will not display. If that happens then remove the battery, wait 5 seconds, then re-insert.
The
Rapid-Enroll feature will auto advance to the next wireless zone.
C. To enroll the next Zone (marked LP1) on this sensor REMOVE the Battery and wait 5 seconds. Then re-insert Battery into
the sensor. Repeat this step to enroll the next Zone (marked LP3).
D. The Loop # must be progammed uniquely for each input since the TXID will be the same for all 3 available wireless zones.
ENROLL METHOD 3 - KEYCHAIN REMOTES
A. PRESS and HOLD button 1 or button 2 on the Keychain Remote while M1 is displaying Push Transmitter Button.
B. Upon successful enrollment the Keypad will chime and briefly display the 6 digit TXID code of the Sensor.
- If enrollment FAILS the TXID will not display. If that happens then remove the battery, wait 5 seconds, then re-insert.
NOTE: If the M1 Lrn (Enroll) function times out or is manually exited then It may be necessary to restart from Step 1
6. To end Rapid-Enroll once all wireless zones (sensors) have been enrolled, press the ELK key one time.
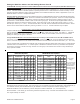
7. Loop # - For internal reed sensors like the ELK-6020 and 6021, the Loop # setting should be set to 2, but the M1 factory default
loop value of 0 will actually recognize the reed switch without the need of changing the Loop from 0 to 2. For multi-zone sensors
like the ELK-6022 it is VERY IMPORTANT to set the Loop #. For Keychain remotes the Loop # setting does not matter!
To set the Loop # scroll up or down to the desired M1 wireless zone and press the left arrow. The screen will display a 9 digit
number (the TXID in decimal) followed by Loop=. Press the right arrow and move cursor over to Loop=. Refer to the "Elk 6000
Series Wireless Sensors" for more information.
8. Program the Zone Def. using Menu 5: Zone Definitions.
Enrolling Sensors from the ElkRP Software
1. Launch ElkRP and open the desired Customer Account file.
2. If no wireless zones currently exist in the M1 you will first need to create a group of 16 wireless zones. In the folders column
right click on Zones (Inputs), then click New Wireless Zones. Select Group 2. NOTE: The first M1XRFTW must be enrolled at
data bus address 2, therefore the first wireless zone will always be Zone 17 which resides in Group 2. Additional groups of
16 zones may be added as required. It a hardwired zone expander is occupying address 2 it will have to be relocated to another
address so that the M1XRFTW can be at address 2. Up to 3 additional M1XRFTW Transceivers may added for expanded
coverage. If so, they must be enrolled at addresses 3, 4, and 5 respectively. If a large quantity of wireless zones is expected,
avoid enrolling hardwired expanders in data bus addresses below 10. This will allow for the maximum of 144 wireless zones.
3. Program the Zone Definition,Name,Type, and desired options by clicking on: Wireless Group (the group just added). Then
select each zone one at a time to program. Zones definitions may be assigned before or after sensor enrollment.
4. To enroll the sensors click on: Wireless Setup from the folders column.
A. Click the > Transmitters tab, then double click a zone.
B. Place a check mark in the Enabled box.
C. Set Supervision type as either: 0=Non Supervised (Keyfobs), 1=Normal “Burg” Supervision, or 2=Fire Supervision
D. TXID # - type in the Sensor TXID printed on the label on the inside and outside of the sensor.
E. LOOP # - Refer to step 7 above and the "Elk 6000 Series Wireless Sensors" for more information.
F. Click Save. Repeat the entire step 4 for each additional Wireless Sensor.
IMPORTANT! For sensors with multiple zone inputs such as the ELK-6022 the enrollment must be repeated for each additional
Zone Input and the TXID will be the same for each. We strongly recommend enrolling the additional zone(s) in sequence with
the 1st. The Loop # must be programmed correctly to identify which zone input belongs with which wireless zone.
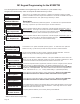
'Quick Step' Enrollment of Elk 6000 Series Sensors