General Embroidery FACTS AND QUESTIONS
General Embroidery FAQ Page Q1 Needle 3 3 Q1-1 What kind of needle should I use? Q1-2 When should I replace the needle? 3 3 3 3 3 3 Q2 Thread Q2-1 What kind of thread should I use for the needle thread (upper thread)? Q2-2 What kind of thread should I use for the bobbin thread (lower thread)? Q2-3 How should I trim the needle thread (upper thread)? Q2-4 How should I trim the bobbin thread (lower thread)? Q2-5 How should I wind the bobbin evenly? Q2-6 What do I do if there is not enough thread on the bob
FAQ Q1 NEEDLE Q1-1 What Kind of needle should I use? A1-1 The blue tip needles (Part #813404013) that come with the embroidery machine is recommended. You can also use Organ needle HA x 1 #11, HA x 1SP #11. Contact the store from which the machine was purchased for more details. Q2 THREAD Q2-1 What kind of thread should I use for the needle thread (upper thread)? Jump thread are the threads left when the machine finishes one shape and starts a new one.
FAQ Q3 FABRIC Always test sew before starting embroidery. Q3-1 How should I embroider a towel? A3-1 Attach a water soluble emboidery Topping on the towel, and embroider. Embroidering on the towel without using a water soluble embroidery Topping may cause a malfunction of the embroidery machine or fraying of the towel. Do not embroider on a highpile towel. The thickness of the towel should be about 0.3 cm (1/8in) or less. Q3-2 A3-5 Using a water soluble stabilizer is recommended.
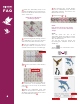
FAQ Draw the centerlines on the paper of the stabilizer, and attach the fabric to the stabilizer matching the positioning lines of the hooping fabric. Q3-10 Q3-11 A3-10 A3-11 Score the paper on the sticky stabilizer just a little smaller than the embroidery fabric. Score the paper on the sticky stabilizer just a little smaller than the embroidery fabric. Cut out a square hole 1cm (3/8”) smaller than the embroidery fabric. Attach the embroidery fabric to the stabilizer.
FAQ Q3-12 How should I use a stabilizer? A3-12 To create the best quality embroidery, attach a stabilizer to the wrong side of the fine fabric. Stabilizer usage varies depending on the fabric. Refer to the following chart. Iron-on • Adhere with an iron to the wrong side of the fabric. • Nonwoven type: Remove the nonwoven type after the embroidery. • Woven type: Use the woven type if it is not necessary to remove the stabilizer.
FAQ Q4 OTHER FAQ Q4-1 I want better looking finish on the rear side of the embroidery design. A4-1 Use the same thread for the needle and bobbin threads. Q4-2 Will there be any more designs with this machine? A4-2 New designs are added from time to time. Check back frequently for the latest! Q4-3 How should I adjust the position of the hoop? A4-3 Press the jog buttons on top of the machine to adjust the position of the hoop.
FAQ Attach the embroidery hoop to the machine and adjust the hoop position so that the needle drops at the intersection of the center lines. After finishing the second design, remove the embroidery hoop from the embroidery machine and remove the fabric from the hoop. Repeat steps to . Raise the needle before pressing jog keys.
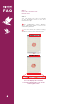
FAQ Q4-7 How can I check the next thread color? A4-7 You can check the color of thread on the “Real-time screen” in the “dot Customizer” app. The confirmation screen appears when embroidery data is sent to the embroidery machine. You can check the current sewing situation, current color and next color. You can display the real-time screen by tapping the icon on the lower right corner.