MT3600 (2.15 cu.in) - MT4000 (2.38 cu.
INTRODUCTION en To correctly use the chain saw and prevent accidents, do not start work without having first carefully read this manual. You will find explanations concerning the operation of the various parts plus instructions for necessary checks and relative maintenance. Note: Illustrations and specifications in this manual may vary according to Country requirements and are subject to change without notice by the manufacturer. THE OPERATOR’S MANUAL Your operator’s manual is for your protection.
TABLE OF CONTENTS en PRODUCT IDENTIFICATION Chain Saw Components . . . . . . . . . . . . . . . . . . . . . . . . . . . . . . . . . . . . . . . . . . . . . . . . . . . . . 4 SAFETY Understanding Safety Labels . . . . . . . . . . . . . . . . . . . . . . . . . . . . . . . . . . . . . . . . . . . . . . . . . State and Local Requirements . . . . . . . . . . . . . . . . . . . . . . . . . . . . . . . . . . . . . . . . . . . . . . . . 5 5 SAFETY RULES Basic Safety Precautions . . . . . . . . . Fuel Handling .
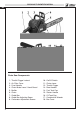
PRODUCT IDENTIFICATION en Chain Saw Components 1 2 3 4 5 6 7 8 9 4 - Throttle Trigger Lockout - Air Filter Cover - Front Handle - Chain Brake Lever / Hand Guard - Muffler - Chain - Guide Bar - Guide Bar Adjusting Screw - Carburetor Adjustment Screws 10 11 12 13 14 15 16 17 18 - On/Off Switch - Choke Lever - Throttle Trigger - Rear Handle - Fuel Tank Cap - Starter Handle - Oil Tank Cap - Combination Wrench - Bar Cover
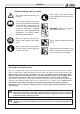
SAFETY en Understanding Safety Labels - This symbol indicates Warning, and Caution. - Your manual contains special messages to bring attention to potential safety concerns, machine damage as well as helpful operating and servicing information. PLEASE READ ALL THE INFORMATION CAREFULLY TO AVOID INJURY AND MACHINE DAMAGE. - Wear eye, hearing and head protection when operating this equipment. - Wear non-slip, heavy-duty protective gloves when handling the chain saw and saw chain.
SAFETY en 6 WARNING: Exposure to vibrations through prolonged use of gasoline powered hand tools could cause blood vessel or nerve damage in the fingers, hands, and wrists of people prone to circulation disorders or abnormal swellings. Prolonged use in cold weather has been linked to blood vessel damage in otherwise healthy people.
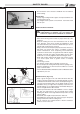
SAFETY RULES en Basic Safety Precautions 1 35 ft 2 3 4 5 • Read this manual carefully until you completely understand and can follow all safety rules, precautions, and operating instructions before attempting to use the unit. • Restrict the use of your saw to adult users who understand and can follow safety rules, precautions, and operating instructions found in this manual. Minors should never be allowed to use a chainsaw.
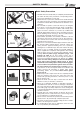
SAFETY RULES en Fuel Handling 6 7 8 9 10 ft 10 8 WARNING: Gasoline is an extremely flammable fuel. Use extreme caution when handling gasoline or fuel mix. Do not smoke or bring any fire or flame near the fuel or the chainsaw (Fig. 7). • To reduce the risk of fire and burn injury, handle fuel with care. It is highly flammable. • Mix and store fuel in a container approved for gasoline (Fig. 8). • Mix fuel outdoors where there are no sparks or flames.
SAFETY RULES en 11 12 • As an additional safety precaution, apply the chain brake prior to setting down the saw. • Only use the chain saw in well-ventilated places, do not operate the chain saw in explosive or flammable atmospheres or in closed environments (Fig. 12). Beware of carbon monoxide poisoning. • Do not operate saw from a ladder or in a tree. Always cut from a firm-footed and safe position. • Do not put pressure on the saw at the end of the cut.
SAFETY RULES en • Do not twist the saw as the bar is withdrawn from an undercut when bucking. Avoid Pull-In: • Always begin cutting with the engine at full speed and the saw housing against wood. • Use wedges made of plastic or wood. Never use metal to hold the cut open. 16 Reduce the Risk of Kickback Recognize that kickback can happen. With a basic understanding of kickback, you can reduce the element of surprise which contributes to accidents.
SAFETY RULES en • Do not cut above shoulder height. It is difficult to maintain control of saw above shoulder height. Kickback Safety Features WARNING: The following features are included on your saw to help reduce the hazard of kickback; however, such features will not totally eliminate this dangerous reaction. As a chain saw user, do not rely only on safety devices.
SAFETY RULES en WARNING: WE DO NOT REPRESENT AND YOU SHOULD NOT ASSUME THAT THE CHAIN BRAKE WILL PROTECT YOU IN THE EVENT OF A KICKBACK. DO NOT RELY UPON ANY OF THE DEVICES BUILT INTO YOUR SAW. YOU SHOULD USE THE SAW PROPERLY AND CAREFULLY TO AVOID KICKBACK. Reduced-Kickback Guide Bar and Low-Kickback Chain Reduced-kickback guide bars and low-kickback saw chains reduce the chance and magnitude of kickback and are recommended. Your saw has a low kickback chain and bar as original equipment.
SAFETY RULES en WARNING: The computer derived angles of par. 5.11 of ANSI B 175.1 – 1991 may bear no relationship to actual kickback bar rotation angles that may occur in real life cutting situations. In addition, features designed to reduce kickback injuries may lose some of their effectiveness when they are no longer in their original condition, especially if they have been improperly maintained. Compliance with par. 5.11 of ANSI B 175.
SAFETY RULES en • • • • Never touch the chain or attempt to service the saw while the engine is running. Never use fuel for cleaning operations. Keep the chain saw in a dry place, off the ground with the chain guard on and the tanks empty. If your chain saw is no longer usable, dispose of it properly without damaging the environment by handing it in to your local Dealer who will arrange for its correct disposal. • Replace immediately any safety device when damaged or broken.
ASSEMBLY en Assembling the Bar and Chain 20 21 22 WARNING: Check the chain tension frequently when operating the chain saw. Never touch or adjust the chain while the engine is running. The saw chain is very sharp, always wear protective gloves when performing maintenance to the chain. 1 Ensure that the chain brake is not set by pulling the chain brake lever / hand guard towards the front handle as shown in Fig. 20.
ASSEMBLY en 13. Chain is correctly tensioned when there is no slack on the underside of the guide bar, the chain is snug, but it can be turned by hand without binding, see Fig. 28. Ensure that the chain brake is not set. NOTE: If chain is too tight, it will not rotate. Loosen bar nuts slightly and turn adjusting screw 1/4 turn counterclockwise. Lift the tip of the guide bar up and retighten bar nuts. 25 26 27 28 16 WARNING: Check the chain tension frequently when operating the chain saw.
OPERATION en Chain Tension WARNING: Never touch or adjust the chain while the motor is running. The saw chain is very sharp, always wear protective gloves when performing maintenance to the chain. 29 30 31 1. Stop the engine before setting the chain tension. Loosen the guide bar nuts slightly, turn the chain tensioning screw clockwise to tension the chain. Refer to Assembly-Assembling the Bar and Chain Section. Retighten guide bar nuts.
OPERATION en Bucking Spike 34 WARNING: Your chain saw may be fitted with an optional bucking spike (G, Fig. 34). The bucking spike is very sharp and can cause injury. Be extremely careful when working near the bucking spike. Fueling 35 36 (Do Not Smoke!) This product is powered by a 2-cycle engine and requires premixing gasoline and 2-cycle oil. Pre-mix unleaded gasoline and 2cycle engine oil in a clean container approved for gasoline (Fig. 35).
OPERATION en NOTE: 2-Cycle Engine Oil contains a fuel stabilizer and will stay fresh up to 30 days. DO NOT mix quantities larger than usable in a 30 day period. A 2-cycle oil containing a fuel stabilizer is recommended. Fuel Mixture 2-Cycle Engine Oil (25:1) 4% 10 ft 38 39 Gasoline Oil 1 Gallon (US) . . . . . . . . . . . . . . . . . . . . . . . . . 5.2 oz. 1 Liter . . . . . . . . . . . . . . . . . . . . . . . . . . . . . . 40 cc (40 ml) Filling the Tank (Fig. 39) 1. 2. 3. 4. 5.
OPERATION en 1. Fill the oil tank every time engine is fueled. Chain saw should use approximately one tank of oil per tank of fuel. 2. The automatic oil pump is a positive displacement pump operated through gears driven off the clutch drum assembly. The pump will not oil at idle speeds. Preparation for Cutting Proper Grip on Handles. Refer to Safety Section for appropriate Safety Equipment. 1. Wear non-slip gloves for maximum grip and protection. 41 42 WARNING: Hold the saw firmly with both hands.
OPERATION en Work Area Precautions 35 ft 44 WARNING: Cut only wood or materials made from wood. Do not cut metal, plastics, masonry, or non-wood building materials. • Never allow children to operate your saw. Only allow others to use this chainsaw who have read this Operator's Manual or received adequate instructions for the safe and proper use of this chain saw. • Keep everyone - helpers, bystanders, children, and animals a safe distance from the cutting area (Fig. 44).
OPERATION en 47 48 • Move the on/off switch (A) to the start position “I”. • Pull the choke lever (B) to the full choke (fully extended position or closed position 1, Fig.47). The half-throttle is automatically set when choke lever is set at Full Choke. • Pull the starter rope until the first firing of the engine is heard (no more than five (5) pulls). A new unit may require additional pulls. • Push the choke lever to the half choke position 2, Fig. 48. • Pull the starter rope until the engine starts.
OPERATION en Difficult Starting (or starting a flooded engine) The engine may be flooded with too much fuel if it has not started after 10 pulls. Flooded engines can be cleared of excess fuel by following the warm engine starting procedure listed above. Ensure the ON/STOP switch is in the ON position. Starting could require pulling the starter rope handle many times depending on how badly the unit is flooded. If engine fails to start refer to the TROUBLESHOOTING TABLE (page 35).
OPERATION en Chain Brake Operation (A) (B) 55 56 Refer to Safety-Chain Brake Section before use. The chain brake Run Position (A, Fig. 55) and Brake Position (B) are illustrated below. The chain brake operating condition should be checked prior to each use as follows: 1. Start the engine and grasp front and rear handles securely with both hands. 2. Pull the throttle trigger to bring the chain saw up to full speed.
OPERATION en WARNING: Periodically glance at the top of the tree during the backcut to assure the tree is going to fall in the desired direction. WARNING: If the tree starts to fall in the wrong direction, or if the saw gets caught or hung up during the fall, LEAVE THE SAW AND SAVE YOURSELF! 58 59 60 61 62 • Carefully plan your sawing operation in advance. • Clear the work area. You need a clear area all around the tree so you can have secure footing.
OPERATION en DO NOT cut down a partially fallen tree with your saw. Be extremely cautious with partially fallen trees that may be poorly supported. When a tree doesn’t fall completely, set the saw aside and pull down the tree with a cable winch, block and tackle, or tractor. 63 Buttress Roots A buttress root is a large root extending from the trunk of the tree above ground. Large buttress roots should be removed prior to felling. Make the horizontal cut (A, Fig.
OPERATION en Logs Under Stress (Fig. 66-67) Make the first bucking cut (F) 1/3 of the way through the log and finish with a 2/3 cut (G) on the opposite side. As the log is being cut, it will tend to bend. The saw can become pinched or hung in the log if you make the first cut deeper than 1/3 of the diameter of the log. Give special attention to logs under stress to prevent the bar and chain from pinching. Types of Cutting Used Overbucking (Fig.
OPERATION en 72 73 Limbing Operation (Fig. 72-73) • Always limb a tree after it is cut down. Only then can limbing be done safely and properly. • Leave the larger limbs underneath the felled tree to support the tree as you work. • Start at the base of the felled tree and work toward the top, cutting branches and limbs. Remove small limbs with one cut. • Keep the tree between you and the chain. Cut from the side of the tree opposite the branch you are cutting.
MAINTENANCE en Chain Maintenance 76 77 Use only Dual Raker low-kickback chain on this saw. This fast-cutting chain will provide kickback reduction when properly maintained. For smooth and fast cutting, raker chain needs to be maintained properly. The chain requires sharpening when the wood chips are small and powdery, the chain must be forced through the wood during cutting, or the chain cuts to one side. During maintenance of your chain, consider the following: 1.
MAINTENANCE en 82 83 84 Top Plate Angle File holders are marked with guide marks to align file properly to produce correct TOP PLATE ANGLE (Fig. 82). G) CORRECT- 30° H) LESS THAN 30° - For Cross Cutting. I) MORE THAN 30°- Feathered Edge Dulls Quickly. Side Plate Angle (Fig. 83) J) CORRECT- 85° - 90° Produced automatically if correct diameter file is used in file holder. K) “HOOK”- “Grabs” and dulls quickly. Increases potential of KICKBACK.
MAINTENANCE en Carburetor Adjustment 87 Before adjusting the carburetor, clean the starter cover vents as shown in Fig. 87, and air filter as shown in Fig. 88, refer to Operation-Starting Unit and Maintenance-Air Filter Sections for details. Allow the engine to warm up prior to carburetor adjustment. This engine is designed and manufactured in order to comply with CARB (California Air Resources Board) and EPA (Environmental Protection Agency) regulations.
MAINTENANCE en Starter Unit Use a brush to keep the cooling vents of the starter assembly free and clean of debris (Fig. 92). 92 WARNING: The coil spring is under tension and could fly apart causing serious injuries. Never try to disassembly or modify it. Engine Clean the cylinder & flywheel fins with compressed air or a brush periodically (Fig. 93). Dangerous overheating of engine may occur due to impurities on the cylinder.
MAINTENANCE en • • • • 96 97 Remove the muffler shield (C), cover (D) and diffuser (E). Remove the muffler body screw (F) and muffler body (G). Clean and inspect the spark arrester screen (A). Reassemble components in reversed order of removal and torque the screw to 45 in/lbs (4.9 Nm) and the muffler nuts to 70 in/lbs (7.9 Nm). WARNING: If the spark arrester screen is damaged, faulty or deteriorated, replace the muffler body or entire muffler assembly.
TROUBLESHOOTING en Using Troubleshooting Chart WARNING: Always stop unit and disconnect spark plug before performing all of the recommended remedies below except remedies that require operation of the unit. When you have checked all the possible causes listed and you are still experiencing the problem, see your Servicing Dealer. If you are experiencing a problem that is not listed in this chart, see your Servicing Dealer for service.
STORAGE en Storing Chain Saw WARNING: Stop engine and allow to cool, and secure the unit before storing or transporting in a vehicle. Store unit and fuel in an area where fuel vapors cannot reach sparks or open flames from water heaters, electric motors or switches, furnaces, etc. Store unit with all guards in place. Position so that any sharp object cannot accidentally cause injury to passersby. Store the unit out of reach of children and other unauthorized persons. 1.
en WARNING: To ensure safe and correct operation of the chainsaw, this operator's manual should always be kept with or near the machine. Do not lend or rent your chainsaw without the operator's instruction manual. AVERTISSEMENT: Afin de garantir un fonctionnement correct et en toute sécurité de la tronçonneuse, il est recommandé de toujours conserver le manuel de l'utilisateur à proximité de la machine.