EATC08RE1 EATC12RE1 EATC14RD2 EATC10RE1 EATC12RE2 EATH14RD2 EATC10RE2 EATE12RD2
CONTENTS IMPORTANT SAFETY INSTRUCTIONS ....................1 INSTALLATION INSTRUCTIONS ................................4 NORMAL SOUNDS ...................................................18 AIR CONDITIONER FEATURES ...............................18 CARE AND CLEANING .............................................20 TROUBLESHOOTING TIPS ......................................
● Plug in power plug properly. Otherwise, it may cause electric shock or fire due to excess heat generation. ● Do not operate or stop the unit by inserting or pulling out the power plug. It may cause electric shock or fire due to heat generation. ● Do not damage or use an unspecified power cord. It may cause electric shock or fire. If the power cord is damaged, it must be replaced by the manufacturer or an authorised service centre or a similarly qualified per son in order to avoid a hazard.
● When the air filter is to be removed, do not touch the metal parts of the unit. It may cause an injury. ● Do not put a pet or house plant where it will be exposed to direct air flow. This could injure the pet or plant. ● Ventilate the room well when used together with a stove, etc. An oxygen shortage may occur. ● Do not use strong detergent such as wax or thinner but use a soft cloth. Appearance may be deteriorated due to change of product color or scratching of its surface.
Do not unplug and plug in the cord to turn the unit on or off.
needed
If there is an existing sleeve and rear grille, they will need to be replaced by the one included in the accessory kit.
and
and
and
and
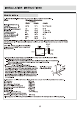
Install (2) tapered spacer blocks to the floor of the sleeve as shown. with the tapered end 1/2 from the back of the sleeve. This helps induce a rearward slop on the unit. 3.
and
and
and
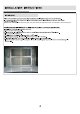
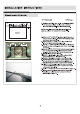
The previous directions are the preferred installation method for the rear grille for optimal performance. Only use the Direct Mounting option as a last resort. As a last resort, direct mounting of the grille to the unit can be considered. Align the top of the grille with the top of the unit making sure the overhang on both sides is equal.
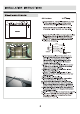
between the wall-sleeve and the unit using a flat-head screwdriver or putty knife.
Before you begin, thoroughly familiarize yourself with the control panel and functions (shown below). This unit can be controlled by the control panel or with the included remote. default to seen on the display and the temperature will be automatically maintained.
Press to select the Fan Speed: Auto, Low, Med, or High. On certain models the fan speed cannot be adjusted under HEAT mode. On Dry mode the Fan Speed will automatically be set to Low. The new temperature will be maintained for 6 hours then it will return to the previously programmed setting. The LED (light) will illuminate after 250 hours of operation as a reminder to clean the Air Filter for optimal performance.
Here are more control features you should be familiar with: The Cool circuit has an automatic 3-minute time delay if the unit is turned off and on quickly. This is a safeguard to prevent overheating of the compressor and possible tripping of the circuit breaker. The fan will continue to run during this time. The temperature can be displayed in either Fahrenheit or Celsius. To change, press and hold the Left and Right Temp/Timer buttons at the same time for 3 seconds.
Take the filter by the center and pull up and out. Wash the filter using liquid dishwashing detergent and warm water. Rinse filter thoroughly and gently shake to remove excess water from the filter. Gently shake excess water from the filter. Be sure the filter is thoroughly dry before replacing. The filter can also be vacuumed to remove dust and debris. Before calling for service, review the following Troubleshooting Tips.
and Please call Customer Service: 1-844-801-8880