HOME THEATER SYSTEM with DVD/AUDIO CD PLAYER DOLBY DIGITAL DECODER and AM/FM DIGITAL TUNING RECEIVER OWNERS MANUAL AV101 Visit our web site at www.emersonradio.
Welcome... Warning And thank you for purchasing this Emerson Audio/Video Home Theater System. This state of the art system includes everything you need to experience movie theater quality digital video and audio in the comfort of your own living room. The only thing you need to add is your own TV. We have designed this system to be easy to set up, and even easier to use.
IMPORTANT SAFETY INSTRUCTIONS (CONTINUED) Before using the unit, be sure to read all operating instructions carefully. Please note that these are general precautions and may not pertain to your unit. For example, this unit may not have the capability to be connected to an outdoor antenna. 1. 2. 3. 4. 5. 6. 7. 8. 8A. 9. 10. 11. 12. 13. 14. 2 READ INSTRUCTIONS All the safety and operating instructions should be read before the product is operated.
IMPORTANT SAFETY INSTRUCTIONS (CONTINUED) 15. OVERLOADING Do not overload wall outlets and extension cords as this can result in a risk of fire or electric shock. 16. OBJECT AND LIQUID ENTRY Never push ojects of any kind into this product through openings as they may touch dangerous voltage points or short out parts that could result in fire or electric shock. Never spill or spray any type of liquid on the product. 17.
IMPORTANT SAFETY INSTRUCTIONS (CONTINUED) FCC NOTICE: This equipment has been tested and found to comply with the limits for a Class B digital device, pursuant to part 15 of the FCC Rules. These limits are designed to provide reasonable protection against harmful interference in a residential installation. This equipment generates, uses, and can radiate radio frequency energy and, if not installed and used in accordance with the instructions, may cause harmful interference to radio communications.
Table of Contents Warnings and Cautions Setting and Adjustments Welcome ................................................................................1 UL Safety Instructions ........................................................1-3 FCC Notice .............................................................................4 Using the SETUP Menu and Navigation Buttons ........................31 SETUP Menu Listing ................................................................32 TV Display Setting ......
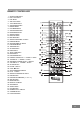
LOCATION OF CONTROLS AND INDICATORS Main Unit (Front View) 1. POWER button 2. STANDBY button 3. Standby LED 4. Disc Tray 5. Remote SENSOR 6. Display 7. MASTER VOLUME Control 8. MEMORY Button 9. TV Button 10. VIDEO Button 11. TUNER Button 12. DVD Button 13. MONO/ST. Button 6 14. PAUSE ; Button 15. PLAY 4 Button 16. STOP < Button 17. OPEN/CLOSE Button 18. SKIP Forward : Button 19. SKIP Reverse 9 Button 20. TUNING Up 5 / Down 6 Button 21. PRESET STATION Up 5 / Down 6 Button 22. SELECT Button 23.
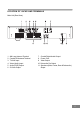
LOCATION OF JACKS AND TERMINALS Main Unit (Rear View) 1. 2. 3. 4. 5. 6. AM Loop Antenna Terminal Coaxial FM Antenna Terminal TV/AUX Input Video (Audio) Input Audio (DVD) Output S-Video Output 7. Coaxial Digital Audio Output 8. Power Cord 9. Video Output 10. Subwoofer Pre Output 11.
MAIN DISPLAY INDICATORS 1. Key Lock Indicator 2. Play/Pause Indicator 3. Dolby Digital Indicator 4. Dolby Surround Pro logic Indicator 5. DTS Indicator 6. DSP Mode Indicator 7. Dolby 3-Stereo Indicator 8. 2 Channel Stereo Indicator 9. Repeat 1/A-B Indicator 10. FM Stereo Indicator 11. Preset Station Indicator 8 12. Channel / Decibel / Milliseconds Indicators 13. Remain Time Indicator 14. Total Indicator 15. Night Indicator 16. Status Bar Indicator 17. Track Indicator 18. Chapter Indicator 19.
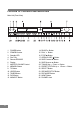
REMOTE CONTROLLER 1. 2. 3. 4. 5. 6. 7. 8. 9. 10. 11. 12. 13. 14. 15. 16. 17. 18. 19. 20. 21. 22. 23. 24. 25. 26. 27. 28. 29. 30. 31. 32. 33. 34. 35. 36. 37. 38. 39. 40. 41. 42. 43. 44.
Important Safeguards and Precautions Power Cord Protection To avoid any malfunctions of the unit, and to protect against electric shock, fire or personal injury, please observe the following: Hold the plug firmly when connecting or disconnecting the AC power cord. Keep the AC power cord away from heating appliances. Never put any heavy object on the AC power cord. Do not attempt to repair or reconstruct the AC power cord in any way.
Features of This System DVD player with built-in and Dolby Digital* decoder, supporting Dolby Pro Logic and Virtual Surround. 5.1 Channel amplifiers and subwoofer. AM/FM digital tuner. Compatible with DVD, MP3, CD-R/RW, KODAK PHOTO CDs and CD-DA discs. DVD navigation functions. Fluorescent front panel display and on screen display menu. Full function remote control. * Manufactured under license from Dolby Laboratories.
TYPES of DISCS That Can be Played on This System This player can playback discs bearing any of the following marks: Note-1 DVD players and discs are designed with region numbers which dictate the regions in which a disc can be played. If the region number on the disc you want to play does not match the region number in your DVD player, you will not be able to play the disc. If you try to play the DVD, the messageWRONG REGION will appear on the screen display.
Notes on Discs Disc handling precautions To keep the disc clean, handle the disc by its edge. Do not touch the surface. Do not stick paper or tape on the disc. If there is glue (or a similar substance) on the disc, remove the glue completely before using the disc. Do not expose the disc to direct sunlight or sources such as hot air ducts, or leave it in a car parked in direct sunlight as there can be considerable rise in temperature inside the car. After playing, store the disc in its case.
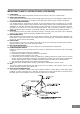
Installation Unpacking This section describes how to connect the system to the speakers, a TV monitor with audio / video input jacks and other video components. You cannot connect this system to a TV monitor which does not have a video input connector. Be sure to turn off the power of each component before making the connections. Check that you have the following items: Main unit (1). Subwoofer (1). Speakers (5). Remote control (1). Video cable (4 feet x 1). AM loop antenna (1).
Speaker System Connection Connect the supplied speaker system by matching the colors of the terminals and those of the cords. To avoid short-circuiting the speakers Make sure the stripped end of each speaker cord does not touch another speaker terminal or the stripped end of another speaker cord. The speaker cables and speaker terminals are color-coded for easier connection. Connect the Front Left and Right Speakers with Red/Black cables to the Main SPEAKERS Red/Black terminals on the back panel.
Antenna Connections Connect the supplied AM/FM antennas for listening to the radio. Connect the AM loop antenna to the AM terminals. Connect the FM antenna to the FM antenna terminal. Notes: To prevent noise pickup, keep the AM loop antenna away from the system and other components. Be sure to fully extend the FM antenna. After connecting the FM antenna, keep it as horizontal as possible. Tips for connecting antenna and speakers wires Push and hold Speaker terminal tab down to insert wire.
TV and Optional Component Connections Required cords Video cord for connecting a TV set (included). Audio cords (not included). When connecting a cord, be sure to match the color-coded pins to the appropriate jacks on the components. Notes: TV Connection-Normal (Connection Cable Included): To view the video from DVD discs on your TV set connect the Video Out jack of this system to the Video ln jack of your TV set. The Video jacks are usually colored yellow.
Basic System Set Up Speaker Positioning Information This chapter explain how to properly position your speakers; adjust the individual speaker levels; and preset up to 30 of your favorite AM/FM stations in the digital tuner memory. Your system is supplied with 5 compact sized satellite speakers and one subwoofer. The satellite speakers reproduce only the mid range and higher frequencies. All of the low frequency (bass) sounds are produced by the subwoofer.
Speaker Positioning Information (Continued) The 5 satellites can be positioned either vertically or horizontally. We have also included 20 pieces of rubber feet, 4 pieces per satellite speaker, in a small plastic bag with the other accessories.
Typical Speaker Set Up All 5 satellite speakers approximately same distance from your listening position. Center speaker directly above (or below) TV screen. Left and right front speakers at same height as center speaker. Rear speakers either in line with, or behind listening position, approximately at ear level, or slightly above, when seated. Subwoofer on floor near TV, or in corner, facing the listening position. All speakers must be visible.
Controls and Their Functions 1. Main POWER Switch Turns the main system power on and off. This switch must be set to the On position in order to operate the system by remote control. We suggest that you leave this switch in the On position unless the system will not be used for an extended period of time. 2. Standby Power Switch Turns the system on or off. (Main Power Switch must be in the On position.) 3. STANDBY Power Indicator Lights when the system is in the Standby (Off) mode.
Presetting Radio Stations You can preset up to 30 of your favorite AM and FM stations, in any combination, in the tuner memory for easy recall. 4. When the desired station appears on the display (example: FM 103.50 MHZ) press the MEMORY button on the front panel. (Note: There is no MEMORY button on the remote control.) The PRESET indicator and channel 01 indicators will flash in the display for 5 seconds. When the indicators stop flashing, the station is memorized in Preset Memory number 1. 5.
Playing Discs This chapter describes how to play a DVD/CD/MP3 disc. Basic Playback IMPORTANT: Please note that some DVD movie discs may not have all the features described in this chapter. For example, older movies may not allow you to select multiple camera angles. Refer to the instructions or liner notes that are included with each disc to determine what features and operations are available on that particular disc. 1.
Basic Playback (Continued) Frame By Frame Advance (Step Function) When a disc is inserted the following will occur depending on the type of disc inserted. When playing a DVD. A DVD menu or title menu may appear on the TV screen. When playing a CD or MP3. The CD will begin to play the disc from the first track. Note: While the disc is loading, the player will not respond to any commands.
Adjusting The Speaker Levels (TEST TONE) The levels of the five satellite speakers have been preset at the factory at 0 db. This means that if you were able to position all of the satellites the same distance from your normal listening position as recommended, the sound from all five satellites will sound equally loud at your normal listening position. This equality in the satellites will provide the most realistic surround sound experience.
Understanding the Individual DVD Disc Menu Most DVD movie discs will automatically display either a Title Menu or a Root Menu before the actual movie begins to play. When these menus appear at the beginning of a movie the PLAY or PLAY MOVIE command will usually be highlighted. If you press the PLAY or ENTER button on the remote the menu screen disappears and the movie begins to play.
Repeat Playback A-B Repeat Playback You can play all of the chapters in a title or an entire DVD disc repeatedly. You can play a specific portion in a chapter or track repeatedly. This is useful when you want to memorize lyrics or repeatedly watch a portion of the DVD or CD over and over. You can play all of tracks on an audio CD repeatedly. You can play a single title, chapter or track repeatedly. In program play mode, the system repeats the chapters or tracks in the programmed order. 1.
Program Play (Audio CDs only) You can play the contents of the disc in the order you want by arranging the order of the tracks on the disc to create your own program. One program can be stored in the system and contain up to 20 tracks. Note This function is not available for DVD and MP3 disc. We recommend that you turn your TV On while programming a CD since the Program Numbers only appear on the On Screen TV Display. They do not appear on the front panel display.
Selecting a Start Point by Chapter or Time Code You can start playback from a specific title or chapter on a DVD disc. Note: This function is not available on audio CDs or MP3 CDs. TO START PLAYBACK AT A SPECIFIC ELAPSED TIME You can start playback at any specific point in time on a DVD movie disc by entering a time code in the Time Menu. For example, to start playback at a point 1 hour and 15 minutes and 20 seconds from the start of the movie you would key in 0-1-1-5-2-0 as follows: 1.
Checking Disc Information Using Display Button You can check information about the disc, such as the total number of the titles or chapters, tracks or time, using the Display function. The information you want appears on the TV screen and/or on the front panel display. When playing back a DVD 1. Press the DISPLAY button once, the information about title number, chapter number and title elapsed time appears on the TV screen as shown below. When playing a normal audio CD 1. Press the DISPLAY button once.
Settings and Adjustments This chapter explains how to use the SETUP MENU to adjust various functions and controls. We have preset all of the functions and controls of this system at our factory to the preferred settings for the system to be used in North America. In most cases the original default settings should not be changed. However you may want to change certain default settings such as the language for the audio, the on screen displays, the subtitles, the parental control level, etc.
SETUP Menu Listing Following is a listing of all of the possible options for each setting in this system, as they appear on the menu pages. The factory default setting for each item is highlighted. Before you decide to change any of the factory default settings please review the specific explanation of each setting on the following pages to be sure you understand how the change will effect the operation of your system.
TV Display Setting Path: General Page TV Display TV Type Setting (Multi/NTSC/PAL) If you live in North America your TV broadcast system is NTSC, your TV set is either a NTSC TV or a multi system TV, and the DVD movies you buy or rent will be labeled NTSC system. The initial Default TV Type setting of this system is NTSC. This setting will allow NTSC discs to play properly on NTSC TVs. If you live in North America no further adjustment is necessary. You can skip to the next section.
Selecting Angle Mark Path: General Page Angle Mark Selecting the On Screen Display (OSD) Language We have preset the initial Default On Screen Display (OSD) Language to English. This means that all of the on screen menus and icons will appear in English. If English is your preferred language no adjustment is necessary and you can skip to the next section. If you wish to change the On Screen Display (OSD) Language to something else, your choices are French, German, Spanish.
Selecting Captions Path: General Page Captions Default Setting: Off Screen Saver Setting (SCR Saver) Path: General Page SCR Saver Some newer DVD movies include closed captioning for hearing impaired viewers. In addition to showing the dialog spoken by the actors on the bottom of the screen, like subtitles, the captioning feature also describes the other sounds that are being heard together with the dialog.
Preferences The preferences page allows you to select the default language for the audio, subtitles and disc menus, change the parental control setting to prevent children from viewing unsuitable material, and change the password which is needed in order to change the parental control level. Important: You cannot enter the Preferences page while a DVD disc is playing. If a disc is playing you must press the STOP button twice to completely stop playback. The STOP indicator appears on the front panel display.
Setting the Parental Control Level Path: Preferences Parental Default Setting: No Parental Many DVD movie discs contain Motion Picture Association rating codes. This home theater system recognizes the codes on those discs and provides a method for you to prevent children from viewing films that are unsuitable or objectionable. Important: If a disc does not include the MPAA coding it will play on this system regardless of the Parental Control level setting.
Special Functions Zoom Control This chapter describes how to use some special functions, such as subtitle selection, angle selection, etc. 1. Press the ZOOM button on the remote control during normal, slow or still (pause) playback. 2. If you press the ZOOM button repeatedly, the magnification level increases. Three magnification levels are available. On each press of ZOOM, the following message will appear on the TV screen.
Angle Selection Subtitle Language Selection Some DVD discs contain scenes which have been shot simultaneously from a number of different angles. For these discs, the same scenes can viewed from each of the different angles. (The recorded angles differ from disc to disc.) Note: This function can only be used for DVD discs on which subtitles have been recorded in multiple languages. 1. 2. While playing a title shot from different angles, the angle mark appears on the TV screen.
Other Functions Listening to the Radio This chapter describes how to use some functions contained in the system. i.e. listen to the radio, how to listen to an external source, how to select a listening mode, etc. To listen to preset radio stations Preset radio stations into the systems memory first (see Presetting Radio Stations on page 22). 1. Press the TUNER button on the main unit repeatedly until FM or AM appears on the front panel display. The last received station is tuned in. 2.
Listening to the Radio (Continued) To listen to non-preset radio stations Use manual or automatic tuning in step 2. For manual tuning, press TUNING (5or6) repeatedly. For automatic tuning, press and hold TUNING (5or6) until the frequency indicator starts to change automatically, then release the button. Adjusting the Left/Right Balance If your normal listening position is closer to one side of your room rather than in the exact center, you can compensate by adjusting the Balance control.
Listening to an External Source If other audio component(s) are connected to this system (see page 17) You can hear the external source through the speakers of this system. 1. You can press the TV or Video button to select the desired external source directly. 2. Operate the unit which is connected to this system. 3. Adjust the volume level by pressing the VOL 5/6 button on the front panel or remote control of this system.
Additional Information Troubleshooting If you experience any of the following difficulties while using the system, use this troubleshooting guide to help you remedy the problem. Should any problem persist, consult your nearest service center by calling 1-800-695-0098. No power. Is the power cord firmly plugged into the power outlet? One of the safety mechanisms may be operating. In this event, unplug the player from the power outlet briefly and then plug it in again. No picture.
Troubleshooting (Continued) The left and right sounds are unbalanced or reversed. Check that the speakers and components are connected correctly and securely. Adjust front balance parameter using CH. LEVEL and R/L +/buttons (see pages 41). Severe hum or noise is heard. Check that the speakers and components are connected securely. Check that the connecting cords are away from a transformer or motor, and at least 3 meters away from a TV set or fluorescent light.
Glossary Bit rate Value indicating the amount of video data compressed in a DVD per second. The unit is Mbps (mega bit per second). 1 Mbps indicates that the data per second is 1,000,000 bits. The higher the bit rate is, the larger the amount of data. However, this does not always mean that you can get higher quality pictures. Chapter Sections of a picture or a music piece on a DVD that are smaller than titles. A title is composed of several chapters.
Specifications 46
47
EMERSON RADIO CORP. LIMITED WARRANTY What does this warranty cover? Any manufacturing defects in original material, including original parts and workmanship, under normal use and conditions. For how long? For a period of ninety (90) days for labor and for a period of one (1) year for parts, from the date of original purchase in the U.S.
EMERSON RADIO CORP. EMERSON PART NO.