BP7407 44" & 52" Curva Sky 1/11/10 9:54 PM Page 1 READ AND SAVE THESE INSTRUCTIONS CURVA SKY™ 44” & 52” Damp & Wet Location Snugger Ceiling Fan Owner's Manual 44” Model Numbers for Damp Locations 52” Model Numbers for Damp Locations CF144BS00 CF152BS00 Brushed Steel Brushed Steel CF144CRM00 CF152CRM00 Chrome Chrome 44” Model Numbers for Wet Locations 52” Model Numbers for Wet Locations CF144WW00 CF152WW00 Appliance White Appliance White CF144ORB00 CF152ORB00 Oil Rubbed Bronze Oil Ru
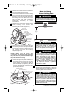
BP7407 44" & 52" Curva Sky 1/11/10 ! 9:54 PM Page 2 WARNING WARNING: To avoid fire, shock, and serious personal injury, follow these instructions. Safety Instructions 1. Read your owner’s manual carefully and keep it for future reference. 2. Before servicing or cleaning unit, switch power off at service panel and lock service panel disconnecting means to prevent power from being switched on accidentally.
BP7407 44" & 52" Curva Sky 1/11/10 9:54 PM Page 3 THE FAN MODELS CF144BS, CF144CRM, CF152BS & CF152CRM ARE SUITABLE FOR DAMP LOCATIONS SUCH AS COVERED PORCHES, COVERED PATIOS, AND COVERED DECKS...ANYWHERE THERE IS A ROOF OVERHEAD. THE FAN MODELS CF144WW, CF144ORB, CF152WW & CF152ORB ARE SUITABLE FOR WET LOCATIONS SUCH AS PORCHES, PATIOS, AND DECKS.
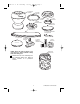
BP7407 44" & 52" Curva Sky 1/11/10 9:54 PM A. FAN MOTOR ASSEMBLY Page 4 B. CEILING TRIM RING E. LOWER HOUSING F. LIGHT KIT PLATE C. CEILING MOUNTING PLATE H. NO-LIGHT COVER PLATE D. FAN BLADES (3) K. 50W MINI CANDELABRA HALOGEN BULBS G. GLASS SHADE I. 6-SPEED ELECTRONIC RECEIVER J. 6-SPEED HANDHELD TRANSMITTER NOTE: Place the parts from the loose parts bags in a small container to keep them from being lost. L. LOOSE PARTS BAG PROTECTIVE PLASTIC BAG 2.
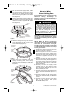
BP7407 44" & 52" Curva Sky 1/11/10 9:54 PM Electrical Requirements How to Assemble Your Ceiling Fan IMPORTANT: Your ceiling fan will not function properly, and may be damaged, if used with any wall dimmer switch or control other than the Emerson Electric Fan/Light Remote Control supplied with the fan. 1. Position the fan motor assembly upside down in preparation for mounting the three fan blades. 2. Slide blade through blade slot in fan housing assembly.
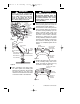
BP7407 44" & 52" Curva Sky 1/11/10 9:54 PM 6. Remove and retain the wire connectors from the white and blue wires. 7. Connect the white wire from the ceiling fan to the white wire of the light kit plate (Figure 3). Connect the blue wire from the ceiling fan to the black wire of the light kit plate. Use wire connectors (previously removed) to make connections. 8. Remove one of the three screws in the lower housing and loosen the remaining two screws (Figure 3).
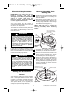
BP7407 44" & 52" Curva Sky 1/11/10 9:54 PM 2. Pull the electrical supply black, white and ground wires through the center opening of the ceiling mounting plate before securing the plate to the outlet box (Figure 6). How to Wire Your Ceiling Fan If you feel that you do not have enough electrical wiring knowledge or experience, have your fan installed by a licensed electrician. 3.
BP7407 44" & 52" Curva Sky ! 1/11/10 9:54 PM Page 8 WARNING ! Check to see that all connections are tight, including ground, and that no bare wire is visible at the wire connectors, except for the ground wire. Do not operate fan until blades are in place. Noise and fan damage could result. To avoid possible fire or shock, make sure that the electrical wires are completely inside the outlet box and not pinched between the ceiling mounting plate and the fan motor housing assembly.
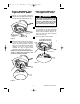
BP7407 44" & 52" Curva Sky 1/11/10 9:54 PM How to Assemble Your Light Kit Glass Shade How to Assemble Your No Light Cover Plate 1. Screw in two 50-watt (maximum) halogen mini candelabra base bulbs in the light kit plate sockets (Figure 13). 50-WATT (maximum) HALOGEN MINI CANDELABRA BASE BULBS (2) Page 9 ! WARNING Do not install any light bulbs into the light kit plate if using the cover plate.
BP7407 44" & 52" Curva Sky 1/11/10 9:54 PM REMOTE CONTROL PROCEDURES Page 10 Installation of Battery 1. Remove the battery cover by pressing firmly below the arrow and sliding the cover off the control (Figure 16). General Your Emerson Ceiling Fan/Light Remote Control consists of hand-held transmitter and a receiver which is mounted under the fan ceiling cover. The remote control is designed to separately control your ceiling fan speed and light intensity.
BP7407 44" & 52" Curva Sky 1/11/10 9:54 PM Page 11 Setting Operating Frequency of Remote Control Your remote control has code switches which must be set in one of 32 possible code combinations (Figure 16). The five levers (numbered 1, 2, 3, 4, and 5) on the switches are factory-set in the ON (up) position. Change the switch settings as follows (Figure 18): 1. Slide the five switch levers in the remote control to your choice of ON (up) or down positions.
BP7407 44" & 52" Curva Sky 1/11/10 9:54 PM Page 12 Maintenance Accessories IMPORTANT CARE INSTRUCTIONS for your Ceiling Fan 1. Downrod Extension Kits (see store or catalog). 2. Ceiling Fan Controls (see store or catalog). Periodic cleaning of your new ceiling fan is the only maintenance that is needed. When cleaning, use only a soft brush or lint free cloth to avoid scratching the finish.
BP7407 44" & 52" Curva Sky 1/11/10 9:54 PM Page 13 Remote Control Trouble Shooting Fan/Light Fails to Operate Short Range • Check that the speed switch on the fan is set to HIGH (....) speed. • Check that the light switch is on. • Check that the battery is good (red indicator light should light when any button is pressed). • Check that the receiver is wired properly. • Check that code switches in the remote control and receiver are set in the same position.
BP7407 44" & 52" Curva Sky 1/11/10 9:54 PM Page 14 Repair Parts Listing Damp Part Numbers Key Model No. Model No. No. Description CF144BS00 CF152BS00 Wet Part Numbers Model No. Model No. Model No. Model No. Model No. Model No.
BP7407 44" & 52" Curva Sky 1/11/10 9:54 PM Page 15 Repair Parts 1 14 2 17 3 13 8 - 52" 9 - 44" 15 4 16 10 5 11 5 6 12 Before discarding packaging material, be certain all parts have been removed. HOW TO ORDER REPAIR PARTS WHEN ORDERING REPAIR PARTS, ALWAYS GIVE THE FOLLOWING INFORMATION: • PART NUMBER • PART DESCRIPTION • NAME OF ITEM • MODEL NUMBER The model number of your Fan will be found on a label attached to the top housing. For repair parts, phone 1-800-654-3545. 15 UL Model No.
BP7407 44" & 52" Curva Sky 1/11/10 9:54 PM Page 16 LIMITED WARRANTY What The Warranty Covers: This warranty covers the motor and the other components and accessories of your Emerson ceiling fan against all defects in workmanship and materials. You must be the original purchaser or user of the product to be covered. What The Period Of Coverage Is: As it applies to the motor, this warranty will last for the lifetime of your ceiling fan.