READ AND SAVE THESE INSTRUCTIONS TM Model No. CF2000AB02 CF2000AW02 CF2000BC02 CF2000ORB02 CF2000PW02 CF2000WB02 CF2000WW02 DATE CODE: The date code of this fan may be found on the box, stamped in ink on a white label. Max. Weight: 26.0 Lbs. With Blades You should record this data above and keep it in a safe place for future use. MAUI BAY ™ Ceiling Fan Owner's Manual Part No. F40BP73230001 Form No. BP7323-1 U.L. Model No.
! WARNING WARNING: To avoid fire, shock, and serious personal injury, follow these instructions. Safety Instructions 1. Read your owner’s manual carefully and keep it for future reference. 2. Before servicing or cleaning unit, switch power off at service panel and lock service panel disconnecting means to prevent power from being switched on accidentally. When the service disconnecting means cannot be locked, securely fasten a warning device, such as a tag, to the service panel. 3.
This Manual Is Designed to Make it as Easy as Possible for You to Assemble, Install, Operate and Maintain Your Ceiling Fan Tools Needed for Assembly One Phillips head screwdriver Five wire connectors (supplied) Installed Wire Length Up to 50 ft. 50-100 ft. One stepladder One wire stripper ! MATERIALS Wiring outlet box and box connectors must be of type required by the local code. The minimum wire would be a 3-conductor (2-wire with ground) of the following size: Wire Size A.W.G.
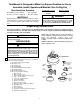
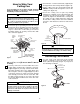
Assembly Instructions 1. Remove the fan motor and housing assembly from styrofoam packaging and position it so that the top of the motor is facing you. 2. Separate, untwist and unkink the three motor leads. Route the motor leads through the hanger ball/downrod assembly and seat the downrod in the motor coupling (Figure 1). 4. Install the setscrew (supplied) in the motor coupling (Figure 2). While pulling up on the hanger ball, tighten the setscrew using the setscrew wrench (supplied).
8.Reinstall the hanger ball on the downrod (Figure 5) as follows. Route the motor leads through the hanger ball and slide the hanger ball over the downrod. Install the pin through the holes at the top of the downrod and slide the hanger ball up the downrod, aligning the ball so the pin is captured in the groove in the top of the hanger ball. Pull the hanger ball up tight against the pin and securely tighten the setscrew in the hanger ball. A loose setscrew could create fan wobble.
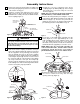
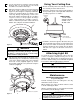
How to Wire Your Ceiling Fan 3. Screw the two 1-1/4” threaded studs (supplied) into the tapped holes in the hanger bracket (Figure 10). 4. Lift the ceiling cover up to the threaded studs and turn until studs protrude through the holes in the switch. ceiling cover (Figure 10). If you feel that you do not have enough electrical wiring knowledge or experience, have your fan installed by a licensed electrician. 5.
Using Your Ceiling Fan 2. Use the 10 round recessed holes in the motor hub marked with "5" and install the five blade assemblies in accordance with Step 3. 1. Restore electrical power to the outlet box by turning the electricity on at the main fuse box. 3. Attach one blade assembly to the motor hub using two 10-32 x 5/8" oval head screws (supplied) (Figure 12). Do not tighten completely at this time. Install four remaining blade assemblies in the same way.
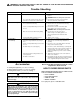
WARNING: FOR YOUR OWN SAFETY TURN OFF POWER AT FUSE BOX OR CIRCUIT BREAKER ! BEFORE TROUBLE SHOOTING YOUR FAN. Trouble Shooting TROUBLE PROBABLE CAUSE 1. Fan will not start. SUGGESTED REMEDY 1. Fuse or circuit breaker blown. 1. Check main and branch circuit fuses or circuit breakers. ! 2. Fan sounds noisy. 2. Loose power line connections to the fan, or loose switch wire connections in the switch housing. 2. Check line wire connections to fan and switch wire connections in the switch housing. 1.
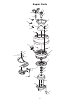
Repair Parts 2 1 3 16 14 6 15 18 17 13 17 18 31 30 27 5 4 29 21 22 23 8 7 25 9 19 26 10 28 24 20 9 12 11
Description Hanger Bracket Assy.
LIMITED WARRANTY What The Warranty Covers: This warranty covers the motor and the other components and accessories of your Emerson ceiling fan against all defects in workmanship and materials. You must be the original purchaser or user of the product to be covered. What The Period Of Coverage Is: As it applies to the motor, this warranty will last for the lifetime of your ceiling fan. All other components and accessories are covered by this warranty for one year from the date you purchased your ceiling fan.
Air Comfort Products Printed in China 03/07 Part No. F40BP73230001 DIVISION OF EMERSON ELECTRIC, CO. 8100 W. Florissant ¥ St.