
Instructions / Assembly

5
emersonfans.com
Please contact 1-800-654-3545 for further assistance
ETL Model No.: CF860
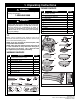
3. Ceiling Fan Assembly
FAN MOTOR
ASSEMBLY
UPPER MOTOR
COVER
Figure 1
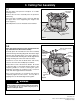
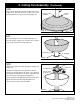
3.1
F
lip the upper foam pad over and place on a stable
working surface.
Remove the fan motor assembly from the protective
p
lastic bag.
Place fan motor assembly on top of the foam pad with
the upper motor cover supporting the weight of the
motor (Figure 1).
This will permit access for the blades to be installed.
WASHER HEAD SCREWS
(3 per blade)
BLADE (3)
MOTOR
ASSEMBLY
BLADE
MOUNTING
TAB
BLADE LARGE
MOUNTING
FLANGE
Figure 2
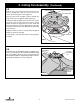
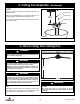
3.2
Note: The blades will have screws installed from the
top and bottom into the motor assembly.
Carefully place the first blade onto the motor assembly
such that the large mounting flange with three holes aligns
with the three matching holes of the motor (Figure 2).
The two bottom blade mounting tabs should align with the
mating mounting ears on the other side of the motor.
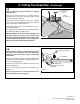
Install three screws into the blade holes and loosely
fasten to the motor with a Phillips tip screwdriver.
Repeat this for each of the other two blades. Be careful
to align the edge of each blade with the edge(s) of the
adjoining blades to avoid scratching the paint.
Reposition the blades as needed to form a concentric
circle with uniform gaps between the blades.
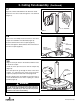
After all three blades are installed and aligned,
completely tighten the nine screws. You may hear a
popping noise as the blade edges mate together.
To reduce the risk of personal injury, do not bend the
blade assemblies when installing, balancing the blades
or cleaning the fan. Do not insert foreign objects in
between rotating fan blades.
WARNING
!