
Instructions / Assembly

7
emersonfans.com
Please contact 1-800-654-3545 for further assistance
ETL Model No.: CF860
3. Ceiling Fan Assembly (Continued)
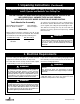
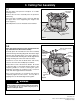
PHILLIPS HEAD SET SCREW
(LOOSENED)
HANGER BALL
4.5" DOWNROD
PIN
GREEN GROUND WIRE
Figure 6
3.6
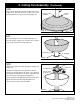
NOTE: If using a longer accessory downrod, discard
the supplied 4.5" downrod and install the longer
downrod (sold separately) using the following
instructions.
Remove the hanger ball by loosening the Phillips head
setscrew in the hanger ball until the ball falls freely down
the 4.5” downrod (Figure 6).
Remove the pin from the 4.5” downrod, then remove the
hanger ball (Figure 6).
Retain the pin and hanger ball for reinstallation in
Step 3.12.
Note: Do not loosen the screw that attaches the
green ground wire to the hanger ball.
3.5
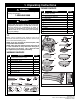
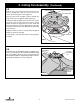
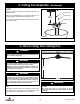
NOTE: Installation of the blade will be complete
after this step:
Align the two blade tab holes of one blade with the
threaded holes of the motor and install a washer head
s
crew into each hole (Figure 5).
Loosely fasten each screw into the motor ear. It will be
necessary push on the blade with your hand to align the
holes. Have patience during this step.
Repeat the washer head screw installation for each of
the remaining blades.
Fully tighten all six screws when the mating blade edges
are aligned and appear equally spaced.
NOTE: Installation of the three blade assemblies will
form the ceiling fan housing. The blades can be
adjusted by loosening the fifteen washer head screws
and repositioning the blades. Fully re-tighten all
fifteen screws when finished with adjustments.
BLADE
ASSEMBLY (3)
BLADE SCREWS
(2 per blade
assembly)
Figure 5