
Owner`s manual


26557-0-0110Page 8
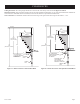
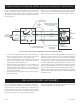
Locating Firebox
Placereboxinframedopening.Attachtheframingbracketsto
thereboxandsecurereboxtoframing.Differentholelocations
canbeusedfornishingmaterialswiththicknessesof3/8",1/2"
and3/4".Securethebracketswithscrewsprovidedusingtwo(2)
per framing bracket. See Figure 7.
Framingbracketsshouldtdirectlyagainstframingmaterial.Use
at least one (1) nail or screw per bracket to secure in place.
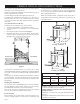
IMPORTANT!Checksquarenessofthereboxpriortosecuring
to framed opening. See Figure 8.
Figure 7
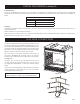
Black hoods are furnished with each rebox (or the optional
hood(s))andMUSTbeinstalledbeforethereboxisused.Failure
todosomaycreateapossiblerehazard.Forshippingpurposes,
the hoods are located behind the upper louver(s), or inside the
reboxonushfaceunits.Ifbrass,stainlesssteel,orhammered
pewter hoods are desired, they can be purchased as an option.
Attachment is the same as the standard black hood.
Louvered Models
1. Removeupperlouver,orushpanel.
2. Placethetophoodangeontopoftheinnerreboxtop,then
install three screws through the rebox top from below and
screwintothepilotholesinthehoodange(B).
3. Install one (1) screw at each end of the hood as shown (C).
4. Re-installlouver(s)orushpanel(s).
Caution: All hoods must be installed prior to operation of
appliance. See Figure 9.
Figure 9
FIREBOX OPENING
CHECK TO SEE
THAT BOX IS SQUARE
PRIOR TO ATTACHING TO
FRAMING
Figure 8
FIREBOX INSTALLATION INSTRUCTIONS (continued)
INSTALLING HOOD
B
C
INNER FIREBOX TOP
Louvered Models
ATTACH (4)
FRAMING BRACKETS
TO SIDE(S) OF FIREBOX
PRIORTO INSTALLING
UNIT TO FRAMED OPENING