
Instructions / Assembly


ASSEMBLY AND INSTALLATION INSTRUCTIONS for LR11T
Enclosed you will find everything needed for the assembly
and use of your storage rack. Two people make assembly
and installation easier. The parts and hardware included are:
Hardware included:
4 – Hard Glides
4 – 3/8” x 5/8” Button head Screws
2 –3/8” x ½” Button head Screws
1 – 7/32” Allen Wrench
Components included:
2 – Uprights
1 – Tool Bar
2 – Legs
1 – Broom
1 – Poker
1 – Shovel
ASSEMBLY AND INSTALLATION INSTRUCTIONS
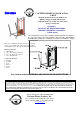
Rack Assembly
1) Push Hard Glides onto the ends of each leg.
2) Place each leg approximately 12” apart and parallel to each other.
3) Set uprights perpendicularly on top of the legs, lining up holes attach with the four 3/8” x 5/8” button head screws, tighten only
finger tight.
4) Place tool bar across the top outside of the uprights, making sure the hooks are facing upward. Secure into place using the
remaining (2) 3/8” x ½” button head screws, going from the outside of the tool bar thru the inside of the uprights. Again, leave
screws finger tight.
5) Square up your rack and tighten all button head screws using the Allen wrench included in the hardware. The assembly of your
rack is now complete.
6) All of our hammered steel racks are finished with an industrial wax designed to give years of protection to the rack. Cleaning is
easily done with a damp cloth. Dry thoroughly after cleaning. If a touch-up is ever needed we recommend a "Pledge" like wax
product.
It is important that your rack is assembled correctly. If the unit is assembled or used
incorrectly, it could become unstable and collapse, possibly causing injury.
Natural broom straw is flammable. Keep the broom well away from open flame. It should not
be used to sweep hot coals or ash.
If you need help, please call 1-877-ENCLUME
Enclume Design Products, Inc.
24 Colwell Street, Port Hadlock, WA. 98339
Phone 360-385-6100 Fax 360-385-6156
www.enclume.com
WARNING