
Manual

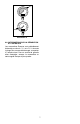

4. Replace sleeve on end of gauge adaptor.
5. Position either end of gauge connector in
pump gauge port and secure with gland nut
(finger-tight).
6. Place gauge on the other end of gauge
connector and secure with gland nut (finger-
tight. NOTE: Any Enerpac stainless steel
gauge of appropriate capacity can be used.
7. Tighten both gland nuts with light force
applied to a short wrench. DO NOT OVER-
TIGHTEN.
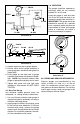
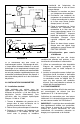
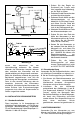
4.2 Burst Test Set-up
Use whenever sudden pressure drops are
anticipated, i.e., testing vessels to destruction.
1. Use any Enerpac stainless steel gauge of
appropriate capacity, preferably on having a
maximum indicating pointer.
2. Install gauge as shown in Illustsration A and
B. The shut-off valve, Model No. 72-750 (not
furnished with pump), protects the gauge
against recoil damage when the test vessel
ruptures. For maximum protection, the shut-
off valve should be nearly closed.
5.0 OPERATION
The gauge should be operated at
pressures which do not normally
exceed 75% of full scale.
Using the gauge to read less than
10% of the full scale can result in an
erroneous reading. See Illustration C.
IMPORTANT: The gauge should be
checked for accuracy on a periodic
basis, especially when the pressure
measurement is critical and a gauge
failure or inaccuracy will create a
hazard to personnel or property,
Illustration C
6.0 REPAIR AND SERVICE INFORMATION
Enerpac gauges are precalibrated by the
factory to within ±1% and ±1
1
/
2
% of the full
scale. For recalibration, please refer to your
local phone or business directory. For warranty
and/or repair service, send your gauge to the
nearest Enerpac Service Center.
75%
10%
3
43-701
45-11643-300
72-75043-001
83-011
T-6010L
P-2282
Illustration A
Illustration B
T60116
83-011
72-750
43-300
11-400