
Owner`s manual

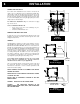
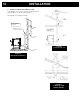

A. HORIZONTALLY THROUGH WALL (refer to Figure 7, 8,
or 10)
NOTE: Follow Vent chimney manufacturer’s instructions.
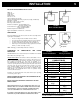
1. Position stove, adhering to clearances shown in Figures 1 & 2.
2. Locate position of hole in wall; directly behind stove exhaust
vent (refer to figure 4).
3. Always maintain 3” clearance from combustible materials.
4. Install Vent wall thimble per Vent manufacturer’s instructions.
5. Attach enough piping to penetrate and extend at least 6 inches
beyond the exterior wall. There should always be at least one
foot of vertical rise for each foot of horizontal run (see
Appendix A). At least 3 feet of vertical rise are needed in all
cases. A longer vertical rise will favour a better exhaust.
6. To reduce the risk of smoke spillage, never terminate with a
horizontal run. If your system terminates with a horizontal run,
add at least 3 feet of vertical rise (see Appendix A).
7. Attach cap and seal outside wall thimbles with non-hardening
waterproof mastic.
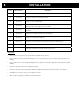
B. VERTICALLY WITH NEW CHIMNEY SYSTEM (Refer to
Figure 9 – Venting through roof)
NOTE: Follow Vent chimney manufacturer’s instructions.
OPTION: To achieve a centered vertical installation, a 45º elbow
and a clean-out tee can be used to offset the pipe from the exhaust
outlet to the rear center of the stove.
OPTION: Install Vent elbow in place of clean-out tee. Locate stove.
Drop plumb bob to center of tee outlet, mark point on ceiling. Install
ceiling support and Vent pipe per Vent manufacturer’s instructions.
1. Always maintain 3” clearance from combustible materials.
When passing through additional floors or ceilings, always
install firestop spacer.
2. After lining up for hole in roof, cut either a round or square hole
in roof, always 3” larger all the way around pipe. Install upper
edge and sides of flashing under roofing materials, nail to the
roof along upper edge. Do not nail lower edge. Seal nail heads
with flexible waterproof sealant.
3. Apply flexible, waterproof sealant where the storm collar meets
the vent. Slide storm collar down until it sits on the flashing.
Seal and install cap. Mobile home installations must use a
spark arrester.
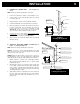
45 DEGREE ELBO
W
FOLLOW CHIMNEY OR
VENT MANUFACTURER'S
INSTRUCTIONS
WALL
THIMBLE
TERMINATION
COLLAR
CLEAN OUT
TEE
WALL
STRAP
90 DEGREE ELBOW
COUPE-FEU
MURAL
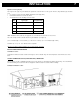
1' HORIZONTAL RUN EVL = 1' 1' HORIZONTAL RUN EVL = 1'
WALL
STRAP
CLEAN OUT
TEE
VERTICAL LENGTH4' EVL = 4 X 0.5' = 2'
VERTICAL LENGTH 4' EVL = 4 X 0.5' = 2'
VERTICAL LENGTH 4' EVL = 4 X 0.5' = 2'
90° ELBOW "T" LEE = 5'
VERTICAL ROOF VENT
FOLLOW CHIMNEY OR
VENT MANUFACTURER'S
INSTRUCTIONS
FIGURE 7
Venting through wall
FIGURE 8
Venting through wall
IN
S
TALLATI
O
N
9