Table of Contents DuraFon 1X Instruction Manual Digital Long Range Cordless Phone EN Manuel D’ Instruction Telephone sans fil numerique a longue portee FR Safety Instructions ........................................................................................ 4 General Safety Instructions...................................................................... 4 Product Safety Instructions ...................................................................... 4 Battery Safety Instructions ............
Advanced Operations................................................................................. 31 Handset Registration.............................................................................. 31 Handset Group Subscription.................................................................. 32 Registration of Additional Base.............................................................. 32 Call Transfer...........................................................................................
. Changes or modifications to this product not expressively approved by the manufacturer will void the warranty and the FCC authorization to operate the equipment. Use only manufacturer provided accessories. 4. Do not use the telephone near water. Never spill liquid of any kind on this product. 14. Do not place the product where persons can step, trip, or fall on it. 15. Do not place conductive objects over or near the antenna. 16.
Regulatory Information Notes: In the event of any inconsistency between the English and French versions hereof, the English version shall prevail. DuraFon 1X FCC ID: NI3-SN1302 IC: 3616A-SN1302 This device complies with Part 15 of the FCC Rules. Operation is subject to the following two conditions: 1) this device may not cause harmful interference, and 2) this device must accept any interference received, including interference that may cause undesired operation. 1.
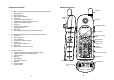
Equipment Checklist 1. 2. 3. Handset Illustration In a Base + Handset package, please find the following components: a. Base Station x 1 b. Base Antenna x 1 c. Base AC/DC Adaptor x 1 d. Handset x 1 e. Low Profile Handset Antenna x 1 f. Optimal Performance Handset Antenna x 1 g. 1700mA Li-ion Battery Pack x 1 h. Charger x 1 i. Charger AC/DC Adaptor x 1 j. Telephone Cord x 1 k.
Handset Features Basic Handset Features 1. 4-line LCD (Liquid Crystal Display) a. The LCD display has LED (Light Emitting Diode) for backlighting. b. The 1st line of LCD consists of icons. c. Icons explanation from left to right (1) RSSI (Receive Signal Strength Indicator) During a call, the number of bars is proportional to the radio signal strength received.
2. Ringer Vibrator a. Five-level ringer volume selections (high/ low/ vibrate/ vibrate-thenring/ off) b. Four ringer type selections 3. Caller ID a. Displays incoming call phone number and name on the LCD (needs Caller ID service from local telephone company) 4. Call waiting with caller ID a. Displays 2nd incoming call information on the same phone line when 1st call is in progress (needs Call Waiting with Caller ID service from local telephone company) 5. Name tagging with caller ID a.
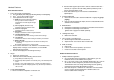
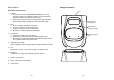
a. Allow user to pre-program the most frequently used PBX feature along with its feature code into DuraFon which is adjunct to the PBX system b. Up to 9 entries can be saved c. Once the feature and feature codes being programmed, you can quick perform those functions during the call by pressing OPTION soft key. Base Illustration 5HVHW 5HJLVWHU %XWWRQ %XWWRQ /LQH ,Q 5- IRU $QVZHULQJ PDFKLQH $XGLR ,Q '& ,Q Administrator Features Handsets 11 and 12 are designated administrators.
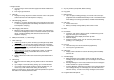
Base Features Charger Illustration Basic Base Station Features '& ,Q 1. Antenna a. The antenna port has a reverse thread connector; to remove antenna or cable, turn clockwise; to install, turn counterclockwise. Improper installation may damage the connector b. When using an outdoor antenna, locate the antenna (not the base station itself) as high as possible for a clear transmission path. 6SDUH %DWWHU\ &KDUJLQJ 6ORW 2. LED a. Power: it indicates base station has power. b.
Getting Started Charger Features Base Station Installation 1. DC In Connects to Charger AC Adaptor. 2. Handset Charging Slot a. Charge handset battery when handset is placed in cradle. b. Refer to the handset LCD for charging status (1) Charging: LCD screen showed “Charging” (2) Fully Charged: battery status bar stands still and the LCD screen would display “Fully Charged” (3) Charge Fail: Should there be any error occurred during charging mode, the LCD screen would display “Charge Fail” 3.
and receiving phone calls and intercom calls. No base station or handset programming is needed for basic operations. Basic Operations Operation Modes Note: 1. Handset(s) packaged along with a Base Station are preregistered at the factory. If you have a new handset, you will need to register the handset with the base station in order to be recognized as a member handset by the base(s) and by other handsets. See Handset Registration. 2. Fully charge battery packs before the first usage.
7R DERUW GLDOLQJ SUHVV (1' NH\ 0 D LQ P H Q X 6XE PHQ X Notes: .H\*XDUG 1. 3KRQH%RRN 'LDOHG 5HFHLYH G 0LVVHG &DOO /RJV 2. 5 L Q J 9 R O X P H 5 LQ J 7 R Q H .H\ 9ROXPH .H\ 7RQH 6RXQG 3. 4.
handset responds. 4. Before a handset answers, the INTERCOM can be cancelled from the base by pressing INTERCOM again. However, once a handset answers, only the answering handset can end the call. C. Intercom/2-Way from Handset to Base 1. Press Intercom key followed by a two-digit base ID [Note: Base 1 ID as 10, Base 2 ID as 20, Base 3 ID as 30, and Base 4 ID as 40] 11 Please enter Ext. #: 10 2. The base will ring once, then automatically connect the intercom call from a handset. Making a Broadcast A.
[Note] Intercom numbers (Handset ID) are not stored in the last 10 numbers dialed log. To end a telephone or intercom call, press END key or place handset into charger cradle. Receiving a Telephone Call Adjusting Receiver (Earpiece) Voice Volume 1. When an incoming call arrives, the ringer will ring or vibrate unless the ringer has been turned off. 1. Voice volume can only be adjusted during a call. 2.
hold. effective only for the current call. Do Not Disturb (Silent Ring) 1. Enter the key sequence MENU – Sounds – Ring Volume, then select “Off”. Press SAVE to confirm your choice. This will turn off the ringer until it is turn on again from the menu. 2. For temporary silencing the ringer when an incoming call arrives, press SILENT (Left) soft key. 11 Sounds: ÇÈ 1. Ring Volume 2. Ring Tone 3. Battery talk time and standby time vary depending on the talk/standby pattern and the operating distance.
Advanced Operations Handset Registration 2. 1. If your handset(s) is purchased as part of a system, it has been preregistered with the base station at the factory. 3. 4. 2. If Handset ID as “00,” that means it is a new handset or the ID has been erased. You need to register the handset with the base station. pressing the REG button. The handset has a 12 second registration timeout starting from the registration or deregistration option has been selected.
3rd, and 4th base unit. 3. Registration: a. Press MENU-6 from HS 11 to enter the registration mode b. Press and hold the Registration (REG) button on that additional base unit, which you want to add into the system) for 2 seconds until 4 LEDs light up. c. Press handset key “3”, then enter the base ID i.e. nd rd th 20 for 2 base, 30 for 3 base, or 40 for 4 base. this completes the registration process. (1) Speak to the destination handset. (2) Press XFER soft key or the END to end announcement.
a. Press Menu-9 and enter the two-digit base ID to enter the System mode. b. Press 1 to enter Tone selection c. You can adjust the dial mode between Tone and Pulse. The default setting is Tone. d. The default setting is Tone. 2. Flash Time a. Press Menu-9 and enter the two-digit base ID to enter the System mode. b. Press 2 to enter Flash selection c. You can adjust the flash time from 100ms to 900 ms (9 levels to choose from.) For example, press “2” if the desired flash time is 200ms.
Notes: 1. When enter a phone number, the cursor automatically advances to the next digit field. Use ¿or À scrolling key to move the cursor backward or forward to insert or delete. 2. When entering a name, the cursor automatically advances to the next character field if you press a different key for the next character. If you need to enter consecutive characters from the same key, you can wait for the cursor to advance or use ¿or À scrolling key to move the cursor backward or forward manually.
confirm your selection. 3. To edit the Call barring code a. Once turn on the call barring feature, you can key in the “call barring” code. (1) Up to 5 digit can be edit to be call barring code. For example, if you want to block all call dialing to Manhanttan, NY area, you can enter 1212 as the call barring code. (2) If you base station is adjunct to a PBX system, please also include that specific number to retrieve the PSTN tone. b. Press OPTION to erase or edit the call barring codes. c.
2. Up to 9 most frequently used PBX feature codes can be pre-programmed. 3. Name and enter PBX feature codes: a. Press Menu (Right) soft key while the handset is in standby. b. Press “5” following by “0” to enter “PBX Options” menu. c. Press ADD soft key to edit a PBX feature to be memorized. d. Key in the name of the PBX features just like editing a phonebook entry i.e. PBX Transfer. Press SAVE to confirm your entries. e. Key in the feature code of the correspondence PBX feature i.e. Flash*70.
(2) Save: press “2” to edit and save or save without editing into the phonebook. (3) View Number: press “3” to view the complete number if the phone number is longer than 14 digits. b. Press “2” to view the last 10 phone numbers received, starting from the most recent one. Use ¿orÀ to scroll through the list. Press OPTION for options. (1) Erase: press “1” and confirm to erase the current record. (2) Save: press “2” to edit and save or save without editing into the phonebook.
(2) When finished; press SAVE to save change. Technical Specifications g. Press “7” to change the LCD backlight: (1) Use ¿orÀ to scroll through options: On, Off, and 8 Seconds. Default = 6 seconds, meaning that the backlight will turn off the backlight after 8 seconds of inactivity. (2) When finished; press SAVE to save change.
Index 2 2-Way/Intercom, 12, 24, 34 A Adjusting Receiver (Earpiece) Voice Volume, 28 Administrator Features, 15 Audio-in Jack, 17 B Base Station Features, 17 Base Station Installation, 20 Battery, 5, 6, 9, 11, 14, 19, 20, 21, 22, 28, 30, 46 Battery Recharge and Replacement, 29 Battery Strength, 11 Broadcast, 12, 17, 22, 25, 26 Broadcasting a Group of Handsets, 25 Broadcasting all Handsets, 25, 26 Broadcasting an Individual Handset, 25 C Call Barring, 13, 38, 39, 45 Call Manager, 34, 35, 45 Call Timer, 14 Cal
Reverse Thread Connector, 17 Ringer, 7, 11, 13, 27, 29, 43 RSSI, 11 S Safety Instructions, 4, 6, 41 Spare Battery Charging Slot, 19 Speed Dial, 23 T Talk Mode, 12, 22 Talk/ ,11 Technical Specifications, 7, 46 Text Messaging, 14, 39, 40, 45 Transformer, 20 Three Call Logs, 13, 43, 44 To View Missed Call(s), 29 Two-Digit Address Index, 11 V Vibrator, 12 W Warning Message, 19
Table des matières DuraFon 1X Manuel D’ Instruction Telephone sans fil numerique a longue portee ~47~ FR Instructions de sécurité .............................................................................. 50 Instructions générales de sécurité ......................................................... 50 Instructions de sécurité du produit ......................................................... 51 Instructions de sécurité pour la batterie .................................................
Opérations avancées ................................................................................. 82 Enregistrement du combiné ................................................................... 82 Enregistrement de groupe de combinés ................................................ 83 Enregistrement d’une base supplémentaire .......................................... 84 Transfert d’appels .................................................................................. 84 Gestionnaire d’appels .......
Instructions de sécurité du produit 1. Lisez et comprenez bien toutes les instructions. 2. Conformez-vous à tous les avertissements et instructions incluant ceux indiqués sur le produit. 3. Les changements ou modifications à ce produit qui ne sont pas expressément approuvés par le manufacturier annuleront la garantie et l’autorisation FCC d’opération de l’équipement. Utilisez seulement les accessoires fournis par le manufacturier. 12.
4. Ne jeter pas la batterie dans les résidus urbains. Informez-vous sur les lois locales concernant les instructions pour les déchets. 5. Manipulez les batteries avec soin pour ne pas court-circuiter la batterie avec des matériaux conductibles comme des bagues, des bracelets, des clés, des couteaux de poche et des pièces de monnaie. La batterie ou le matériel conductible pourrait surchauffer et causer des brûlures ou un incendie. 5.
Liste de vérification de l’équipement 1. 2. Dans un ensemble de Base + Combiné, vous retrouverez les composants suivants : a. Station de base x 1 b. Antenne de base x 1 c. Adaptateur de base c.a.-c.c. x 1 d. Combiné x 1 e. Combiné -l'Antenne de Combiné de Profil Basse x 1 f. L'Antenne optimale de Combiné d'Exécution x 1 g. Bloc-piles à l’ion-lithium 1700mA x 1 h. Chargeur x 1 i. Adaptateur c.a.-c.c. de chargeur x 1 j. Cordon téléphonique x 1 k.
Caractéristiques du combiné Caractéristiques de base du combiné 1. LCD à 4 lignes (affichage à cristaux liquides) a. L’affichage à cristaux liquides a un DEL (diode électroluminescente) pour le rétroéclairage. b. La première ligne du LCD est composée d’icônes. c. Les explications des icônes se trouvent de gauche à droite (1) RSSI (Indicateur de force du signal reçuReceive Signal Strength Indicator) Pendant un appel, le nombre de barres est proportionnel à la force du signal radio reçu.
b. (ID) Identification 11-19 ; 21-29 ; 31-39 ; 41-49: Identifications du combiné individuel. ID 11 et 12 sont les deux premières identifications attribuées par la base et sont des « administrateurs » désignés pouvant modifier les paramètres de la base comme le message de bienvenue et autres fonctions administratives de base. c. ID 01-09 : Identifications de groupe.
identification (ID) de combiné (jusqu’à 28 chiffres) et nom (jusqu’à 14 caractères) b. Affichage en ordre alphabétique et recherche par lettre c. Composez à partir de l’affichage d. Pendant le mode Attente, vous pouvez entrer l’annuaire téléphonique en appuyant sur les touches de défilement ¿ouÀ 15. Tonalitͼ de touche a. Choix de volume de tonalité de touche à trois niveaux (haut/bas/arrêt) b. Quatre choix de types de tonalités de touches 16. Minuterie de temps d’appel a.
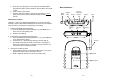
&DUDFWpULVWLTXHV GH OD EDVH Illustration de la base (QWUpH GH %RXWRQ GH OLJQH UpHQFOHQFKHPHQW (QWUpH DXGLR 5- SRXU %RXWRQ UpSRQGHXU &RXUDQW FRQWLQX WpOpSKRQLTXH G¶HQUHJLVWUHPHQW HQWUDQW %RXWRQ 9ROXPH %RXWRQ ,QWHUFRP %RXWRQ 'LIIXVLRQ $QWHQQH 5pFHSWHXU 0LFURSKRQH ~63~ &DUDFWpULVWLTXHV GH EDVH GH OD VWDWLRQ GH EDVH $QWHQQH D /H SRUW G¶DQWHQQH SRVVqGH XQ FRQQHFWHXU ILOHWp LQYHUVH 3RXU HQOHYHU O¶DQWHQQH RX OH FkEOH WRXUQH] GDQV OH VHQV GHV DLJXLOOHV G¶XQH PRQWUH 3RXU L
8. Courant continu entrant : pour brancher l’adaptateur de courant 9.
&DUDFWpULVWLTXHV GX FKDUJHXU &RXUDQW FRQWLQX HQWUDQW 5. L’adaptateur pour le changement de station peut être aussi utilisé comme chargeur de voyage. Cependant, vous ne pouvez le fermer lorsque vous chargez le combiné avec le chargeur de voyage. Un message d’avertissement : « débrancher le chargeur de voyage, alors de » sera affiché sur l’écran à cristaux liquides (LCD).
avec protection de ligne téléphonique. Comment démarrer Installation de la station de base 3. Branchez le cordon téléphonique dans la prise « LINE » Il y a trois installations de station de base possibles : z Seulement la station de base z Station de base et dispositif de répondeur téléphonique z Station de base et téléphone ordinaire Pour un meilleur rendement, laissez au moins 1 mètre de distance (environ 3 pieds) entre la station de base et les autres appareils électroniques (ex.
c. Opérations de base Modes d’opération La station de base et le combiné ont des niveaux de fonctionnement qui peuvent effectuer les procédures et les fonctions à des temps donnés. Pour plus de détails sur les fonctions disponibles par le choix de MENU, allez à la page 93. d. L’affichage de la structure du MENU est comme suit : A. Modes de fonctionnement de base 1. Mode Inactif- est le mode par défaut. Les touches Intercom, Diffusion et Volume sont actives en mode Inactif. 2.
5HYLVLRQ RI 0HQX 6RXV PHQX 0 HQ X S U L QFL S DO *XDUG&ODYLHU &RPSR VH 5 H oX 0D Q TX H 1XPHURV $ S S HO 9 R O V R Q R U H 7 R Q D O L WH & O H I Y R O & O HI W R QR UH 6 RQ & R PS R V HU *URXSH /DQJDJH ( I I D F HU 1RPPHU & R Q W U DV W H / X P L H U H $ S S H O E D U U H ( W LT X H W W H 2SWLRQV 3%; $UUDQJHPHQW ( Q U H J L V W U H 0HVVDJH 7H[WH $G PL Q SRXU DFFpGHU j O¶DQQXDLUH WpOpSKRQLTXH E $SSX\H] VXU 7$
B. Intercom/Bidirectionnel de la base au combiné 1. Appuyez (Press) sur la touche Intercom sur la station de base pour faire un intercom de tous les combinés enregistrés. Le premier combiné qui répond établira une liaison téléphonique avec la base. destination s’ouvrira d. Appuyez sur la touche END pour terminer la diffusion. 11 Appel entrant de Base 1 SLIENC 2. Le voyant DEL INTERCOM clignotera jusqu’à ce qu’un combiné réponde. 3.
retournez en mode Inactif. Notes : 1. C. Diffuser du combiné à la base 1. Diffusion à la station de base a. Entrez l’identification (ID) de la base et appuyez ensuite sur la touche «BROADCAST » b. Vous entendrez bi-bi-bip du combiné qui diffuse tous les combinés à l’intérieur de la couverture de communication c. Commencez à dire le message à diffuser une fois que vous entendez le son « bip » ; le poste téléphonique à haut-parleur du combiné de destination s’ouvrira. d.
2. Il y a 6 niveaux de choix de volumes. Le volume par défaut est 4. Utilisez (Use) les flèches de défilement ¿etÀ pour l’ajustement. Ne pas déranger (Sonnerie silencieuse) 3. Le nouveau réglage demeure en vigueur pour tous les futurs appels jusqu'à ce qu’il ne soit modifié. 1. Entrez (Enter) la séquence de touches MENU – Sons – Volume de sonnerie et Sélectionnez « Fermer ». Appuyez sur GARDER pour confirmer votre choix.
Recharge et remplacement de la batterie Opérations avancées 1. Chargez la batterie lorsqu’une ou plusieurs des situations suivantes surviennent : a. Le téléphone émet un bip toutes les deux secondes. b. L’icône de la batterie est vide. c. Le téléphone n’émet aucun son lorsque vous appuyez sur une touche. d. L’écran à cristaux liquides (LCD) et le rétroéclairage deviennent faibles. e. Une faiblesse de la portée d’émission est expérimentée. Enregistrement du combiné 2.
e. Appuyez et tenez le bouton REG de la base pendant 2 secondes jusqu’à ce que 4 voyants DEL s’allument. f. Appuyez sur la touche 2 du combiné. Ceci termine le processus de désenregistrement. Une fois le désenregistrement réussi, l’identification du combiné affiche 00. Notes : 1. La base possède un délai d’attente d’enregistrement de 30 secondes à partir du moment où vous appuyez sur le bouton REG.
d’autocommutateur privé, vous pouvez transférer l’appel à un poste d’autocommutateur privé désigné. (2) Généralement, chaque système d’autocommutateur privé acquiert un code-objet spécifique pour effectuer la fonction « transfert d’appel ». (3) Vous pouvez pré-programmer le code-objet en accédant au mode « Système » (Menu-9). Vous devez entrer l’identification (ID) de la base pour vous relier à la station de base. (4) Appuyez sur 3 et entrez ensuite le code-objet spécifique « Transfert d’appel ». 11 1.
b. Appuyez sur 1 pour passer au mode Sélection de la tonalité. c. Vous pouvez ajuster le mode de composition entre Tonalité et Impulsion. Le mode par défaut est Tonalité. d. Le réglage par défaut est Tonalité. 2. Durée de rappel d’enregistreur a. Appuyez sur Menu-9 et entrez l’identification (ID) de la base à deux chiffres pour accéder au mode Systeme. b. Appuyez sur 2 pour passer à la sélection Allumer. c. Vous pouvez ajuster le temps de Allumer de 100ms à 900 ms (vous pouvoir choisir entre 9 niveaux).
configuration » et une confirmation Terminé. (3) Utilisez (Use) la touche SUPPRI pour supprimer le dernier caractère entré. Lorsque terminé, appuyez sur la touche GARDER pour confirmer votre choix. Opérations de l’annuaire téléphonique 1. 2. 3. Vous pouvez enregistrer jusqu’à 30 entrées dans l’annuaire téléphonique. Chaque entrée peut contenir un numéro de téléphone ou une identification (ID) de combiné (jusqu’à 28 caractères) et un nom (jusqu’à 14 caractères).
touche OPTION et sélectionnez l’Option 3 pour voir le numéro au complet. Notes : Tableau des caractères 6. Pour rechercher un enregistrement : a. Utilisez les flèches de défilement ¿ouÀ pour accéder au mode Numeros. b. Appuyez sur une touche correspondant au premier caractère du nom que vous recherchez. c. Par exemple, vous recherchez « EnGenius » et appuyez ensuite sur le numéro "3" une fois. d. Utilisez les flèches de défilement ¿ouÀ pour trouver l’enregistrement exact que vous recherchez. 7.
b. Appuyez sur OPTION pour effacer ou modifier les codes d’interdiction d’appels. c. Jusqu’à 5 séries de codes d’interdictions d’appels peuvent être programmés. Messagerie texte 1. De courts messages textes pouvant comprendre jusqu’à 50 caractères chacun peuvent être envoyés à partir d’un combiné à un autre combiné ou à un groupe de combinés. 2. Jusqu’à 5 messages sortants peuvent être modifiés, enregistrés et envoyés.
Entrant. Options d’autocommutateur privé programmables 1. 2. Lorsque l’unité de base DuraFon 1X est installée derrière le système d’autocommutateur privé (PBX), il est possible de pré-programmer certaines caractéristiques d’autocommutateur privé (PBX) avec les codes-objets dans le système. Jusqu’à 9 codes-objets les plus fréquemment utilisés peuvent être préprogrammés. 3. Nommez et entrez les codes de caractéristique d’autocommutateur privé : a.
Opérations du menu 6RXV PHQX 0 HQ X S U L QFL SD O a. Appuyez sur “1” pour voir les 10 derniers numéros de téléphones composés à partir du plus récent. Utilisez (Use) ¿ouÀ pour défiler à travers la liste. Appuyez sur OPTION pour accéder aux options. (1) Effacer : appuyez sur “1” et confirmez que vous effacez les enregistrements. (2) Garder : appuyez sur “2” pour modifier et sauvegarder ou sauvegarder sans modifier dans l’annuaire téléphonique.
2. journaux d’appels. Les appels intercom ne sont pas enregistrés. Le service Identifiant d’appel de votre compagnie de téléphone locale est requis pour recevoir les numéros de téléphone, les noms et l’horodateur des appels entrants. Les journaux des appels reçus et manqués n’enregistreront pas d’appels entrants si le service Identifiant d’appel n’est pas disponible. 5. Appuyez sur “4” pour régler les paramètres reliés au son : a.
(1) Programmez et sauvegardez les fonctions d’autocommutateur privé les plus utilisées dans le système DuraFon. (2) Veuillez vous référer à la page 95 pour les détails du fonctionnement. 7. Appuyez sur “6” pour enregistrer ou désenregistrer le combiné et la base : Voir les instructions à la page 82. 8. Appuyez sur “7” pour visualiser le ou les message(s) textes de la boîte de réception. Voir les instructions à la page 93. 9. Appuyez sur « 8 » pour entrer le paramètre de Gestionnaire d’appel. a.
Température de stockage Humidité Taille avec antenne Poids -10 – 70 qC -10 – 70 qC 20 – 75 % 188*161*42mm 424g 20 – 75 % 161*58*31mm 175g Notes: 1. 2. S/O = Sans objet. Le manufacturier se réserve le droit de modifier les concepts et les spécifications sans préavis. EN G E N IUS TE C HNOL O G I ES U.S. A . 1580 SC ENIC AVE ., C OSTA MESA, C A 92626 U.S.A. TEL: 1-7 14-432-8 668 FAX: 1-71 4-43 2-8 667 E-MAIL: info@engeniustech. c om WEBSITE: httpP : //www.engeniustech.