
- Outdoor Wireless Client Bridge User Manual


Version 1.02
2
1.4 System Requirements
Installation of the Outdoor Wireless Client Bridge requires the following:
1. A Windows-based PC/AT compatible computer or Ethernet
data device with an available RJ-45 Ethernet port to run the
configuration program or with TCP/IP connection to the
Ethernet network.
2. A 10/100Base-T Ethernet RJ-45 Ethernet cable is connected to
Ethernet network.
3. A RS-232 consol port cable is connected to PC/AT compatible
computer.
4. An AC power outlet (100~240V, 50~60Hz) supplies the power.
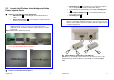
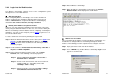
1.5 Inline Power Injector (PoE)
The Wireless client bridge is equipped with an Inline Power Injector module.
The Inline Power Injector (PoE) delivers both data and power to Wireless
client bridge unit via a signal Ethernet cable, and gives the following
benefits to improve the performance vs. installation cost ratio.
1. This works great in areas where you may not have power
and/or Ethernet easily accessible, like house roof.
2. This also allows you to place the Wireless client bridge unit
closer to the antenna, more easily thus reducing signal loss
over antenna cabling.
3. Ethernet signal travels well over CAT 5 cable but 2.4GHz
signal doesn't do as well over antenna cabling.
4. Ethernet cabling is much cheaper than Antenna cabling.
Version 1.02
3
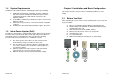
Chapter 2. Installation and Basic Configuration
This chapter describes the procedures of installing the Wireless client
bridge.
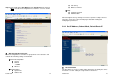
2.1 Before You Start
After unpacking the system, make sure the following items are present and
in good condition.
1. Wireless client bridge Outdoor Wireless Client Bridge unit
2. AC/DC adapter 100~240VAC, 50~60Hz with wall-mount plug
and DC plug power cord
3. Inline Power Injector (PoE) 24VDC, 830mA
4. Water protect kit consists of three of components
5. Grounding wire 1.8m
6. User manual CD-disc
7. Wall/mast mounting kit, including one (1) band clamp
2
3
4
5
7
6
1