
- Outdoor Wireless Client Bridge User Manual


Version 1.02
6
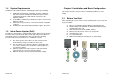
Figure 2.2.1
You can also mount the Wireless client bridge to the mast as shown in
Figure 2.2.2.
Figure 2.2.2
Version 1.02
7
2.3 Preparing Installation
Before installing Wireless client bridge for the outdoor application in a hard-
to-reach location, we recommend to configure and test all the devices first.
For configuring the Wireless client bridge, please follow the quick steps
below to power up the Wireless client bridge.
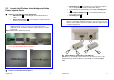
Step 1
Attach the 1.8m RS-232 null modem console cable to the Console
Port on the Wireless client bridge unit (refer to page 4
), and the
other end (DB9 female type) to a terminal or a PC running a
terminal emulation program.
Step 2
Plug the DC plug of the AC/DC power adapter into the DC Input
Port of Inline Power Injector and the wall-mount plug into a power
outlet or power strip (refer to page 4
). The Power LED on the Inline
Power Injector will light up.
Step 3
Run the cross-over type uplink Ethernet cable from Data Input
Port (refer topage 4
) to the Ethernet port on a PC
Step 4
Step 5
Step 2
Step 3
Step 1:
Console Port
Connection