
User Manual


CAUTION: Extremely high gain and volume levels in Lead mode can produce powerful feedback.
Avoid feedback squeals; they can lead to hearing loss and damage speakers! At higher volumes,
back off the Gain and Treble levels in order to prevent unchecked feedback!
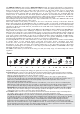
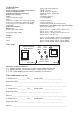
4 Bass: Bottom end voicing control of the preamps´s passive EQ.
5 Middle: Mid-range voicing control of the preamps´s passive EQ.
6 Treble: Upper range voicing control of the preamps´s passive EQ.
Tips and info from the designer: To help you get acquainted with the amp's fundamental sounds,
I recommend that you set all tone controls to the center position; that is, to around 5.
Two channels with different gain structures (Clean and Lead) share the same voicing section here.
This is why the passive three-band tone controls have been tuned to deliver optimum results even
with settings remaining unchanged when switching channels.
Note the range of these passive controls is narrower than that of comparable active EQ systems.
If you want to dial in very soft lead, blues, or jazzy clean sounds, try setting the Treble knob
between position 4 and 6 at the RockMaster amp. For more aggressive riffs or funk-approved tone,
try a knob position between 5 and 8 at the MetalMaster amp.
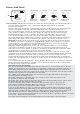
7 Reverb: Reverb intensity knob. Twist it to adjust the amount of reverb for Clean and Lead.
Turn the Reverb control knob clockwise to increase the effect's intensity. The signal remains
completely dry when the knob is set to the 0 position or if Reverb is deactivated via a footswitch.
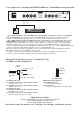
You can switch the reverb unit on and off using a footswitch connected to jack 17.
The reverb unit is always on if you do not plug a footswitch into jack 17.
Note: A digital processor generates the reverb effect.
8 Lead Volume: Volume control for the Lead channel (pre-FX loop, influences the Send level during
Lead mode). The red LED above the channel switching selector (10) indicates Lead operating
mode. Use this knob to dial in the desired balance of levels between the Lead and Clean channels.
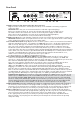
9 Mid Shape function: Mid Boost (RockMaster amp) or Mid Scoop (MetalMaster amp)
This voicing feature influences specific midrange frequencies in the preamps´s EQ section. The
sound-shaping button operates globally, affecting both channels. When activated, frequencies
between 300 Hz and 2 KHz are
boosted varyingly strong: Mid Boost, RockMaster amp;
cut at a varyingly strong degree: Mid Scoop, Metal Master amp.
The LED above the button lights up to indicate Mid Shape (Mid Boost or Mid Scoop) is activated.
The Mid Shape (Mid Boost or Mid Scoop) sound feature may also be switched using a footswitch
connected to jack (18).The button (9) on the amp's front panel is disengaged when you switch the
Mid Shape (Mid Boost or Mid Scoop) function via footswitch (18).
For more details see the chapter 18 !
A tip from the designer:
The Mid Shape (Mid Boost or Mid Scoop) button voices specific midrange frequencies that are
instrumental in fine-tuning a guitar's sound.
This tone-shaping option is remotely controllable via footswitch, so you can adapt the amp's
fundamental sound on the fly, say to better support rhythm guitar work, singing leads,
and slashing power chords.
10 Lead/Clean: This channel switching button selects the Clean channel or the Lead channel.
Press it to activate the Lead channel. The red LED above the button lights up to indicate Lead mode
is active. This function can also be activated via the respective footswitch connected to jack 18.
Once a footpedal is connected, the channel selector switch is deactivated.
11 Master: This master volume knob controls the power amp's output (it is located post FX Loop).
12 Power On: this LED lit when the amp is powered up.
13 Stand By: Power amp standby switch: Use this switch to silence ("down" position) the amp when
you take a break. The amp's tubes stay warm, which means that it is ready to roll immediately
when you switch it back to full power. The standby switch is also well-suited for muting the amp
for brief breaks, for instance when you're switching guitars.
A tip from the designer: I suggest you get into the habit of using standby during short breaks.
In this mode, current is not piped through the power tubes, so they don't get as hot (due to the
lack of anode dissipation) and are spared considerable wear. The amp is ready to run when you
flip the Standby switch because the tubes are already warm and don't require time to heat up.
For breaks of 20 minutes and longer, I recommend that you switch the amp off in order
to conserve energy.
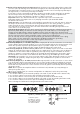
13 Power: AC power on/off. The power on LED (12) indicates when the amp is switched on.
Please note: ensure that the Stand By switch (13) is set to Stand By ("down" position) before you
switch the amp on. Let the tubes heat up for about 30 seconds before you activate the power amp.
This procedure spares the tubes.
CAUTION: After an extended period of operation and higher ambient temperatures the amps's
chassis can become very hot, therefore avoid touching the rear panel surface!