
User guide

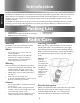


Turning the Radio On and Off
To turn the radio ON press and hold the red power button until the LCD iluminates and a power
on tone is generated after 1 second to indicate the transceiver has passed its self-diagnostic test.
To turn the radio OFF press and hold the power button until the LCD displays “POWERING OFF”
and its illumination switches off.
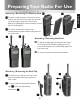
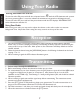
Using Your Radio
Before using your radio you may need to adjust the volume on the radio to take in to account
background noise. Adjust the volume using the rotary control on the top of the radio.
Common
7
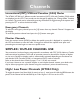
Using Your Radio
1. Turn the transceiver on using the power button. During standby the LED indicator will pulse
amber every 3 seconds, verifying its circuitry is functioning correctly. Adjust the volume using the
rotary control on top of the radio. After power-on, the transceiver will always default to the last
channel selected.
2. Select the desired channel using the [UP/DOWN] buttons. A full listing of channels can be found
on page 17 to 19.
3. When receiving a signal the LED indicator illuminates green.
Reception
Transmitting
1. Perform steps 1 through 2 of RECEPTION.
2. Before transmitting, monitor the channel and make sure it is clear.
3. For communications over short distances, press the [H/L] button or press & hold the MEM button
to toggle from High Power (4 watts) to Low power (1 watt) denoted by an L on the LCD,
(available on the HT844 only). Transmitting on 1 watt prolongs battery life, and should be selected
whenever possible.
4. When receiving a signal, wait until the signal stops before transmitting. The transceiver cannot
transmit and receive simultaneously.
5. Press the [PTT] (Push-To-Talk) button to begin your transmission. To confirm transmission is in
progress, the LCD indicator illuminates TX and the LED illuminates red.
6. Hold the transceiver 1 inch from your mouth and speak slowly and clearly into the microphone.
7. When the transmission is finished release the [PTT] button .