
User Manual


12
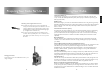
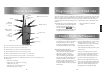
Programming your HT446E radio
Checking the current configuration
• A momentary press of the top side function
button will cause the radio to beep the
frequency programmed into the channel
(see Frequency Table beep codes on P.15).
Changing the assigned frequency
• Press and hold the PTT button and the top
side function button together until the
radio emits a “warble” sound and
illuminates the LED red, confirming the
radio is in channel programming mode.
• Using the upper side function button enter
the frequency number from the table. For
example to enter frequency number 7 press
the upper button 7 times. There are 8
frequencies available in total (see Frequency
Table on P.15).
Now press the PTT button to store the setting
and automatically return to the “check
configuration” mode (a long beep and flashing
yellow LED will confirm this action).
To check the entered setting, press the top side
function button.
Note: If you accidentally “go past” the required
frequency number, keep pressing the button until
you hear the “warble” sound again (emitted on
button press 9). This confirms you are back at the
start of the channel assigned frequency mode.
Please note: The orange button allows you to
escape from any setting without saving the data.
If you are in frequency programming mode but
decide not to save the setting you may press
the orange button to exit without saving.
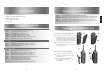
Check / Modify the Frequency
The radio’s frequency and tone configuration can be changed in user programming mode. This will
allow you to put any of the standard frequencies or tones in to any channel position. When a radio
has been configured this information can be quickly and easily cloned into other units using an
optional cloning cable. The programming process is confirmed using a series of audible beep tone
patterns.
To put radio in to user programming mode
• Press and hold the top side function button
and PTT button and turn the radio on
• The radio will emit a beep and
the LED slowly flash yellow to confirm “user
programming mode” has been entered.
• Select the channel to be checked /
modified.
HT446E
11
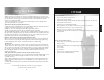
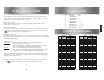
Controls & Indicators
3
Channel change control
Antenna
5
Dealer
programmable
button 1
4
Push To Talk
(PTT) button
6
Dealer
programmable
button 2
1
On / Off
2
Volume control
Speaker
Microphone
1
On / Off button. Press to turn radio on, press and hold to turn off.
2
Press up / down buttons to increase / reduce volume.
3
Channel change control. Rotate to select the desired channel.
4
Push To Talk (PTT) button. Press to speak and release to listen.
5
Dealer programmable button 1 (ask your dealer for more information).
6
Dealer programmable button 2 (ask your dealer for more information).
7
Dealer programmable button 3 and LED indicator. Default - Local panic alarm long button press
8 LED indicator.
• RED steady = Transmitting
• RED flashing slowly = Battery needs re-charging
• GREEN steady = Receiving
• YELLOW steady = Non valid signal detected
• YELLOW flashing rapidly = Scanning
7
Dealer
programmable
button 3
8
LED indicator