
User's Guide Hub/Switch 2E253, 2H252, 2H253, 2H258
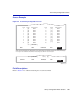

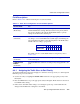
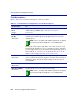

Traffic Class Configuration Screen
802.1p Configuration Menu Screens 8-11
Field Descriptions
Refer to Table 8-4 for a functional description of each screen field.
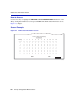
8.4.1 Assigning the Traffic Class to Port Priority
To map the Traffic Class to Priority and apply it to either the selected port only or to all front panel
Ethernet ports, proceed as follows:
1. Use the arrow keys to highlight the Traffic Class field next to the appropriate priority in the
Priority list.
2. Press the SPACE bar to step to the appropriate value, 0 through 3. The 0 selection is the lowest
level Traffic Class setting.
3. If more than one Traffic Class setting is to be changed, repeat steps 1 and 2 until all of the
changes in the Traffic Class settings have been made.
Table 8-4 Traffic Class Configuration Screen Field Descriptions
Use this field… To…
Priority
(Read-Only)
See the list of eight priority levels (0 through 7) that can be associated
with the Traffic Class settings. Priority 0 is the lowest priority. When
the screen is displayed, the current default Traffic Class-to-priority
settings are shown for the selected port.
Traffic Class
(Selectable)
Enable the frames with a certain priority to be mapped to transmit
according to one of four Traffic Classes (0 through 3) with 0 being the
lowest transmit level. Refer to the following table for the Traffic Class
default values according to port priority.
For details on how to set the Traffic Class for each priority, refer to
Section 8.4.1.
SAVE
(Command)
Save the Traffic Class selections for each priority and apply them only
to the selected port.
SAVE TO ALL
PORTS
(Command)
Save the Traffic Class selections for each priority and apply them to all
ports.
Port Priority 01234567
Traffic Class
10012233