
User's Guide Hub/Switch 2E253, 2H252, 2H253, 2H258


Quick VLAN Walkthrough
12-18 VLAN Operation and Network Applications
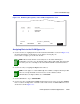
Figure 12-7 Walkthrough Stage Two, Port 3 Egress Setting
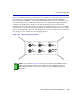
Now that Port 3 belongs to VLAN 2, we will designate one port as a trunk port for a connection to
another VLAN-aware switch. This trunk port will carry tagged frames from all VLANs, allowing
VLAN frames to maintain their VLAN ID across multiple switches.
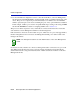
5. Use the arrow keys to highlight the Egress field for port 10 in the Static VLAN Egress
Configuration screen.
6. Use the SPACE bar to step to TAGGED.
7. Use the arrow keys to highlight the SAVE command at the bottom of the screen. Press ENTER.
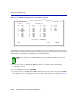
Port 10 will now serve as a trunk port connection. The screen should now look like Figure 12-8.
NOTE: For the purposes of this walkthrough, port 10 will be configured as the trunk
port.
30691_64
RETURN
EXIT
Port Egress
---- ----------
1 [ NO ]
2 [ NO ]
3 [UNTAGGED ]
4 [ NO ]
5 [ NO ]
6 [ NO ]
7 [ NO ]
8 [ NO ]
SAVE
SET ALL PORTS: [UNTAGGED]
Port Egress
---- ----------
9 [ NO ]
10 [ NO ]
11 [ NO ]
12 [ NO ]
13 [ NO ]
14 [ NO ]
15 [ NO ]
16 [ NO ]
Port Egress
---- ----------
17 [ NO ]
18 [ NO ]
19 [ NO ]
20 [ NO ]
21 [ NO ]
22 [ NO ]
23 [ NO ]
24 [ NO ]
Port Egress
---- ----------
25 [ NO ]
26 [ NO ]
27 [ NO ]
VLAN ID: 2 FDB ID: 2 VLAN NAME: Test