
Specifications


EPSON EPL-N1600 Chapter 4 Disassembly and Assembly
Rev. A 4-151
4.3.42 Drive Assembly-F/P
1. Remove the Cover Side,E. (Section 4.2.1)
2. Remove the Control Assembly Panel (E). (Section 4.2.3)
3. Remove the Cover Assembly MBF.E.(Section 4.2.4)
4. Remove the Tray Assembly MBF.E.(Section 4.2.5)
5. Remove the Cover Assembly,E. (Section 4.3)
6. Remove the C258MAIN Board.(Section 4.3.49)
7. Remove the Shield Assembly Bottom (E). (Section 4.3.44)
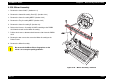
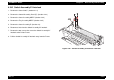
8. Remove the Harness of Drive Assembly Main aside from the front
plate of the Drive Assembly-F/P.
9. Release the Harness Assembly ROS-HE from the Drive Assembly-
F/P.
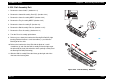
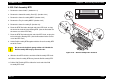
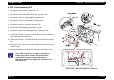
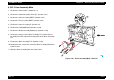
10. Remove the four screws that secure the Drive Assembly-F/P to the
Printer Frame.
11. Slowly pull the Drive Assembly-F/P away from the Printer Frame.
Figure 4-48. “Drive Assembly F/P” Removal
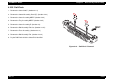
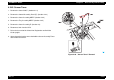
CHECK
PO INT
The spring-loaded lever is slightly caught by the
bottom part of Gear 10 when you pull the Drive
Assembly-F/P straight away from the printer.
Manipulate the Drive Assembly-F/P so that the lever
clears Gear 10.