
Specifications

EPSON EPL-N1600 Chapter 3 Troubleshooting
Rev. A 77
7
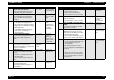
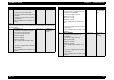
HPS
1. Remove Cover Assembl
y
Main.
2. Disconnect J222 of the Fan IOT from
the HPS.
3. Check the volta
g
e between P/J222-3
and P/J222-1
Is there +24VDC between P/J222-1 and
P/J222-3?
Go to step 8 Replace HPS.
Note:
Steps 8 throu
g
h 16 attempt to isolate a fault
y
component that mi
g
ht be loadin
g
down
the Power Suppl
y
.
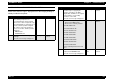
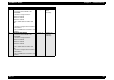
8 C258MAIN Board
1. Reinstall the C258MAIN leavin
g
all
the connectors disconnected.
2. Check the volta
g
es between:
CN231-A10 and FG
CN231-A11 and FG
CN231-B11 and FG.
Is there +5VDC between CN231 and
FG?
1. Check the volta
g
e between P/J222-3
and P/J222-1
Is there +24VDC between P/J222-1 and
P/J222-3?
Go to step 9. Replace the
C258MAIN
Board.
Step Actions and Questions Yes No
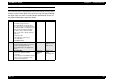
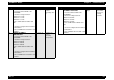
9
DRIVE ASSEMBLY MAIN
1. Reconnect J27 of the Main Motor to
CN227 of the C258MAIN.
2. Check the volta
g
es between:
CN231-A10 <=> FG
CN231-A11 <=> FG
CN231-B11 <=> FG
Is there +5VDC between CN231 and
FG?
1. Check the volta
g
e between P/J222-3
and P/J222-1
Is there +24VDC between P/J222-1 and
P/J222-3?
Go to step 10. Replace the
Drive Assembl
y
Main.
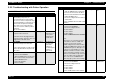
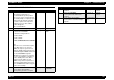
10
ROS ASSEMBLY
1. Reconnect J23 to CN223 of the
C258MAIN.
2. Check the volta
g
es between:
CN231-A10 and FG
CN231-A11 and FG
CN231-B11 and FG
Is there +5VDC between CN231 and
FG?
1. Check the volta
g
e between P/J222-3
and P/J222-1
Is there +24VDC between P/J222-1 and
P/J222-3?
Go to step 11. Replace the
ROS
Assembl
y
.
Step Actions and Questions Yes No