® PowerLite Home Cinema 1080 UB Home Theater Projector User’s Guide
Copyright Notice All rights reserved. No part of this publication may be reproduced, stored in a retrieval system, or transmitted in any form or by any means, electronic, mechanical, photocopying, recording, or otherwise, without the prior written permission of Seiko Epson Corporation. The information contained herein is designed only for use with this Epson product. Epson is not responsible for any use of this information as applied to other products.
Contents Introduction Projector Parts Front Back Bottom Projector Control Panel Remote Control Button Map Optional Accessories Registration and Warranty Using This Manual Setting Up the Projector Choosing a Location Installing the Projector Connecting the Cables Connecting Video and Computer Equipment Making Other Connections Installing Batteries in the Remote Control Turning the Projector On and Off Selecting the Image Source Positioning the Image Making Basic Adjustments Focusing and Zooming Choosing th
Making Detailed Adjustments Using the Menu System Changing How the Menus Display Adjusting the Picture Quality Input Brightness Settings Sharpness and Picture Quality Settings Color Settings Adjustments for Computer Images Selecting Memory Settings and Resetting the Projector Selecting Memory Settings Creating Memory Settings Deleting Saved Memory Settings Resetting the Projector Customizing Projector Features Image Sizing Screen Options Other Setup Options Maintenance Cleaning the Lens Cleaning the Projec
Specifications General Lamp Remote Control Dimensions Electrical Environmental Safety Compatible Video Formats ESC/VP21 Command Codes Notices 61 61 61 61 62 62 62 62 63 65 Important Safety Information FCC Compliance Statement Declaration of Conformity Epson America, Inc.
Contents
Introduction The PowerLite® Home Cinema 1080 UB projector lets you enjoy theater-quality images in the relaxing environment of your own home.
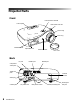
Projector Parts Front Horizontal lens shift dial Control panel Vertical lens shift dial Zoom ring Focus ring Ventilation slots Adjustable foot Infrared receiver Lens cover Back PC port HDMI1 port HDMI2 port Component video ports Trigger out port Infrared receiver Video port S-Video port 8 Introduction AC power inlet Main power switch Control (RS-232C) port Kensington® lock port
Bottom Mounting bracket connections Lamp cover Air filter Projector Control Panel Source button Switches the video input source Power light Power button Menu button Displays the menus Menu navigation buttons Esc button Exits the current menu item Aspect button Changes the picture’s aspect ratio Warning light Select button Selects menu items or opens the line menu Introduction 9
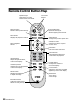
Remote Control Button Map Operation light Lights when you send remote control commands Memory button Recalls custom picture settings Menu button Displays the projector’s menus Menu navigation buttons On and Off buttons Color Mode button Optimizes viewing for different lighting environments Aspect button Changes the picture’s aspect ratio Select/Line menu Selects menu items or opens the line menu ESC button Exits the current menu item Source buttons Switch between equipment connected to the projector
Optional Accessories Epson provides the following optional accessories for the projector: Product Part number Replacement lamp V13H010L39 (ELPLP39) Air filter replacement V13H134A09 (ELPAF09) Projector mount ELPHB550 Kensington security lock (anti-theft device) ELPSL01 You can purchase accessories from an authorized Epson reseller. To find the nearest reseller, please call 800-GO-EPSON (800-463-7766). To purchase online, visit www.epsonstore.com (U.S. sales) or www.epson.ca (Canadian sales).
Using This Manual This book contains all the information you need to use the projector, in addition to basic setup and maintenance instructions, troubleshooting tips, important safety instructions, specifications, and warranty information. Please follow these guidelines as you read through the manual: Warning: Must be followed carefully to avoid bodily injury. Caution: Must be observed to avoid damage to your equipment. Note: Contains important information about your projector.
Setting Up the Projector Follow the instructions in this section to choose a location for the projector, connect the cables, and display an image. Choosing a Location You can install the projector for various viewing setups, as shown below.
Ideally, place the projector at a height where its lens is between the top and bottom of the screen. That way, you can keep the projector level and use the vertical lens shift dial to position the image. This produces the best-looking picture. Try to be as close as possible to the calculated projector position when installing the projector. Too much lens shift can cause minor reduction in image dimensions.
The maximum size of the image is determined by the distance from the projector’s lens to the screen. Depending on your display settings and how you use the Zoom ring, the actual size may be smaller. Use this table as a rough guide for projector placement: 16:9 aspect ratio Maximum diagonal image Projection distance size (width × height) Offset A to Offset B Horizontal Offset 2.8 to 6.2 feet 30 in. (26 × 15 in.) 6.8 to –6.8 in. 0 to 13 in. 3.8 to 8.3 feet 40 in. (35 × 20 in.) 9.1 to –9.1 in.
Also keep these considerations in mind: ■ Make sure there is plenty of space for ventilation around and under the projector. Do not set the projector on top of loose materials that could block the vents underneath. ■ Make sure the projector is within 9.8 feet of a grounded electrical outlet or extension cord. Installing the Projector To install the projector, you first need to determine the location, based on the size of your screen (maximum diagonal image size).
The following illustrations show the dimensions of the projector: 5.18 in. 4.88 in. 5.63 in. 2.60 in. 0.75 in. 4.33 in. 15.98 in. 11.81 in. 2.08 in. 3.04 in. 12.20 in. 6.30 in. To install, you will need the optional projector mount designed for the projector. See page 11 for ordering information. Warning: When installing or adjusting the ceiling mount, do not use adhesives to prevent the screws from loosening and do not use any type of oil or lubricant.
In addition to the tools supplied with the projector mount, you will need a Phillips head screwdriver and a drill to use on the wall or ceiling. If you install the projector on the ceiling, you will need to invert the picture so that it appears right side up. Follow these steps: Menu button 1. Press the Menu button on the remote control. 2. Press the menu navigation buttons to open the Settings menu, then select Projection. 3. Use the navigation buttons to select Front/Ceiling.
Port name Video equipment connection* Computer connection* Component Use a component video cable (with RCA-style connectors): — Component video ports PC Connect the cable to the three component video ports. Match corresponding colors between the cable and the ports. — Use a Mini D-sub, 15-pin monitor cable to connect to a computer RGB (monitor) port: S-Video Use an S-video cable: — Video Use an RCA video cable: — RGB port * For details on compatible video formats, see page 63.
If you connect to the Component port, be sure to select the correct Input Signal setting for your equipment, or the image may not display properly (see page 23). Making Other Connections Connect the power cable and other cables described below, depending on how you plan to use the projector. ■ Plug the power cable into the projector and a grounded electrical outlet. ■ The Trigger out port outputs a 12-volt DC signal when the projector is turned on.
Installing Batteries in the Remote Control The remote control uses two AA batteries. Warning: Keep batteries away from children. If a battery is swallowed, contact your doctor immediately. 1. Release the tab and lift open the cover. 2. Insert two new AA batteries as shown. 3. Insert the tab on the cover and press it down until it clicks into place. Aim the remote control at the front or back of the projector.
Turning the Projector On and Off Turning On the Projector 1. Remove the lens cap. 2. Turn on any connected equipment you plan to use. 3. Turn on the main power switch on the back of the projector. Power switch 4. Press the On button on the remote control or the P Power button on the projector. Turn on the projector Note: To prevent children from turning on the projector, you can use the Child Lock. See page 32 for details.
Turning Off the Projector 1. Turn off any equipment connected to the projector. 2. Press the Off button on the remote control, or press the P Power button on the projector twice. 3. When the P Power light stops flashing orange and stays on, turn off the projector’s main power switch on the back. It is now safe to unplug the projector, if necessary. Caution: Turn off this product when not in use to prolong the life of the projector. Continuous 24-hour-a-day use may reduce the overall life of the product.
If you press the Source button on the projector, you see a menu of available sources. Source button Press the u or d button to go up or down the menu, then press the Select button. Note: If an image does not appear, see “Problem Solving” on page 55. To temporarily turn off the image and darken the screen, press the Blank button on the remote control. Press the Blank button again to return to normal viewing.
Positioning the Image If the image is not centered on the screen, use the horizontal and vertical lens shift dials to adjust its position. Caution: Do not try to move the lens by hand, or you may damage the projector. Always use the lens shift dials to change the lens position. Horizontal lens shift dial Vertical lens shift dial Note: You can display a test pattern to help adjust the image position by pressing the Pattern button on the remote control.
The image display position cannot be moved to the maximum distance in both the vertical and horizontal directions. For example, the image cannot be shifted vertically when it has been shifted horizontally by the full amount. When the image has been shifted vertically by the full amount, it can be shifted up to 9 percent of the horizontal width of the screen.
Making Basic Adjustments Follow the instructions in this chapter to make basic adjustments to the image shape, size, color, and quality. For further refinements, see “Making Detailed Adjustments” on page 33. Focusing and Zooming Sharpen or reduce the focus using the focus ring. Zoom into or out of the picture using the zoom ring.
Choosing the Aspect Ratio In many cases, video signals are automatically resized to fit on your screen when Auto is selected as the Aspect setting. You may need to change the size of the image (or aspect ratio) for certain image types by pressing the Aspect button on the remote control. If the Auto setting is unavailable, you may want to choose one of these settings: ■ Normal for standard TV broadcasts, computer images, or images with a 4:3 aspect ratio. ■ Full for images recorded in squeeze mode.
Choosing the Color Mode You can change the Color Mode to automatically adjust brightness, contrast, and color, letting you quickly optimize the projected image for various lighting environments. You can also select a different color mode for each input source—which is useful if you view different types of images from different sources.
Adjusting Color Temperature, Skin Tone, and Gamma To further customize the color and image quality, you can adjust the Gamma, abstract Color Temperature, and Skin Tone settings using buttons on the remote control. (Not available when you’re projecting sRGB images.) Gamma button S. Tone button ColorTemp. button Note: You can fine-tune these and other color and image quality settings using the projector’s menu system (see page 33).
Adjusting the Gamma Setting You can select from five gamma settings (2.0 to 2.4) or customize your own setting from your image or a displayed graph. Lower values will increase the contrast of dark areas, but tend to blur the bright areas. Higher values will darken the light areas. Gamma presets make minor adjustments to mid-tone values. The larger the gamma preset, the lower the midtone values. Changing these settings affects contrast which can be seen as a blur in bright areas. 1. Press the Gamma button.
Locking the Projector The projector includes two lock settings to prevent the image from being accidentally changed once it’s adjusted, and to keep children from turning on the projector without adult supervision. To access the lock settings, follow these steps: 1. Press the Menu button on the remote control. 2. Use the menu navigation buttons to open the Settings menu. Menu button 3.
Making Detailed Adjustments You can use the projector’s on-screen menus to make detailed adjustments to the image quality—such as the brightness, contrast, sharpness, and color. You can also change the menu display, sleep mode settings, and other projector features. Using the Menu System You can access the menu system either from the remote control or the buttons on the projector’s control panel.
5. When you’re finished, press the Esc button to return to the previous menu or press the Menu button to exit the menu system. To display one of the line menus of the Image menu, press the display like this at the bottom of the image: Select button. You see a Press the u or d button to highlight an option (if necessary), then press the l or r button to adjust it. Press the Esc button to return to the previous menu or the Menu button to exit the menu system.
■ Menu Color Settings Æ Display Æ Menu Color Select a color scheme for displaying the menus. Adjusting the Picture Quality Before fine-tuning the image using these adjustments, make sure you have already selected the best Color Mode for your picture and viewing environment, as described on page 29. Then use the settings in this section to finish adjusting the picture to your liking.
■ Brightness Image Æ Brightness Note: This setting cannot be adjusted when Color Mode is set to x.v. Color. Adjust the brightness so it’s suitable for your viewing conditions. For example, if you’re projecting in a brightly lit room or onto an especially large screen, you may need to increase the brightness. Decrease the brightness for dark rooms or small screens; this also reduces power consumption and fan noise, and helps to prolong the life of the lamp.
■ HDMI Video Range Signal Æ HDMI Video Range Note: This setting can be used only when either HDMI1 or HDMI 2 is selected as the image source (see page 23). If your video equipment has an HDMI port and you’ve connected it to the projector using an HDMI cable, set the level of the projector to match that of the video equipment. When this setting is turned on, the projector disregards the EPSON Super White setting.
Leave this setting on Video for most purposes. Set to Film/Auto when the input source is a film, and you want to project an image closer to its original source. Note: This setting applies only when viewing composite video, S-video, component video, or 480i, or 1080i RGB video (see page 63). ■ Motion Detection Signal Æ Motion Detection This setting specifies how signals are converted to progressive signals.
■ Tint Image Æ Tint Note: This setting cannot be adjusted when Color Mode is set to x.v. Color. Shifts the color balance between magenta and green. ■ Abs. Color Temp. Image Æ Abs. Color Temp. Note: This setting cannot be adjusted when Color Mode is set to x.v. Color. Shifts the color balance between red and blue, making the image appear warmer or cooler. You can also access this setting by pressing the ColorTemp. button on the remote control. See page 30 for more information.
■ RGBCMY Image Æ Advanced Æ RGBCMY Note: This setting cannot be adjusted when Color Mode is set to x.v. Color. Use the RGBCMY settings to adjust the hue and saturation of the six color components (red, green, blue, cyan, magenta, yellow). After adjusting each color, press Esc to move to another menu option. ■ Gamma Image Æ Advanced Æ Gamma Note: This setting cannot be adjusted when Color Mode is set to x.v. Color. You can select from five gamma settings (2.0 to 2.
■ Tracking Signal Æ Tracking Note: This setting only appears when a computer signal is being input to the PC port. Adjust the tracking to eliminate vertical bands. It is easiest to adjust the tracking when the image contains a lot of fine detail (such as black text on a white background). ■ Sync. Signal Æ Sync. Note: This setting only appears when a computer signal is being input to the PC port. Adjust the synchronization to eliminate blurriness.
Selecting Memory Settings and Resetting the Projector Your projector comes with 10 memory locations for installers to save customized settings, designed to provide the best color quality for each of your video inputs. Selecting Memory Settings You can easily recall the memory settings by using the memory button on the remote control. 1. Press the Memory button on the remote control. 2. Select Load Memory. Memory button 3. Use the arrow buttons to select the desired setting, then press the Select button.
Deleting Saved Memory Settings You can clear all your memory settings at once. 1. Press the Menu button on the remote control. 2. Open the Reset menu, then select Reset Memory. 3. Press the Select button to delete the memory settings. Note: You can delete memory settings one at a time with the Erase Memory setting under the Memory menu. Resetting the Projector If the image quality isn’t what you expect, one or more settings may be adjusted improperly.
■ Select Reset Memory to clear all memory settings. ■ Select Reset All to return all projector settings to their original defaults (except Component, Save Memory, Language, and Lamp). Customizing Projector Features Use the settings in this section to adjust the image size and position, suppress on-screen text, and select basic setup options.
Screen Options ■ Messages Settings Æ Display Æ Messages Turn this setting off if you want to prevent on-screen messages from appearing (such as the no-signal message, or the identifying text that appears when you switch between image sources or color modes). ■ Startup Screen Settings Æ Display Æ Startup Screen Turn this setting off if you want to prevent the startup screen from appearing while the projector is warming up.
■ Component Settings Æ Input SignalÆ Component Change this setting to match the type of equipment connected to the Component port. For component video, select Auto to let the projector automatically interpret the signal; or select YCbCr or YPbPr to manually select your video equipment’s signal. Use YCbCr for digital movie camera input. Use YPbPr for DVD or satellite input.
Maintenance Your projector needs little maintenance. All you need to do on a regular basis is keep the lens clean. You also may need to clean the air filter to prevent overheating. Warning: Before you clean any part of the projector, turn it off and unplug the power cord. Never open any cover on the projector, except the lamp and filter covers. Dangerous electrical voltages in the projector can injure you severely.
Cleaning the Projector Case Before you clean the case, turn off the projector and unplug the power cord. ■ To remove dirt or dust, wipe the case with a soft, dry, lint-free cloth. ■ To remove stubborn dirt or stains, moisten a soft cloth with water and a neutral detergent. Then wipe the case and dry it with a dry cloth. Caution: Never use wax, alcohol, benzene, thinner, or other chemical detergents. These can damage the case.
5. If you need to replace the filter, release the tab and lift up the cover. 6. Remove the old filter and replace it with a new one. 7. To replace the cover, insert the tabs and press down until the cover clicks into place.
Replacing the Lamp The projection lamp lasts for up to 3000 hours. You can use the Info menu to check how long it’s been in use (see page 53). It’s time to replace the lamp when: ■ The projected image gets darker or starts to deteriorate. ■ The projector’s warning light flashes red at half-second intervals. ■ The message Replace the lamp appears on the screen when you start projecting. Warning light Note: Lamp life results will vary depending on mode selected, environmental conditions, and usage.
5. Press in the latches securing the lamp cover and lift off the cover. 6. Loosen the two screws securing the lamp (they don’t come all the way out). 7. Grasp the bottom of the lamp as shown and pull it straight out. Warning: The lamp(s) in this product contain mercury. Please consult your state and local regulations regarding disposal or recycling. Do not put in the trash.
8. Gently insert the new lamp and tighten its screws. Caution: Don’t touch the glass portion of the lamp assembly. Touching the glass could result in premature lamp failure. 9. Replace the lamp cover. (The projector won’t work if the lamp cover is open or loose.) 10. Reset the lamp usage timer, as described on page 52. Resetting the Lamp Usage Timer After replacing the lamp, plug the projector back in, turn on the power switch on the back, and press the P Power button.
Checking the Projector Status You can use the Info menu to view information about the current display settings and how long the projection lamp has been in use. To access the Info menu: 1. Press the Menu button on the projector or remote control. 2. Use the menu navigation buttons to open the Info menu.
Transporting the Projector Note: Epson shall not be liable for any damages incurred during transportation. The projector contains many glass and precision parts. When shipping the projector for repairs, use the original packaging material if possible. If you do not have the original packaging, use equivalent materials. Be sure the carrier is capable of transporting fragile equipment and is aware that the projector is fragile.
Problem Solving This section explains how to interpret the projector’s status lights, solve problems with the picture and remote control, and contact technical support. What To Do When the Lights Come On or Flash The lights on top of the projector indicate the projector’s status and let you know when a problem occurs.
Light state Warning light is red Cause and solution The projector is too hot, which turns off the lamp automatically. Let it cool for five minutes, then turn it back on. Make sure there is plenty of space around and under the projector for ventilation. Also, clean or replace the filter if necessary (see page 48). If you are using the projector at an altitude above 4900 feet (1500 meters), turn on High Altitude Mode so the fan can properly cool the projector at the high altitude air pressure (see page 46).
■ If using HDMI, make sure the video source is HDMI 1.3 compliant; otherwise, use component, S-video, or composite video, if available, from source. You’re using a computer and no picture appears on the screen. If you’re using a Windows laptop: ■ Press the function key that lets you display on an external monitor. It’s often labeled with an icon such as , but it may also be labeled CRT/LCD. You may have to hold down the Fn key while pressing it. Check your laptop’s manual or online help.
Click here The picture is upside-down or reversed. Change the Projection setting in the Settings menu (see page 45). Only part of the picture is displayed, or the picture is distorted. ■ Press the Aspect button to select a different aspect ratio (see page 28). ■ If the Aspect is set to Zoom, you may need to use the Zoom Caption Pos. option to see the top or bottom section of the screen so that subtitles are visible (see page 44).
■ If you’re using an extension cable, you may pick up interference if the cable is not adequately shielded. You may need to use a signal amplifier for longer cables. ■ If you’re displaying the same image on your computer and projector screen, try turning off your laptop’s LCD display (see page 57). The picture is blurry. ■ Make sure the Input Signal is set correctly for your video equipment (see page 45). ■ There may be dirt on the lens. Clean the lens as described on page 47.
■ Dim the room lights and turn off any fluorescent lights. Make sure the projector is not in direct sunlight. ■ Turn off nearby equipment that emits infrared energy, such as a radiant room heater. ■ Make sure there are no objects between the remote control and the IR receiver. Where To Get Help Internet Support Epson provides technical assistance 24 hours a day at epson.com/support.
Specifications General Type of display Poly-silicon TFT active matrix Size of LCD panels 0.74 inch (18 mm) wide Lens F=2.0 to 3.17 Resolution (native format) 1920 × 1080 pixels, 1080p Brightness 1600 ANSI lumens maximum Contrast ratio 50,000:1 with Auto Iris on, for select color modes Image size 30 to 150 inches Projection distance 2.8 to 31.4 feet (0.87 to 9.57 m) at 16:9 3.5 to 38.4 feet (1.06 to 11.70 m) at 4:3 Zoom ratio 1-2.
Dimensions Height 4.9 inches (124 mm); not including adjustable feet Width 16 inches (406 mm) Depth 12.2 inches (310 mm); not including lens protrusion Weight 12.3 lb (5.6 kg) Electrical Rated frequency 50/60 Hz AC Power supply 100 to 120 VAC, 2.7 A 200 to 240 VAC, 1.
Compatible Video Formats The projector supports analog video in NTSC, PAL, and SECAM formats, and it automatically adjusts to the incoming signal. It can receive these formats as composite video, S-video, or component video— which it accepts through the Video, S-Video, and Component ports, respectively. The projector also supports digital video (SDTV, HDTV) and various monitor display formats. Digital video is accepted by the HDMI and Component video ports.
Analog RGB Aspect setting Signal (4:3) Resolution Normal Full Zoom Wide VGA* 640 × 480 1440 × 1080 1920 × 1080 1920 × 1080 1920 × 1080 VESA 640 × 480 1440 × 1080 1920 × 1080 1920 × 1080 1920 × 1080 SVGA 800 × 600 1440 × 1080 1920 × 1080 1920 × 1080 1920 × 1080 XGA 1024 × 768 1440 × 1080 1920 × 1080 1920 × 1080 1920 × 1080 SXGA 1280 × 1024 1280 × 960 1350 × 1080 1440 × 1080 1920 × 1080 1920 × 1080 1920 × 1080 1920 × 1080 1920 × 1080 1920 × 1080 WXGA 1280 × 768 1360 × 768
ESC/VP21 Command Codes You can use an AV controller with a 9-pin null modem serial cable to control the projector. You can download the complete ESC/VP 21 Communication Manual for home theater projectors from the Epson website at epson.com/support.
Item Aspect ratio 66 Specifications Command Auto ASPECT 00 Normal ASPECT 20 Full ASPECT 21 Zoom ASPECT 22 Wide ASPECT 25
Notices Important Safety Information Follow these safety instructions when setting up and using the projector: ■ Never look into the projector lens when the lamp is turned on; the bright light can damage your eyes. Never let children look into the lens when it is on. ■ Never open any cover on the projector, except the lamp and filter covers. Dangerous electrical voltages inside the projector can severely injure you.
■ The lamp(s) in this product contain mercury. Please consult your state and local regulations regarding disposal or recycling. Do not put in the trash. ■ Allow the lamp to cool for one hour before replacing it. ■ Unplug the projector during lightning storms or when not in use for extended periods. ■ Don’t place the projector or remote control on top of heat-producing equipment. ■ If you use the projector in a country other than where you purchased it, use the correct power cord for that country.
FCC Compliance Statement For United States Users This equipment has been tested and found to comply with the limits for a Class B digital device, pursuant to Part 15 of the FCC Rules. These limits are designed to provide reasonable protection against harmful interference in a residential installation. This equipment generates, uses, and can radiate radio frequency energy and, if not installed and used in accordance with the instructions, may cause harmful interference to radio or television reception.
Declaration of Conformity According to 47CFR, Part 2 and 15 for Class B Personal Computers and Peripherals; and/or CPU Boards and Power Supplies used with Class B Personal Computers: We: Located at: Epson America, Inc. 3840 Kilroy Airport Way MS 3-13 Long Beach, CA 90806-2469 Telephone: (562) 290-5254 Declare under sole responsibility that the product identified herein, complies with 47CFR Part 2 and 15 of the FCC rules as a Class B digital device.
Epson America, Inc. Limited Warranty Basic Two-Year Warranty and 90-Day Lamp Warranty What Is Covered: Epson America, Inc. (“Epson”) warrants to the original retail purchaser of the Epson product enclosed with this limited warranty statement that the product, if purchased new and operated in the United States or Canada, will be free from defects in workmanship and materials for a period of two (2) years from the date of original purchase (except that the warranty period is 90 days for projector lamps).
WARRANTY, NEITHER EPSON AMERICA, INC. NOR ITS AFFILIATES SHALL BE LIABLE FOR ANY LOSS, INCONVENIENCE, OR DAMAGE, INCLUDING DIRECT, SPECIAL, INCIDENTAL, OR CONSEQUENTIAL DAMAGES, RESULTING FROM THE USE OR INABILITY TO USE THE EPSON PRODUCT, WHETHER RESULTING FROM BREACH OF WARRANTY OR ANY OTHER LEGAL THEORY. In Canada, warranties include both warranties and conditions.
Index Numerics 2-2 Pull-down, 38 A Abs. Color Temp.
F L FCC Compliance Statement, 69 Filter, see Air filter Flickering, 38, 58 Focus ring, 27 HDMI, 7, 18, 19, 36 to 37 Help, 60 High Altitude Mode, 46 Home Service, 11 Lamp checking usage timer, 53 life, 61 ordering, 11, 50 replacing, 50 to 52 resetting usage timer, 52 safety instructions, 67 to 68 specifications, 61 Language setting, 34 Lens shift dials, 14, 25 Lens, cleaning, 47 Lights, projector, 55 to 56 Line menu, 10 Lock Child Lock, 32, 46 Control Panel Lock, 32, 46 Kensington, 8, 11 projector button
O R Offset, color, 39 Output scaling, 44 Registration, 11 Remote control batteries, 21 buttons, 10 lighting up buttons, 21 problems, 59 Replacing lamp, 50 to 52 Resetting lamp usage timer, 43, 52 projector settings, 43 Resolution compatible formats, 63 to 64 projector, 53, 61 RGB settings, 39 RGBCMY settings, 40 P Pattern button, 10 Picture problems, 56 to 59 Pixelworks, 62 Positioning image, 25 to 26, 44 Positioning projector, 13 to 16 PrivateLine Support, 12, 60 Problems indicator lights, 55 to 56 pic
Storing projector, 53 Support, 12, 60 S-Video connection, 19 Sync (Synchronization) setting, 40 T Technical support, 12, 60 Tint, 39 Tracking, 40 Transporting projector, 54 Trigger out port, 20 Trigger out setting, 46 Turning on and off projector, 22 to 23, 56 V Video Signal setting, 45 Video, compatible formats, 63 to 64 VP21 codes, 65 W Warranty, 11, 71 to 72 Where to Get Help, 60 Wide setting, 28 X x.v. Color, 29 Z Zoom Caption Pos.