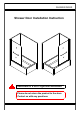
SHOWER DOOR Shower Door Installation Instruction Reversible for a left or right door installation. Please do not return the product to the store. Contact us with any questions.
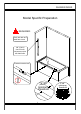
SHOWER DOOR Model Specific Preparation REQUIRED: Verify tub deck and walls with a level. 3/8” (10mm) Out-of-Plumb Adjustment within the Wall Profile. Threshold must be level.
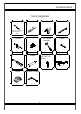
SHOWER DOOR PACKAGE CONTENT cc D dd bb C E aa B A PACKAGE CONTENT PART# A NOTE DESCRIPTION Bottom Anti-Water Strip QTY 1 B Door panel 1 C Wall Jamb 1 D Top Cover Cap 1 E Handle 1 Inspect all parts for missing prior to installation! Contact us for any part missing.
SHOWER DOOR PACKAGE CONTENT A B x1 C x1 x1 D x1 E x1 HARDWARE CONTENT cc bb aa Wall anchor Ø6x38mm 4 pcs Screw ST4*30 4 pcs Fitting 4 pcs dd Screw ST4*10 4 pcs Additional spare parts are included. NOTE Inspect all parts for missing prior to installation! Contact us for any part missing.
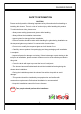
SHOWER DOOR TOOLS REQUIRED Screw Driver Drill Level Measuring Tape Soft Head Hammer Pencil Knife Sealant MASONRY DRILL BIT FOR TILE Ø6mm Safety Glasses Glove Carpenter's Squarer Drill Bits Ø1/8”(3mm) /Ø1/4” (6mm) and Ø5/16”(8mm) dia.
SHOWER DOOR SAFETY INFORMATION CAUTION Please carefully read the following important safety information before handling or installing this shower. There is a risk of serious injury while handling this product. To minimize these risks, please note: • Always wear safety glasses and gloves while handling. • Always follow the installation instructions. • Inspect glass for damage before installation.
SHOWER DOOR Model Dimensions A NOTE This model is reversible for right or left-hand door installation. The left-hand door installation is shown throughout this manual. For the right-hand door installation, simply begin on the opposite wall and reverse the orientation of the installation steps shown.
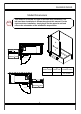
SHOWER DOOR 1-1 Wall Jamb(C) Installation Confirm the Wall Jamb(C) is NOTE plumb with a level before marking the location of the holes for drilling. 1 C X1 Wall Jamb ±0.0 2 Fig.a NOTE Center the Wall jamb (C) on the Threshold.
SHOWER DOOR 1-2 Wall Jamb(C) Installation Fig.a NOTE 1.Drill the holes as Fig.a and Fig.b; 2.Apply silicone into the groove along the entire length of the Wall Jamb(C) as Fig c; 3.Attach the Wall Jamb(C) to the wall as Fig d. see NOTE Fig.b see NOTE aa X3 Fig.c Fig.d · bb X3 NOTE If a Stud is presented behind the wall: drill a Ø1/8”(3mm) pilot hole into the stud and use the ST4.
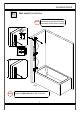
SHOWER DOOR 2 Door panel(B) Installation The Door panel(B) Profiles can be adjusted up to 3/8” within the Wall Jamb(C) for overall width or to correct NOTE for out-of-plumb conditions within the model size. Screw them together after making final adjustments. B aX1 dju stm en UP t 83 "M AX B See label. Pls follow the arrows to install the glass panel! ±0.
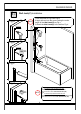
SHOWER DOOR 3 Fasten the Door panel(B) After final adjustments, drill Ø1/8” holes in the Wall Jamb (C). Drill only through the first layer of the Door panel Profile and NOTE install the ST4.0x10mm Pan Head Screws (dd) using the Decorative Covers and Washers (cc) Adjustment 38" max Inside View 1 Drill Bit Φ=1/8" ±0.0 Threshold must be level 2 cc X3 dd X3 3 Include the washers when Inside View ST4X10mm Pan Head Screw installing the ST4.
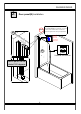
SHOWER DOOR 4 Handle(E) Installation Attach the Handle (E) to the Door Panel (B) . Be NOTE sure to use all of the supplied rubber gaskets to protect the glass.
SHOWER DOOR 5 Top Cover Cap (D)&Bottom Anti-water Strip (A) Installation 1 D X1 2 A X1 NOTE Attach the Bottom Anti-water Strip (A) to Door panel(B).
SHOWER DOOR 6 NOTE NOTE SEALING The surfaces need to be clean and free of debris before applying silicone. Ensure that the Shower door closes tightly and opens smoothly. Apply a good quality silicone sealant along the Wall Jamb(C) Allow 24 hours for the silicone to cure before using the shower. 24 hour ! Apply Silicone Sealant,(not supplied).