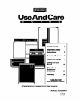
UseAndCare 2 A Note To You iilEZEl:afety Parts And Features Using Your Range Caa;,g For Your 18 If You Need $fzz!: 25 Warranty 28 1400-253-1301 Call US with qmstions STANDARD-CLEANING or comments.
A Note To You Thank you for buying an Estate@ appliance. You have purchased a quality, worldclass home appliance. Years of engineering experience have gone into its manufacturing. To ensure that you will enjoy many years of trouble-free operation, we have developed this Use and Care Guide. It is full of valuable information on how to operate and maintain your appliance properly and safely. Please read it carefully.
Important safety Instructions To reduce the risk of fire, electrical shock, injury to persons, or damage when using the range, follow basic precautions, including the following: General 4ead all instructions before using the range. 4nstall or locate the range only in accordance with the provided Installation Instructions. The range must be installed by a qualified installer. The range must be roperly connected to electrica Psupply and grounded. @Donot use the range for warming or heatin the room.
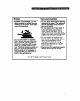
some of the heatin element will be exposed an %may result bno:“he,l~~~.n~,9’,~~t~~~~~e also improves cooking efficiency. *Do not wear loose or hanging @Check to be sure lass cookarments when usin the range. ing utensils are sa3e for use on 8 hey could ignite if t I?ey touch a the ran e. Only certain types of ;rtb;trfde unit and you could glass, g9 ass-ceramic, ceramic, . earthenware or other glazed *Use only dry otholders.
Grease Care and cleaning *Grease is flammable. Do not allow grease to collect around cooktop or in vents. Wipe spillovers immediately. ’ ’ ADO not soak removable heating elements in water. The element will be damaged and shock or fire could result. ~DO not clean door heat seal. It is essential for a ood seal. Care should be ta5 en not to rub, damage or move the seal. Clean only parts recommended in this Use and Care Guide.
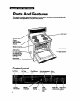
Parts And Features This section contains captioned illustrations of your range. Use them to become familiar with the location and appearance of all parts and features.
Using Your Range In This Section Page Using the surface units ..................... .7 Positioning racks and pans.. ............ .9 For best air circulation .................... .lO Using aluminum foil for baking.. .... .10 Page Broiling .............................................. 13 Broiling tips ....................................... 15 Energy saving tips ............................ 15 The oven vent ................................... 16 Setting the clock ...............................
Until you get used to the settings, use the following as a guide. For best results, l start cooking at the high setting; then turn the control knob down to continue cooking. SElTlNG HI RECOMMENDED USE l l MED-HI l l MED l l MED-LO l LO l Cookware l To start foods cooking. To bring liquids to a boil. To hold a rapid boil. To fry chicken or pancakes. For gravy, pudding and icing. To cook large amounts of vegetables. To keep food cooking after starting it on a higher setting.
Home canning Optional canning kit information To protect your range: l Use flat-bottomed canners/pans for best results. l l l l l Use the largest surface unit for best results. Also, use a canner/pan which can be centered over the surface unit and which does not extend more than one inch outside surface unit area. Large diameter canners/pans, if not properly centered, trap heat and can cause damage to the cooktop. Do not place canner on two surface units at the same time.
For best air circulation Hot air must circulate around the pans in the oven for even heat to reach all parts of the oven. This results in better baking. l Place the pans so that one is not directly over the other. l For best results, allow 1% to 2 inches (4-5 cm) of space around each pan and between pans and oven walls. There must be a minimum space of 1 inch (2.5 cm). l Use only one cookie sheet in the oven at one time.
Setting the clock Push in and turn the Minute Timer Knob to set the clock. 1. Push in Minute Timer Knob and turn clockwise until clock shows the correct time of day. 2. Let the Minute Timer Knob pop Turn clockwise until Minute Timer points to OFF. The clock setting change if you push in the knob turning. Using the Minute out. hand will when llmer The Minute Timer does not start or stop the oven. It works like a kitchen timer. Set it in minutes up to an hour.
Baking/roasting 1. Position the rack(s) properly before turning on the oven. To change rack positlon, lift rack at front and pull out. For further information, see “Positioning racks and pans” on page 9. 2. Set the Oven Selector to BAKE. 3. Set the Oven Temperature Control Knob to the baking/roasting temperature you want. The OVEN HEATING Indicator Light will come on. The oven is preheated when the OVEN HEATING Indicator Light first goes off.
1. Turn the Oven Temperature Control Knob to the off position. Pull knob straight off and flip it over. 2. Loosen the locking screws inside the control knob. Note the position of the notches. Notches _T- 3. To lower the temperature, hold knob handle firmly and move the tooth a notch counterclockwise. Each notch equals about 5°F (2.5%). 4. To raise the temperature, hold knob handle firmly and move the tooth a notch clockwise. Each notch equals about 5°F Locking screws (2.5%). 5.
Custom broil If food is cooking too fast, turn the Oven Temperature Control Knob counterclockwise until the OVEN HEATING Indicator Light goes off. l If you want the food to broil slower from the start, set the Oven Temperature l l Control Knob between 170°F and 325°F (77% and 163°C). These temperature settings allow the broil heating element to cycle and to slow cooking. The lower the temperature, the slower the cooking.
Broiling l l l tips Use the broiler pan and grid for broiling. They are designed to drain excess liquid and grease away from the cooking surface to help prevent spatter, smoke or fire. Refer to a broiling chart in a reliable cookbook for correct broiling times. After broiling, remove the broiler pan from the oven when you remove the food. Drippings will bake on the pan if you leave it in the heated oven. Energy saving Fire Hazard l l Place meat the correct distance from the element.
The oven vent Hot air and moisture escape from the oven through a vent under the right rear surface unit. You can cook on the unit or keep food warm on it while the oven is on. The vent is needed for air circulation. Do not block the vent. Poor baking/roasting can result. NOTE: Plastic utensils left over the vent can mett. Bum and Fire Hazard l l If you leave a utensil on the right rear surface unit, use potholders when moving it. Pan handles could become hot enough to bum.
The anti-tip bracket The range will not tip during normal us& However, tipping can occur if you apply too much force or weight to the open door without the anti-tip bracket properly secured. Personal Injury Hazard *To reduce risk of range tipping over, secure range with a properly installed anti-tip bracket supplied with range or an optional wallmounted anti-tip bracket kit. l If range is moved for cleaning or service, check that anti-tip device is engaged before using range.
Caring For Your Range In This Section Page Page Surface units and reflector bowls ...18 Lift-up cooktop ..... ... .. ..................... .. 21 Removing the oven door ... .... ........ .. 21 Cleaning chart ... .... ..... ... ................. ... 22 The oven light ... .... ..... ....... ... .......... ... 24 Your range is designed for ease of care. You can do most cleaning with items found around your home.
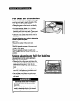
3. Pull the surface unit straight away from the receptacle. 4. Lift out the reflector bowl. See “Cleaning chart” on page 22 for cleaning instructions. Replacing 1. Make sure all surface units are off and cool before replacing surface units and reflector bowls. 2. Line up openings in the reflector bowl with the surface unit receptacle and the element hold-down clip.
3. Hold the surface unit as level as possible with the terminal just started into the receptacle. Push the surface unit terminal into the receptacle. 4. When terminal is pushed into the receptacle as far as it will go, push down the edge of the surface unit opposite the receptacle. The element hold-down clip will keep the surface unit from moving around. NOTE: Reflector bowls reflect heat back to the utensils on the surface units. They also help catch spills.
Lift-up cooktop 1. Lift front of cwktop at toth front corners until the support rods lock into place. Personal Injury Hazard Be sure both support rods are fully extended and in the locked position. Failure to do so could result in personal injury from the cooktop accidentally 1 failing. I I Product Damage Hazard Do not drop the cwktop. Damage could result to the porcelain and the woktop frame. 2. Wipe with warm, soapy water. Use a soapy steel-wool pad on heavily soiled areas. 3.
Cleaning chart Use the following table to help you clean all parts of your range. PART Control knobs HOW TO CLEAN WHAT TO USE Sponge and warm, soapy water l l l l Control panel Sponge and warm, soapy water l l OR Paper towel and spray glass cleaner Exterior surfaces (other than control panel) Sponge and warm, soapy water l l l l Turn knobs to OFF and pull straight away from control panel. Wash, rinse and dry thoroughly. Do not soak Do not use steel wool or abrasive cleansers.
Oven door glass Oven cavity HOW TO CLEAN WHAT TO USE PART Paper towel and spray glass cleaner OR Warm, soapy water and a nonabrasive, plastic scrubbing pad Sponge and warm, soapy water Soapy steel-wool pad for heavily soiled areas l l l l l l Make sure oven is cool. Pollow directions provided with the cleaner. Wash, rinse and dry thoroughly. Remove door for easier access. (See page 21.) Wash, rinse and dry well. Rinse well with water.
The oven light The oven light will come on when you use the Oven Light Switch on the control panel. Electrical Shock and Personal injury Hazard Make sure oven and light bulb are cool and power to the range has been turned OFF before replacing the light bulb. Failure to do so could result in electrical shock or bums. *The bulb cover must be in place when using the oven. The cover protects the bulb from breaking, and from high oven temperatures.
If You Need Assistance Or sewice This section is designed to help you save the cost of a service call. Part 1 of this section outlines possible problems, their causes, and actions you can take to solve each problem. Parts 2 and 3 tell you what to do if you still need assistance or service. When calling our Consumer Assistance Center for help or calling for service, please provide a detailed description of the problem, your appliance’s complete model and serial numbers and the purchase date. (See page 2.
POSSIBLE Cooking results are not what you expected 26 CAUSE SOLUTION Level range. (See Installation tions.) The range is not level. The oven temperature too low or too high. 1 seems Instruc- Adjust the oven temperature control. (See “Adjusting the oven temperature control” on page 13.) The oven was not preheated as the recipe calls for. Preheat oven if called for in recipe. The recipe has never been tested or is not from a reliable source. Use only tested recipes from a reliable source.
2. If you need assistance 4. If you need FSP ment parts . . . .. . Call Whirlpool Consumer Assistance Center telephone number. Dial toll-free from anywhere in the U.S.A.: 1-800-253-l 301 and talk with one of our trained consultants. The consultant can instruct you in how to obtain satisfactory operation from your appliance or, if service is necessary, recommend a qualified service company in your area. If you prefer, write to: Mr.
ESTATE” Electric Range Warranty LENGTH OF WARRANTY WHIRLPOOL WILL PAY FOR FULL ONE-YEAR WARRANTY FSPQ replacement parts and repair labor to correct defects in materials or workmanship. Service must be provided by an authorized WhirlpoolSM service company. From Date of Purchase WHIRLPOOL WILL NOT PAY FOR A. Service calls to: 1. Correct the installation of your range. 2. Instruct you how to use your range. 3. Replace house fuses or correct house wiring. 4. Replace owner accessible light bulbs. B.