
Installation Guide


10
Lumen Adjust/Dimming Mode Selection
1
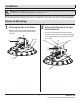
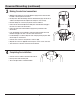
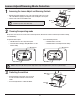
Accessing the Lumen Adjust and Dimming Controls
□ Open the protective waterproof cover on top of the electrical box cover on the
side of the fixture body (A) by removing the screws holding the cover in place.
□ Set the screws aside for reinstallation later.
NOTE: Installation of the screws in the cover is required to
maintain the product’s wet location rating.
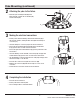
3
Protecting the switches
□ Close the waterproof protective cover and secure
it to the electrical box with the screws removed
earlier.
□ Turn on the light switch to activate the fixture.
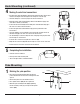
To use the dimming function:
□ Slide DIP Switch 1 to 0-10V
□ Slide DIP Switch 2 to the highest lumen setting.
To adjust the lumen output:
□ Slide DIP Switch 1 to the 3 step lumen option.
□ Select the lumen setting by sliding DIP Switch 2 to the
desired setting.
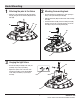
2
Choosing the operating mode
The product can be used in one of two modes: Lumen adjust mode, which allows selection from three preset lumen settings,
or 0-10v Dimming.
DIP Switch 2
DIP Switch 1
A
NOTE: 3 Step Lumen (DIP Switch 1) and the highest lumen output setting (DIP Switch 2) are the factory default settings.
DIP Switch 1
Waterproof
cover
Electrical
box
DIP Switch 2
A
Waterproof
cover
Electrical
box