
Operation Manual


en - 10 ENGLISH NEDERLANDS/FRANÇAIS/DEUTSCH/ENGLISH nl/fr/de/en - 2
D
E
F
G
C
B
A
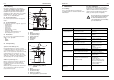
Fig. 1 Hoofdcomponenten
A Koudwateraansluiting
B Warmwateraansluiting
C Indicatielamp
D Blokkeerplaat
E Temperatuurknop
F Typeplaat
G Thermostaatas
Fig. 1 Composants principaux
A Raccordement d’eau froide
B Raccordement d’eau chaude
C Lampe témoin
D Plaque de blocage
E Bouton de réglage de la
température
F Plaque signalétique
G Axe du thermostat
Abb. 1 Hauptbauteile
A Kaltwasseranschluß
B Warmwasseranschluß
C Anzeigeleuchte
D Sperrplatte
E Temperaturknopf
F Typenschild
G Thermostatwelle
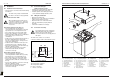
Fig. 1 Main components
A Cold-water connection
B Hot-water connection
C Indicator
D Locking plate
E Temperature switch
F Type plate
G Thermostat axe
10 Installation
10.1 Installation of the waterheater
• Place the device on a flat surface with nothing
in between.
The device may only be installed with
the water connections facing upwards.
10.2 Connections water main
When installing swivels and squeeze
connections, always use 2 open-end
spanners in order to prevent bending
and torsion on the pipes and
accessories.
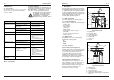
Pressurised system pressure (Fig. 2.1)
• First carefully flush out all the pipes
connecting with the waterheater (especially
important in case of newly-built houses).
• Close off the main cock of the water main.
• Connect the cold-water connection of the
waterheater (blue) with the inlet combination.
• Close off the stop cock of the inlet
combination.
• Install a pressure reducing valve upstream of
the inlet combination if the mater main
pressure is higher than the closing pressure
of the inlet combination.
• Install the inlet combination or the pressure
reducing valve on the cold-water supply.
• Connect the cold-water connection of the tap
with the cold-watersupply.
• Connect the hot-water connection of the
waterheater (red) with the hot-water
connection of the tap.
Unpressurised system (Fig. 2.2)
• First carefully flush out all the pipes
connecting with the waterheater (especially
important in case of newly-built houses).
• Close off the main cock of the water main.
• Connect the cold-water connection of the
waterheater (blue) with the cold-water pipe of
the tap.
• Connect the cold-water connection of the tap
with the cold-water supply.
• Connect the hot-water connection of the
waterheater (red) with the hot-water
connection of the tap.
10.3 Connection drain pipe
(with pressurised system)
• Install an open funnel into the drain pipe
immediately behind the relief valve.
• Install a siphon on the drain pipe if this is
connected immediately with the sewer.
10.4 Filling the waterheater
• Open the hot-water tap.
• Open the stop cock of the inlet combination
(with a system under pressure).
• Open the main cock of the water main.
• Have the waterheater properly flushed
through.
• Check the installation for leakage.
10.5 Connections electricity
The waterheater must be completely
filled with water and the installation
must be free from leaks before a
connection with the electricity grid can
take place.
The device has a three-core cord for a
connection with an earth-connected wall socket.
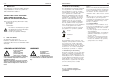
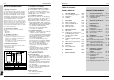
Fig. 6 Connecting diagram
TR= Temperature regulator
TB= Temperature limiter
N = Zero connection
L = Phase connection
TR TB
L
N