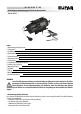
DE GB FR NL IT SLO DE Intelligentes Batterieladegerät 6/12V 4A mit Kabelaufroller Art.-Nr. 16616 Inhalt 1. Bestimmungsgemäßer Gebrauch 2. Lieferumfang 3. Spezifikationen 4. Symbolerklärung 5. Sicherheitshinweise 6. Bedienungsanleitung 6.1 Vorbereitung 6.2 Anschließen des Batterieladegerätes 6.3 Entfernen des Ladegeräts 7. Wartung und Pflege 7.1 Wartung 7.2 Pflege 8. Hinweise zum Umweltschutz 9.
Andere Batterien dürfen mit diesem Gerät nicht geladen werden. Das Ladegerät darf nicht als Starthilfe verwendet werden. Laden Sie zuerst die Batterie des Fahrzeugs vollständig auf, und entfernen Sie das Ladegerät bevor Sie das Fahrzeug starten. Das Ladegerät darf nicht als Gleichstromquelle oder für andere Zwecke verwendet werden. Das Batterieladegerät ist für den Einsatz in trockener und geschützter Umgebung bei Temperaturen von -5 °C bis +40°C ausgelegt.
• • • • • • • • • • • • • • Nehmen Sie das Gerät nicht in Betrieb oder ziehen Sie sofort den Netzstecker, wenn es beschädigt ist oder wenn der Verdacht auf einen Defekt besteht. Nehmen Sie in diesen Fällen Kontakt zu unseren Technikern auf. Ziehen Sie den Netzstecker, wenn das Gerät nicht benutzt wird. Halten Sie das Verpackungsmaterial, besonders Folien und Folienbeutel, von Kindern fern. Es besteht Erstickungsgefahr. Entfernen Sie vor der Inbetriebnahme alle Schutzfolien vom Gerät.
Achtung: Nach dem Einstecken des Netzsteckers müssen Sie das gewünschte Ladeprogramm durch mehrmaliges Drücken der MODE-Taste auswählen. Wird die MODE-Taste nicht gedrückt, wird der Ladevorgang nicht gestartet. Wenn der Ladevorgang läuft, ist es nicht mehr möglich auf ein anderes Ladeprogramm umzuschalten. Wenn Sie mit einem anderen als dem eingestellten Ladeprogramm arbeiten möchten, ziehen Sie den Netzstecker aus der Steckdose und warten bis das Display dunkel geworden ist.
Fehlermeldungen Fehleranzeige nach Falschanschluss (Verpolung), Kurzschluss, Auswahl eines falschen Ladeprogramms oder Überhitzung. Fehlermeldung im 6 V – Modus, wenn eine Batterie mit weniger als 5,5 V ± 0,2 angeschlossen wird oder wenn nach 4 h Ladezeit die Spannung immer noch unter 6 V liegt. 6.3 Entfernen des Ladegeräts Achtung: Ziehen Sie als erstes den Netzstecker aus der Steckdose und beachten Sie die Reihenfolge beim Abklemmen. So vermeiden Sie Funkenbildung.
GB Intelligent battery charger 6/12V 4 A with cable roller Article No. 16616 Content 1. Intended use 6 2. Scope of delivery 6 3. Specifications 6 4. Explanation of symbols 7 5. Safety notes 7 6. Operating instructions 7 6.1 Preparation 8 6.2 Connecting the battery charger 8 6.3 Removing the charger 9 7. Maintenance and care 9 7.1 Maintenance 9 7.2 Care 9 8. Notes regarding environmental protection 9 9.
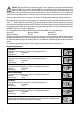
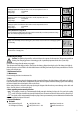
4. Explanation of symbols Corresponds to EC directives Labelled electrical product may not be disposed of in the household waste Devices with this symbol may only be operated in the house (dry environment) Insulated housing (protection class II). Fuse, here: Slow-burning, 1.6A Recommended battery capacity Read the operating instructions Corresponds to the requirements of § 21 of the German Product Safety Law (Produktsicherheitsg esetz) IP65 Protection class Spray water protected 5.
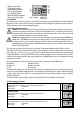
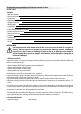
1. Battery voltage display 2. 6 V charging programme 3. Winter charging programme 4. 12 V charging programme 5. Car charging programme 6. Motorbike charging programme 7. Battery charge status display Figure 2: Display 6.1 Preparation Clean the battery pole of dust and corrosion residue. Only for open batteries: Top up with distilled water until the minimum filling level is reached. Leave the cells of the battery open until the end of the charging process.
Motorbike winter mode Charging programme for 12 V batteries from 1.2 Ah to 14 Ah, temperatures below 0°C Charge current: 2 A maximum charge voltage: 14.8 V Car mode Charging programme for 12 V batteries from 14 Ah to 120 Ah, temperatures above 0°C Charge current: 4 A maximum charge voltage: 14.6 V Car winter mode Charging programme for 12V batteries from 14 Ah to 120 Ah, temperatures below 0°C Charge current: 4 A maximum charge voltage: 1 4.
FR Appareil de recharge intelligent 6/12V 4A avec enrouleur de câbles N° d‘art. 16616 Sommaire 1. Utilisation conforme 2. Contenu de la livraison 3. Spécifications 4. Signification des symboles 5. Consignes de sécurité 6. Mode d‘emploi 6.1 Préparation 6.2 Raccordement du chargeur de batterie 6.3 Retirer l‘appareil de recharge 7. Entretien et nettoyage 7.1 Entretien 7.2 Maintenance 8.
3. Spécifications Dimensions : Longueur du câble d‘alimentation : Longueur du câble de chargement : Entrée : Moto : Capacité de la batterie : Classe de protection : Température ambiante : 4. Signification des symboles 180 x 100 x 45 [mm] Poids : 0,475 kg 1,50 m 1,50 m 220-240 V AC 50/60 Hz Sortie : Mode 6V : 6 V DC 2,0 A 12 V DC 2,0 A Voiture : 12 V DC 4,0 A 6 V min 1,2 Ah max. 14 Ah 12 V min 1,2 Ah max.
• • • Tirez le câble d‘alimentation lorsque vous le débranchez de la fiche de contact. Ne placez jamais l‘appareil à proximité de feu, de chaleur et à des températures supérieures à +40°C pendant une période prolongée ! Conservez ce mode d‘emploi et transmettez-le aux futurs utilisateurs. 6. Mode d‘emploi Fig.1 : Vue d’ensemble A Touche MODE B Affichage C Câble de chargement D Pince rouge (+) E Pince noire (-) F Câble d‘alimentation G Crochet d’encourlement des câbles 1.
Moto 6 V Moto 12 V Auto 12 V Moto 6 V hiver Moto 12 V hiver Auto 12 V hiver Le chargeur adapte le courant de chargement à l‘état de chargement de la batterie et assure ainsi un chargement optimal de la batterie raccordée. Le courant de charge maximal indiqué n‘est appliqué que lors de la phase de chargement principale. Le courant de charge appliqué s‘affaiblit juste avant l‘obtention de la capacité de charge maximale.
6.3 Retirer l‘appareil de recharge Attention : Retirez d‘abord la fiche de contact de la prise et observez la procédure de branchement. Vous évitez ainsi la formation d‘étincelles. Ceci est particulièrement important pour votre sécurité car un mélange d‘hydrogène et d‘oxygène très explosif peut se former lors du chargement. Séparez l‘appareil de recharge du réseau d‘alimentation.
NL Intelligent batterijlaadtoestel 6/12V 4A met kabeloproller Art.nr. 16616 Inhoud 1. Reglementair gebruik 15 2. Leveringsomvang 15 3. Specificaties 15 4. Symboolverklaring 16 5. Veiligheidsvoorschriften 16 6. Gebruiksaanwijzing 16 6.1 Voorbereiding 17 6.2 De acculader aansluiten 17 6.3 De oplader verwijderen 18 7. Onderhoud en verzorging 18 7.1 Onderhoud 18 8. Informatie over de milieubescherming 18 9.
4. Symboolverklaring Komt overeen met de EG-richtlijnen Behuizing met randaarde (beveiligingsklasse II). Een dienovereenkomstig gemarkeerd elektrisch product mag niet als afval via het huisvuil worden afgevoerd Apparaten met dit teken mogen uitsluitend binnenshuis (droge omgeving) worden gebruikt Zekering, hier: traag, 1,6 A Aanbevolen capaciteit van de accu's: Komt overeen met 5.
1. Accuspanningsindicatie 2. 6 V-oplaadprogramma 3. Oplaadprogramma voor de winter 4. 12 V-oplaadprogramma 5. Oplaadprogramma voor de auto 6. Oplaadprogramma voor de motorfiets Afbeelding 2: display 7. Accuspanningsindicatie 6.1 Voorbereiding Reinig de accupool van stof en corrosieresten. Uitsluitend voor open accu’s: Vul gedestilleerd water bij tot het minimale vulpeil bereikt is. Laat de cellen van de accu open tot het opladen is beëindigd.
Wintermodus voor de motorfiets Oplaadprogramma voor 12 V-accu‘s, 1,2 Ah tot 14 Ah, temperaturen onder 0°C Laadstroom: 2 A maximaal Laadspanning: 14,8 V Automodus Oplaadprogramma voor 12 V-accu‘s, 14 Ah tot 120 Ah, temperaturen boven 0°C Laadstroom: 4 A maximaal Laadspanning: 14,6 V Wintermodus voor de auto Oplaadprogramma voor 12 V-accu‘s, 14 Ah tot 120 Ah, temperaturen onder 0°C Laadstroom: 4 A maximaal Laadspanning: 14,8 V Druppellaadmodus Zodra de accu volledig is opgeladen, wordt de acculader auto
IT Caricabatteria intelligente 6/12V 4A con avvolgicavo Cod. art. 16616 Indice 1. Uso previsto 2. Volume di consegna 3. Specifiche 4. Spiegazione dei simboli 5. Avvertenze di sicurezza 6. Istruzioni per l‘uso 6.1 Operazioni preliminari 6.2 Collegamento del caricabatterie 6.3 Scollegamento del caricabatterie 7. Cura e manutenzione 7.1 Manutenzione 7.2 Pulizia 8. Avvertenze sulla tutela ambientale 9.
3. Specifiche Dimensioni: 180 x 100 x 45 [mm] Peso: 0,475 kg Lunghezza del cavo di alimentazione: 1,50 m Lunghezza del cavo di carica: 1,50 m Ingresso: 220-240 V AC 50/60 Hz Uscita: Modalità 6 V: 6 V DC 2,0 A Motocicletta: 12 V DC 2,0 A Capacità della batteria: 6 V min 1,2 Ah max. 14 Ah 12 V min 1,2 Ah max. 120 Ah Classe di protezione: IP65 (solo l‘alloggiamento, non il cavo di collegamento e il cavo di carica) Temperatura ambiente: da -5 °C a +40 °C 4.
• • • Per scollegare il cavo di alimentazione, afferrarlo sempre e solo per la spina. Non posizionare il caricabatterie nei presso di fiamme o fonti di calore e non esporlo a temperature superiori a 40°C! Conservate accuratamente le presenti istruzioni d’uso e consegnatele anche agli altri utenti. 6. Istruzioni per l‘uso Figura 1: Vista d‘insieme 1. Indicazione tensione batteria 2. Programma di ricarica 6 V 3. Programma di ricarica invernale 4. Programma di ricarica 12 V 5.
Se si collega la batteria con i poli invertiti o il caricabatterie non fa contatto, sul display si attiva il messaggio di errore „ „. Se sul display viene visualizzato il messaggio di errore „ „, se è stata collegata una batteria guasta di 6 V, non la si può ricaricare con il caricabatteria. Se la batteria è collegata correttamente, sul display vengono indicati l‘attuale tensione della batteria e i simboli del programma di ricarica impostato.
Messaggi di errore Errore indicato dopo un errore di allacciamento (scambio di polarità), cortocircuito, selezione di un programma di ricarica errato o surriscaldamento. Messaggio di errore in modalità 6 V, se viene collegata una batteria con meno di 5,5 V ± 0,2 o se la tensione è ancora inferiore a 6 V dopo 6 h di ricarica. 6.3 Scollegamento del caricabatterie Attenzione: Scollegare prima la spina dalla presa e rispettare la sequenza indicata per il distacco dei morsetti.
SLO Inteligenten polnilnik za akumulatorje 6/12 V 4 A z navijalnikom kabla Št. art. 16616 Obsah 1. Pravilna uporaba 2. Obseg dobave 3. Obseg dostave 4. Razlaga simbolov 5. Varnostni napotki 6. Navodila za uporabo 6.1 Priprava 6.2 Priklop polnilnika akumulatorja 6. 3 Odstranjevanje polnilnika 7. Vzdrževanje in nega 7.1 Vzdrževanje 7.2 Nega 8. Napotki za zaščito okolja 9.
4. Razlaga simbolov Ustreza Direktivam ES Označenega električnega izdelka ni dovoljeno metati med gospodinjske odpadke. Oznake s to oznako je dovoljeno uporabljati samo v notranjosti (suho okolje). Zaščitno izolirano ohišje (razred zaščite II) Varovalka, tukaj: inertna, 1,6 A Priporočena kapaciteta akumulatorja Preberite navodila za uporabo Ustreza zahtevam 21. člena Zakona o varstvu izdelkov (ProdSG) IP65 Razred zaščite Zaščiteno pred brizganjem vode 5.
1. Prikaz napetosti akumulatorja 2. 6-voltni polnilni program 3. Zimski polnilni program 4. 12-voltni polnilni program 5. Program za polnjenje avtomobila 6. Program za polnjenje motornega kolesa 7. Prikaz stanja napolnjenosti akumulatorja Silka 2: Zaslon 6.1 Priprava Z akumulatorskih priključkov očistite prah in ostanke korozije. Samo za odprte akumulatorje: Nalijte destilirano vodo, dokler ne dosežete najmanjšega nivoja polnosti. Celice akumulatorja pustite odprte do konca polnjenja.
Način za avto Polnilni program za 12-voltne akumulatorje od 14 Ah do 120 Ah, temperature nad 0 °C Polnilni tok: najv. 4 A Polnilna napetost: 14,6 V Zimski način za avto Polnilni program za 12-voltne akumulatorje od 14 Ah do 120 Ah, temperature pod 0 °C Polnilni tok: najv. 4 A Polnilna napetost: 14,8 V Način za ohranjanje napolnjenosti akumulatorja Ko se akumulator napolni, polnilnik samodejno preklopi v način za ohranjanje napolnjenosti akumulatorja. To je ustrezno prikazano na zaslonu.